70 | SAMLEX AMERICA INC.
SECTION 4 | Parameter Setup
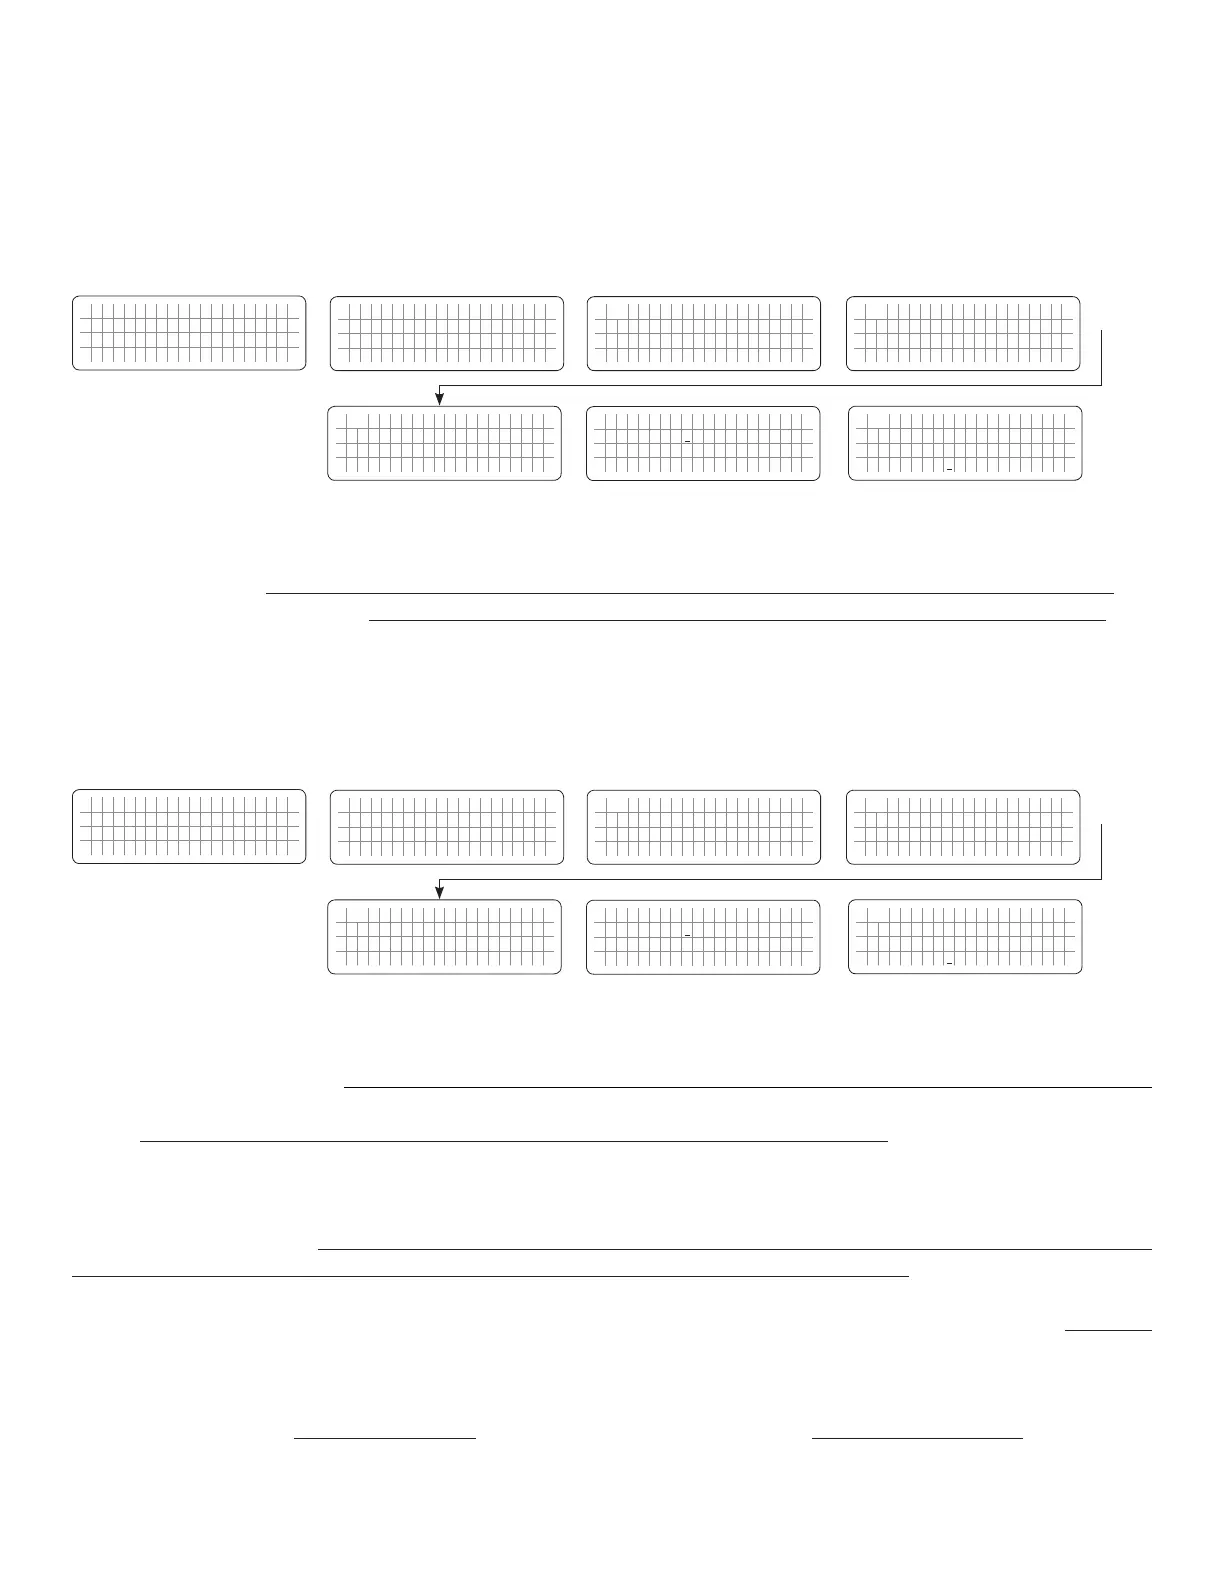
4.5.2.6.1 Programming Steps for Parameter "LOW CUT OFF"
ð ð
E V O - 1 2 1 2 F I n v e r t i n g
A C o u t p u t : 1 2 0 . 0 V
< 0 . 1 0 A
6 0 . 0 0 H z
Enter Key
Any Operating Mode Screen from
Fig 3.1 to 3.5
[Above screen is Screen 1 of Fig 3.2(a)]
Password 8052
See Section 4.3.1
S e l e c t G r o u p
* C H A R G E C U R V E
ð
S e l e c t P a r a m e t e r
* I N P U T S E T T I N G
ð
S e l e c t P a r a m e t e r
I N P U T S E T T I N G
* D E F A U L T F R E Q
0 = 6 0 H z
S e l e c t P a r a m e t e r
I N P U T S E T T I N G
* L O W C U T O F F
5 5 H z
Down Key x 1 time
Enter Key
P a s s w o r d k e y i n
0 0 0 0
ð
Enter Key
S e l e c t P a r a m e t e r
I N P U T S E T T I N G
* L O W C U T O F F
5 5 H z
ð
Enter Key
4.5.2.7 LOW RESET (Table 4.6: (i) Parameter Setup Screen No.6 for EVO-1212F/EVO-1212F-HW/EVO-1224F/EVO-1224F-HW
(ii) Parameter Setup Screen No.7 for EVO-2212/EVO-3012/EVO-2224/EVO-4024)
This is the reset frequency at which the unit will revert to "Charging Mode" after it has switched over to "Inverting
Mode" due to input frequency falling below "LOW CUT OFF".
4.5.2.7.1 Programming Steps for Parameter "LOW RESET"
ð ð
E V O - 1 2 1 2 F I n v e r t i n g
A C o u t p u t : 1 2 0 . 0 V
< 0 . 1 0 A
6 0 . 0 0 H z
Enter Key
Any Operating Mode Screen from
Fig 3.1 to 3.5
[Above screen is Screen 1 of Fig 3.2(a)]
Password 8052
See Section 4.3.1
S e l e c t G r o u p
* C H A R G E C U R V E
ð
S e l e c t P a r a m e t e r
* I N P U T S E T T I N G
ð
S e l e c t P a r a m e t e r
I N P U T S E T T I N G
* D E F A U L T F R E Q
0 = 6 0 H z
S e l e c t P a r a m e t e r
I N P U T S E T T I N G
* L O W R E S E T
5 6 H z
Down Key x 1 time
Enter Key
P a s s w o r d k e y i n
0 0 0 0
ð
Enter Key
S e l e c t P a r a m e t e r
I N P U T S E T T I N G
* L O W R E S E T
5 6 H z
ð
Enter Key
4.5.2.8 SYNCHRONIZATION (Table 4.6, Parameter Screen No. 7 under Column 1 for EVO-1212F/1212F-HW/1224F/122F-HW)
NOTE: Parameter “SYNCHRONIZATION” is not available for EVO-2212/3012/2224/4024.
In EVO-1212F/1212F-HW/1224F/1224F-HW, the frequency and phase of the Inverter Section are always kept
synchronized with the AC input source. This facilitates faster and safer transfer of power between the Inverter Section
and the AC input source. For supplementary details on synchronized transfer of AC power, please refer to Sections
4.4.2.1.1 to 4.4.2.1.4 of the Owner’s Manual for EVO-1212F/1212F-HW/1224F/1224F-HW.
In EVO-1212F/1212F-HW/1224F/1224F-HW, parameter “SYNCHRONIZATION” is used to program the desired sensitivity
of frequency and phase synchronization of the Inverter Section with the AC input source.
2 programming options are available for parameter “SYNCHRONIZATION” for EVO-1212F/1212F-HW/1224F/1224F-
HW. These options are: (i) Option “0= Fine” – see Section 4.5.2.8(a) below and (ii) Option “1= Coarse” – see Section
4.5.2.8(b) below.
(i) Down Key x 4 times for EVO-
1212F/1212F-HW/1224F/1224F-HW
(ii) Down Key x 5 times for EVO-
2212/3012/2224/4024
(i) Down Key x 5 times for EVO-
1212F/1212F-HW/1224F/1224F-HW
(ii) Down Key x 6 times for EVO-
2212/3012/2224/4024
For programmable options, see Table 4.6:
(i) Parameter Setup Screen No. 5 for
EVO-1212F/EVO-1212F-HW/EVO-1224F/EVO-1224F-HW
(ii) Parameter Setup Screen No. 6 for
EVO-2212/EVO-3012/EVO-2224/EVO-4024
For programmable options, see Table 4.6:
(i) Parameter Setup Screen No. 6 for
EVO-1212F/EVO-1212F-HW/EVO-1224F/EVO-1224F-HW
(ii) Parameter Setup Screen No. 7 for
EVO-2212/EVO-3012/EVO-2224/EVO-4024
 Loading...