EasyManua.ls Logo

Samsung DIGIMAX A50 User Manual

Samsung DIGIMAX A50
128 pages
To Next Page IconTo Next Page
Page #1 background imageLoading...
Page #1 background image
ENGLISH
Users Manual
Thank you for buying a Samsung Camera.
This manual will guide you through using the camera, including capturing images,
downloading images and using the application software.
Please read this manual carefully before using your new camera.

Table of Contents

Question and Answer IconNeed help?

Do you have a question about the Samsung DIGIMAX A50 and is the answer not in the manual?

Samsung DIGIMAX A50 Specifications

General IconGeneral
TypeCompact
Optical Zoom3x
Digital Zoom4x
Sensor Resolution5.0 Megapixels
Supported Flash MemorySD/MMC
Sensor TypeCCD
Effective Pixels5.0 Megapixels
Storage MediaSD/MMC
LCD Screen Size1.5 in
Battery Type2x AA batteries

Summary

Getting to know your camera

DANGER

Describes imminent hazards that could result in death or serious injury if not avoided.

WARNING

Describes potential hazards that could result in death or serious injury if not avoided.

CAUTION

Describes potential hazards that may result in minor or moderate injury if not avoided.

Danger

Warning

Caution

System chart

Identification of features

Front & Top

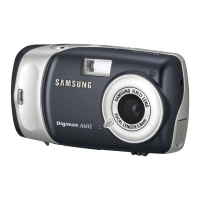
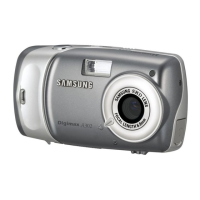
Identifies camera controls and features located on the front and top panels.

Back & Side

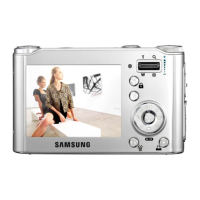
Identifies camera controls and features located on the back and side panels.

Connecting to a Power Source

Instructions on how to use the memory card

Inserting the memory card

Removing the memory card

LCD monitor indicator

Changing the recording mode

Selecting the [MODE] menu

Steps to navigate and select shooting modes via the menu.

Starting the recording mode

How to use the Auto mode

Guide to shooting simple still images using automatic settings.

Starting the recording mode

How to use the Program mode

Guide to shooting using program mode for optimal settings.

Starting the recording mode

How to use the Scene modes

Explanation of various scene shooting modes for different situations.

Starting the recording mode

How to use the VOICE RECORDING mode

Guide to recording audio clips using the camera's microphone.

Using the camera buttons to adjust the camera

SHUTTER button

Function and operation of the camera's shutter button.

ZOOM W/ T button

Function and operation of the camera's zoom control buttons.

ZOOM W/ T button

Voice recording( )/ Voice memo( )/ UP button

Recording a voice memo

Steps to record a voice memo and attach it to a still image.

Focus lock

Flash ( )/ Left button

Selecting the flash mode

Guide to choosing and using different flash modes.

Self-timer ( )/ Right button

Using the self-timer

Instructions for setting and using the self-timer function.

MENU/ OK button

MENU button

Function and operation of the camera's menu button.

M (Mode) button

E (Effect) button

Special Effect : Colour

Applying various color effects to captured images.

Special Effect : Composite shooting

Movie Clip frame stabilizer

+/- button

Setting RGB Values

Adjusting Red, Green, and Blue color balance for images.

+/- button

Selecting an ISO Sensitivity

Adjusting the camera's light sensitivity for better exposure.

Selecting a White Balance

Adjusting colors for different lighting conditions to appear natural.

+/- button

Compensating Exposure

Adjusting exposure levels manually to fine-tune image brightness.

Using the LCD monitor to adjust the camera settings

How to use the menu

Mode

MODE SET

Size

Quality/ Frame rate

Metering

Continuous Shooting

Sharpness

Starting play mode

Playing back a still image

How to review still photos stored on the camera.

Starting play mode

Playing back a movie clip

How to review video clips stored on the camera.

Starting play mode

On camera movie trimming

Editing video clips directly on the camera to shorten them.

Using the camera buttons to adjust the camera

Image enlargement

Zooming in on selected images for detailed viewing.

Thumbnail( )/ Enlargement( ) button

Voice ( ) memo/ Up button

Adding a Voice Memo to a Still Image

Attaching audio commentary to still photos.

Delete ( ) button

Album button

Selecting the album

Steps to organize photos into albums for easier management.

Inserting still images into the album

Adding photos to created albums.

Album button

Playing back the albums

Viewing albums as slideshows with various playback options.

Setting up the play back function using the LCD monitor

Rotating an image

Resize

Protecting images

Deleting all images

DPOF

COPY TO CARD

PictBridge

PictBridge : Picture Selection

PictBridge : Print Setting

PictBridge : Printing

Setup menu

File name

Assigning File Names

Setting the format for image file naming.

Auto power off

Setting Power Off

Configuring automatic camera power-down to save battery.

Formatting a memory card

Setting up the Date/ Time/ Date type

Setting Date/ Time & Selecting Date Format

Configuring the date, time, and date format display.

Auto Focus lamp

How to set up the lamp

Controlling the camera's autofocus assist lamp.

Sound

Setting Operation Sounds

Configuring camera sound alerts for operations.

LCD brightness

Adjusting LCD Brightness

Adjusting the brightness of the camera's LCD screen.

Quick view

Setting Quick View

Configuring the post-capture image review duration.

Initialisation

Initialising the Camera

Resetting all camera settings to their factory defaults.

Setting up the MYCAM menu

Start up image

Setting the image displayed when the camera turns on.

Shutter sound

Selecting the Shutter Sound

Choosing the sound effect for taking pictures.

Start up sound

Setting the Startup Sound

Choosing the sound effect for powering on the camera.

Important notes

Important notes

Warning indicator

Before contacting a service centre

Specifications

Specifications

Software Notes

System Requirements

About the software

Setting up the application software

Setting up the application software

Setting up the application software

Setting up the application software

Setting up the application software

Setting up the application software

Setting up the application software

Setting up the application software

Starting PC mode

Starting PC mode

Downloading stored images

Steps to transfer photos from camera to PC.

Removing the USB Driver for Windows 98SE

Removable Disk

Removing the removable disk

Using the USB Driver for MAC

Digimax Master

Downloading images

Using Digimax Master software to transfer photos from camera.

Digimax Master

Digimax Master

Digimax Master

FAQ

FAQ

FAQ

FAQ

Related product manuals