82Apps
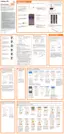
4. Use the keyboard to enter as much information as
you want.
•
Picture: Tap the picture icon to assign a
picture to the contact.
•
Name: Enter the name of the contact.
•
Organization: Enter organization information
for the contact.
•
Phone: Enter the phone number for the contact.
•
Email: Enter email addresses for the contact.
•
Groups: Assign the contact to a group.
•
More: Show additional fields such as Web
address, Notes, Nickname, Website, etc.
•
Scan business card: Take a picture of a business
card to add the information for the contact.
5. When you have finished adding information,
tapSave.
Note: To select a type (label) for a phone number, email
address, or postal address (such as Mobile, Home, or
Work), tap the type to the right of the field and select
the appropriate type.
Note: To add more phone numbers, email addresses,
etc., tap Add on the right side of the entry field.

 Loading...