29
Getting ready
Getting ready
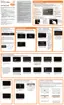
Charging with a PC
You can charge using a PC with a microUSB cable 01
(sold separately). Make sure the direction to connect
them properly. Attempting to forcibly connect may cause
damage.
a
With the engraved side up, insert the microUSB
plug of the microUSB cable 01 (sold separately)
straight into the microUSB connection terminal
of the product
b
Insert the USB plug of the microUSB cable 01
(sold separately) into the USB port of the PC
When charging is nished, appears on the status bar.
• If the found new hardware screen etc. appears on the PC,
select "キャンセル (Cancel)".
microUSBcable01
(soldseparately)
microUSBplug
c
When charging is nished, remove the microUSB
cable 01 (sold separately) from this product
and the PC
◎ If the screen backlight turns on during charging, press /
to display the lock screen. "Charging: XX%" is displayed on the
screen so you can check charge status. Also, if charging
nished while the backlight is turned o, "Charged" is displayed
on the lock screen and
is displayed on the status bar.
◎ is displayed on the status bar when the voltage on the power
supply side is low. Charging occurs, but it takes time. It may
not be able to charge depending on the conditions of this
product.

 Loading...