ENG - 3
01 CHECKING THE COMPONENTS
VOL WOOFER
SOUNDBAR
SOUND
MODE
PAIR
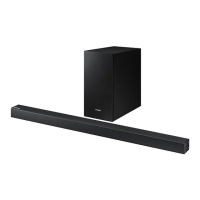
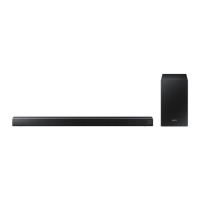
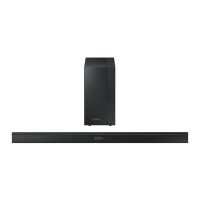
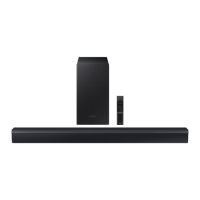
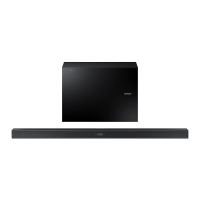
Soundbar Main Unit Subwoofer Remote Control / Batteries
1 3
Power Cord (Subwoofer) AC/DC Adapter
(Main Unit)
Wall Mount Guide
2
Connect the AC plug to the adapter until you hear
a “snapping” sound to ensure they are securely
fastened.
AC Plug
(Depending on the country and
model)
Do not detach the AC plug from the adapter (it will
not be removed once it has been attached).
x 2
x 2
Holder-Screw Screw Bracket-Wall Mount L Bracket-Wall Mount R
• For more information about the power supply and power consumption, refer to the label attached
to the product. (Label: Bottom of the Soundbar Main Unit)
• The power components are labelled (1, 2, 3). For more information about power connections,
see page 4.
• To purchase additional components or optional cables, contact a Samsung Service Centre or
Samsung Customer Care.
• Depending on the region, the appearance of the AC plug may differ from the plug displayed above,
or it may be supplied integrated with the AC/DC adapter.
Inserting Batteries before using the Remote Control (AA batteries X 2)
Slide the battery cover in the direction of the arrow
until it is completely removed. Insert 2 AA batteries
(1.5V) oriented so that their polarity is correct. Slide
the battery cover back into position.
02 PRODUCT OVERVIEW
Front Panel / Right Side Panel of the Soundbar
Right Side of the Soundbar
Display
Volume
Power
Position the product so
that the SAMSUNG logo
is located on the top.
Bottom Panel of the Soundbar
USB (5V 0.5A)
AUX IN
DIGITAL AUDIO IN
(OPTICAL)
DC 19V
DIGITAL AUDIO IN
(OPTICAL)
USB (5V 0.5A)
AUX IN
DC 19V
Source
Selects the source input mode. (D.IN / AUX / BT / USB)
• To turn on “BT PAIRING” mode, change the source to “BT” mode, and then press and
hold the (Source) button for more than 5 seconds.
D.IN Connect to the digital (optical) output of an external device.
USB Connect a USB device here to play music les on the USB device through the Soundbar.
AUX Connect to the Analogue output of an external device.
DC 19V Connect the AC/DC power adapter. (Power Supply In)