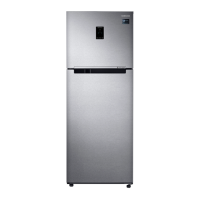
This document is a user manual for the Samsung RT38*/RT35*/RT32*/RT29* series of free-standing refrigerators. It provides comprehensive information on safety, installation, operation, and maintenance.
The manual emphasizes safety throughout, starting with general precautions and specific warnings for transportation, installation, usage, cleaning, and disposal.
General Safety:
The refrigerator is designed for household and similar applications. It can be used by children aged 8 and above, and persons with reduced physical, sensory, or mental capabilities, or lack of experience and knowledge, if supervised or instructed on safe use and understanding of hazards. Children should not play with the appliance, and cleaning/maintenance should not be done by children without supervision.
Refrigerant Information:
The refrigerator uses R-600a or R-134a as a refrigerant. Users are advised to check the compressor label or rating plate to identify the refrigerant type. If R-600a (flammable gas) is used, local authorities should be contacted for safe disposal. The room size for installation depends on the amount of refrigerant, requiring 1 m³ for every 8 g of R-600a. In case of refrigerant leaks, avoid naked flames, remove flammable items, and ventilate the room immediately to prevent fire or explosion. Only authorized service personnel should service the appliance.
Transportation and Site Warnings:
Care must be taken during transport and installation to avoid damaging the refrigerating circuit. Leaking refrigerant can ignite or cause eye injury.
Critical Installation Warnings:
- Avoid damp locations or areas where water contact is possible, as deteriorated insulation can cause electric shock or fire.
- Do not expose to direct sunlight or heat sources (stoves, heaters).
- Do not overload multiple power strips; plug the refrigerator into its own dedicated electrical outlet with matching voltage to prevent fire hazards from overheated wires.
- Do not use loose wall sockets or damaged/abraded power cords, as this poses a risk of electric shock or fire.
- Avoid bending, twisting, tying, or placing heavy objects on the power cord. Ensure the cord is not pinched or damaged when moving the refrigerator.
- Never unplug by pulling the cord; always grip the plug firmly.
- Do not store explosive substances (e.g., aerosol cans with flammable propellant) inside.
- Do not install near heaters, flammable materials, or locations where gas leaks may occur.
- Ensure proper grounding to prevent electric shock from power leakages. Do not use gas pipes, telephone lines, or lightning attractors for grounding.
- Connect the power plug correctly with the cord hanging down to prevent cutting wires and electric shock/fire.
- Ensure the power plug is not crushed or damaged by the refrigerator's back.
- Keep packing materials out of reach of children to prevent suffocation.
- The plug must be accessible after installation.
- If dust or water enters the refrigerator, unplug it and contact Samsung service.
- Do not stand on top of the appliance or place objects on it, as this may cause electric shock, fire, product problems, or injury.
- Remove all protective plastic film before initial plug-in.
- Supervise children to prevent them from playing with snap rings or water tube clips, which pose a choking hazard.
Critical Usage Warnings:
- Do not insert hands, feet, or metal objects into the bottom or back of the refrigerator to avoid electric shock or injury. Sharp edges can cause injury.
- Do not touch freezer walls or frozen products with wet hands to prevent frostbite.
- Do not place water-filled containers on the refrigerator to avoid fire/electric shock if spilled.
- Do not store volatile or flammable substances (benzene, thinner, propane gas, alcohol, ether, LP gas) inside; this refrigerator is for food storage only, and such items pose a fire/explosion risk.
- Supervise children to prevent them from playing with the appliance, hanging on doors/bins, or entering the refrigerator (risk of entrapment/suffocation).
- Do not store pharmaceutical products, scientific materials, or temperature-sensitive products requiring strict temperature controls.
- Do not place or use electrical appliances inside unless recommended by the manufacturer.
- If you smell chemicals or smoke, unplug and contact Samsung service.
- Do not let children step on drawers, as they may break and cause slipping.
- Do not leave doors open unattended or allow children to enter.
- Do not overfill to prevent items from falling out and causing injury/damage.
- Do not spray volatile materials (e.g., insecticide) on the surface, as it's harmful and can cause electric shock, fire, or product problems.
- Do not use a hair dryer or lighted candles inside for drying or odor removal, as this poses a fire/electric shock risk.
- Fill water tanks, ice trays, and ice cubes only with potable water (mineral or purified). Do not use tea, juice, or sports drinks.
- Do not use mechanical devices or other means to accelerate defrosting unless recommended by the manufacturer.
- Do not damage the refrigerant circuit.
- Never stare directly at the UV LED lamp for long periods to avoid eye strain.
- Do not place fridge shelves upside down, as the stopper won't work, potentially causing glass shelf drop and personal injury.
- Keep fingers out of "pinch point" areas between doors and cabinet.
Cleaning Cautions:
- Do not spray water directly inside or outside to avoid fire/electric shock.
- Do not use a hair dryer for drying or lighted candles for odor removal.
- Do not spray cleaning products directly on the display, as printed letters may come off.
- If foreign substances (e.g., water) enter, unplug and contact Samsung service.
- Use a clean, dry cloth to remove dust/foreign matter from power plug blades. Do not use a wet cloth.
- Do not clean by spraying water directly onto the appliance.
- Do not use benzene, thinner, or Clorox/Chloride for cleaning, as they can damage the surface and cause fire.
- Never put fingers or other objects into the dispenser hole to avoid injury/damage.
- Unplug before cleaning or maintenance to prevent electric shock or fire.
Critical Disposal Warnings:
- Dispose of packaging materials environmentally friendly.
- Ensure no pipes on the back are damaged before disposal.
- If R-600a (flammable gas) is used, contact local authorities for safe disposal.
- When disposing, remove doors/seals/latches to prevent children or animals from becoming trapped (risk of injury/suffocation).
- Cyclopentane is used in insulation; special disposal procedures are required for the gases. Contact local authorities for environmentally safe disposal.
- Keep all packaging materials out of reach of children.
Additional Tips for Proper Usage:
- During power failures, minimize door openings. Discard frozen food if power is off for more than 24 hours.
- The refrigerator may not operate consistently in ambient temperatures below its design range.
- Some foods may spoil if refrigerated due to their properties.
- The appliance is frost-free, with automatic defrosting.
- To prevent undue temperature rise during defrosting, wrap frozen food in newspaper.
- Do not refreeze thawed frozen foods.
- Two-star sections may have slightly higher temperatures than other freezer compartments.
Saving Energy Tips:
- Install in a cool, dry, well-ventilated room, away from direct sunlight or heat sources.
- Do not block vents and grilles.
- Allow warm food to cool before placing it inside.
- Thaw frozen food in the refrigerator to utilize its low temperature for cooling other foods.
- Minimize door opening time.
- Install with clearance at the back and sides to reduce energy consumption.
- Keep all internal fittings (baskets, drawers, shelves) in their original positions for optimal energy efficiency.
WEEE Instructions:
The product and its electronic accessories should not be disposed of with household waste. Separate them for responsible recycling. Household users should contact retailers or local government offices for recycling information. Business users should contact their supplier. Samsung's environmental commitments and regulatory obligations (e.g., REACH) can be found on their website.
Installation
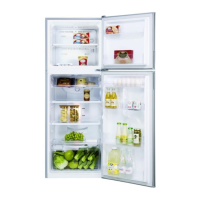
Refrigerator at a Glance:
The manual provides a diagram of the refrigerator with numbered parts, including:
- Shelf (Freezer) *
- Ice Maker *
- Fresh Room *
- Guard-Egg
- Slide Shelf
- Deodorizer *
- Movable VEG Box *
- Vegetable Drawer *
- Freezer Guard
- Tank Water *
- Multi Storage Basket *
- Guard-Bottle
(* indicates applicable models only)
Optional Accessories:
- Spacer: Helps keep the refrigerator cool.
- Cool pack: Helps keep the refrigerator cool.
- Ice tray: Used to make ice.
- Twist Ice Maker: Used to make ice.
(Note: Not all models include all optional accessories.)
To secure more room in the freezer compartment:
Optional accessories like cool packs, shelves, twist ice makers, and ice storage bins can be manually removed without tools. This does not affect thermal and mechanical performance. The declared storage volume is based on the absence of these accessories. For best energy efficiency, ensure all shelves, drawers, and baskets are in their original position.
Load Limit Indicator (applicable models only):
A load limit indicator is located on the top right side of the freezer compartment. Do not place food items over this indicator, as it may affect energy efficiency.
Step-by-Step Installation:
STEP 1: Select a site
- Site requirements: Solid, level surface without carpeting; away from direct sunlight, heat sources; adequate room for door opening/closing; room for maintenance; temperature range between 10 °C and 43 °C.
- Effective temperature range: The refrigerator operates normally within specified class ratings (Extended Temperate, Temperate, Subtropical, Tropical). Cooling performance and power consumption are affected by ambient temperature, door opening frequency, and location. Adjust temperature settings as appropriate.
STEP 2: Spacing (applicable models only)
- Open the door, locate and unpack two provided spacers. Attach them to the rear of the refrigerator to ventilate air to the rear wall and save power.
STEP 3: Flooring
- The installation surface must support a fully loaded refrigerator (approx. 90 kg).
- Place a large piece of cardboard under each leg to protect the floor.
- Once in final position, avoid moving it unless necessary; use thick paper or cloth for movement.
STEP 4: Adjust the levelling feet
- Manually adjust levelling feet: clockwise to lower, counter-clockwise to raise. For safety, adjust the front slightly higher than the rear.
STEP 5: Attach the door support (glass door models only)
- To prevent falling/shaking, attach the door support (A) by tilting the refrigerator backward (with one person holding it), inserting the support into the bottom hole, and tightening with a Philips screwdriver. Use caution to avoid injury or damage.
STEP 6: Initial settings
- Plug in the power cord.
- Open the door and check if the interior light works.
- Set the temperature to the coldest and wait for about an hour; the freezer should chill, and the motor should run smoothly.
- Wait until the refrigerator reaches the set temperature before use.
STEP 7: Final check
- Confirm proper plugging and grounding.
- Ensure installation on a flat, level surface with adequate clearance.
- Verify the refrigerator is level and stable.
- Check that the door opens and closes freely, and the interior light turns on automatically.
Operations
Feature Panel:
The manual describes two types of button panels, both featuring:
- Freezer (Power Freeze): Controls freezer temperature and activates Power Freeze.
- Freezer Convert / Ice On/Off: (Applicable models only) Allows conversion of the freezer to fridge mode or turning ice making on/off.
- Fridge (Power Cool): Controls fridge temperature and activates Power Cool.
Freezer (Power Freeze):
- Temperature setting: Adjusts freezer temperature between -15 °C and -23 °C (default: -19 °C). Repeated presses cycle through -23 °C -15 °C -17 °C -19 °C -21 °C -23 °C.
- Cautions: Do not set to -15 °C in summer (above 35 °C) to prevent system failure or food spoilage. Do not store glass bottles with liquid in the freezer, as they may crack when frozen.
- Power Freeze: Speeds up freezing at maximum fan speed for several hours, then returns to previous setting. Activate by pressing and holding "Freezer" for 3 seconds (indicator lights up). Deactivate by pressing and holding "Freezer" again. Activate for at least 20 hours before freezing large amounts of food. Power Freeze increases power consumption; turn it off if not needed.
Freezer Convert / Ice On/Off (applicable models only):
- Function: Allows using the entire freezer as a fridge or turning it off.
- Mode change: Press and hold "Freezer Convert" for 3 seconds to enter selection mode, then press "Freezer Convert" to select: Fridge Off Freezer Off Fridge.
- Fridge mode: Fridge indicator turns on. Power Freeze and Ice On are deactivated.
- Off mode: Off indicator turns on. Freezer is turned off. Temperature remains below 15 °C to prevent mold/odors with low electricity consumption. Fridge and Freezer cannot be powered off independently. Do not store food/beverages in 'Off mode' as 15 °C is not cold enough.
- Freezer mode: Freezer temperature indicators turn on (default: -19 °C).
- Activation: Changes take 10 seconds. To cancel/change, press and hold "Freezer Convert" for 3 seconds again.
- Cautions: Do not store glass bottles with liquid in the freezer when cancelling Freezer Convert, as they may break. Remove frozen foods before enabling Freezer Convert (they will melt). Remove chilled foods before disabling Freezer Convert (they may freeze).
- Recommendation: Use plastic containers for food, especially vegetables, when using Freezer Convert.
Ice On/Off (applicable models only):
- Function: Turns ice making on/off. Default is on.
- Recommendation to disable: Ice bucket is full, to save power, or water tank is empty.
- Note: If Fridge or Off mode is selected via Freezer Convert, Ice Off mode is automatically entered.
Fridge (Power Cool):
- Temperature setting: Adjusts fridge temperature between 1 °C and 7 °C (default: 3 °C).
- Vacation mode: With temperature set to 1 °C, press "Fridge" to activate Vacation mode (indicator turns on, temperature display turns off, fridge controlled under 17 °C, freezer remains active). Press "Fridge" again to deactivate (default 7 °C).
- Cautions: Do not set to 1 °C in winter or 5-7 °C in summer to avoid cooling performance issues.
- Power Cool: Speeds up cooling at maximum fan speed for several hours, then returns to previous setting. Activate by pressing and holding "Fridge" for 3 seconds (indicator lights up). Deactivate by pressing and holding "Fridge" again. Power Cool increases power consumption; turn it off if not needed.
- Recommendation: Empty fridge compartment and ensure door is closed for Vacation mode.
Dial Type (Fridge/Freezer):
- Fridge: Recommended setting is "Optimal." Levels 4-5 for strong cooling, 1-2 for weak cooling.
- Freezer: Levels 4-5 for strong cooling, 1-2 for weak cooling.
- Cautions: Do not set to 4-5 in winter or 1-2 in summer to avoid cooling performance issues.
- Fridge (Convertible) for Freezer: Turn Freezer Temp. Control dial to "Fridge (Convertible)" level to use freezer as fridge (temperature controlled at approx. 3 °C).
- Recommendation: Empty compartments and ensure door is closed when using convertible modes.
Special Features:
- Ice Making (applicable models only):
- Twist Ice Maker: Open freezer door, slide out tray, fill with water to max level (A), slide back in. Ice making time depends on temperature settings. Ensure ice cube storage bin is in place. Turn handle right then left to dispense cubes. Remove bin by twisting and pulling.
- Tray type: Fill tray with water to max level (A).
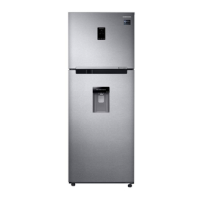
- Water Dispenser (applicable models only): Dispenses chilled water without opening the fridge door.
- Filling the water tank: Clean and dry tank for first-time use. Hold handgrips, slide out. Open front lid (A) or entire cover (B), fill with max 5 L potable water (do not exceed max line). Reinsert tank, ensuring front side faces forward.
- Cautions: Ensure tank fits properly. Do not use refrigerator without tank. Fill only with potable water. Use caution when moving a filled tank. Do not disassemble internal pump.
- First-time use: Push dispenser lever for 10 seconds to emit air. Discard first six glasses of water.
- Dispensing water: Place glass under outlet, push lever gently. Ensure glass is aligned to prevent spills. Discard first 1-2 glasses if dispenser unused for 2-3 days (abnormal smell/taste).
- Note: Water tank can be used for food storage by removing its lid to create more room.
Auto Ice Maker (applicable models only):
- First-time use: Allow 1-2 days for ice production. Discard first 1-2 buckets of ice to remove impurities. Use lower ice tray when upper is full.
- Test button: If no ice is made, remove ice bucket and press Test (A) to check operation.
Maintenance
Handle and Care:
- Ice tray provided models: Remove ice tray, then lift and remove freezer shelf.
- Freezer and fridge shelves: Open door fully, pull shelf forward, lift, and pull out. When reinserting, ensure "Front" label faces forward. Do not tilt.
- Door guards: Lift slightly and pull out. Empty door guards before removing to prevent accidents.
Cleaning:
- Regularly clean power plug terminals with a dry cloth.
- Unplug the refrigerator.
- Use a moistened soft lint-free cloth or paper towel to clean interior and exterior.
- Dry thoroughly with a dry cloth or paper towel.
- Plug in the power cord.
- Note: If removable parts were cleaned, ensure they are reinserted correctly.
- Warnings: Do not use benzene, thinner, Clorox™, or car detergent, as they can damage surfaces and cause fire. Do not spray water on the refrigerator (electric shock risk). Do not put fingers or objects into the dispenser hole.
Replacement:
- Deodorizer filter (applicable models only): Hold top and bottom of filter case, unlock to reveal filter (A). Replace filter, then reinsert case.
- Lamps: Not user-serviceable. Contact Samsung service center for replacement.