Do you have a question about the Sanyo PLC-XW56 and is the answer not in the manual?
Projector is designed compact in size and weight for easy carrying.
Projector accepts various video and computer input signals.
Multi-scan system conforms to most computer output signals.
Expands image size up to approx. 16 times for focusing.
Reduces noise for smoother images.
Blackboard can be used as a projection screen.
AC power cord can be unplugged immediately after turning off.
Operation menu available in 16 languages.
Allows customization of screen logo.
Reduces power consumption and maintains lamp life.
Brightness of projection lamp can be selected.
Ensures security with Key lock and PIN code.
Input signal can be searched automatically.
Warnings regarding fire, electric shock, and proper installation.
Warning about not opening the cover.
Avoid greasy, wet, or smoky conditions.
Read instructions, unplug before cleaning, use damp cloth, avoid liquid.
Avoid unstable surfaces, use approved mounting kits, ensure ventilation.
Use correct power source, avoid overloading outlets, do not service yourself.
Refer servicing to qualified personnel, use specified replacement parts.
Openings for ventilation must not be blocked, keep exhaust vent clear.
Proper positioning for lamp life and fire hazard prevention.
Precautions for carrying and transporting the projector.
FCC compliance statement for Class B digital device.
Requirements for AC power cords in US/Canada and UK.
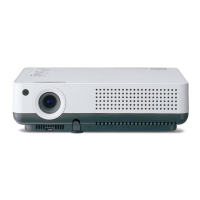
Identification of front panel components.
Identification of back panel components.
Identification of bottom panel components.
Description and function of rear terminals and connectors.
Identification and function of top panel controls and indicators.
Identification and function of remote control buttons.
Steps for installing batteries in the remote control.
Information on the projector's remote control operating range.
Guidelines for projector placement and screen size.
How to adjust the projector's angle using the foot.
How to connect the AC power cord to the projector.
Information on power cord types for different regions.
How to connect the projector to a computer.
How to connect the projector to video equipment.
How to connect to component video equipment.
Step-by-step guide to turn on the projector.
Procedure for entering the PIN code.
Step-by-step guide to turn off the projector.
Guide to navigating and using the on-screen menu.
Overview of menu bar options for computer and video sources.
How to adjust zoom and focus of the projected image.
How to correct keystone distortion.
How to adjust volume and mute sound.
Using specific remote control buttons for common operations.
Operation of the Auto PC adjustment.
Operation of digital zoom functions.
How to blackout the screen.
Details on the keystone button.
How to select image levels.
Operation of the P-timer function.
How to change lamp brightness modes.
How to select the computer input source.
Automatic tuning to computer signals and manual selection.
Automatic adjustment of image parameters for computers.
Manually adjusting image parameters for specific computer signals.
Adjusting horizontal display area.
Adjusting vertical display area.
Resetting adjusted data to previous figures.
Clearing stored data.
Storing adjusted data.
Selecting image levels like Dynamic, Standard, Real, etc.
Adjusting contrast, brightness, color, white balance, sharpness, gamma.
Storing image level adjustments.
Customizing image size (Normal, True, Wide, Full).
Using Digital zoom to expand or compress images.
How to select video input source.
Selecting S-Video, Component, or RGB Scart input.
Selecting video system (PAL, SECAM, NTSC, Component).
Selecting image levels for video sources.
Adjusting color, tint, and color temperature for video.
Adjusting image sharpness.
Adjusting gamma value for better contrast.
Reducing noise for smoother images.
Displaying interlaced video signals in progressive format.
Resetting image adjustments.
Storing image level adjustments.
Adjusting image size for video sources (Normal, Wide).
Selecting the on-screen menu language.
Storing or resetting keystone correction.
Switching the blue back function on/off.
Controlling on-screen displays and countdown.
Customizing screen logo and PIN code lock.
Capturing projected image for start-up display.
Preventing unauthorized changes to screen logo.
Procedure for entering the logo PIN code.
Changing the logo PIN code.
Image rotation for ceiling mounting.
Image rotation for rear projection.
Automatic detection of input signals.
Settings for power saving and lamp life.
Automatic projector startup upon power connection.
Changing screen brightness modes.
Switching remote control codes.
Locking projector controls with a key lock.
Security options for PIN code lock.
Procedure for entering the PIN code.
Changing PIN code lock settings.
Procedure to change the PIN code.
Cooling fan operation modes after projector shutdown.
Resetting the lamp replacement counter.
Resetting all settings to factory defaults.
Interpreting warning indicator lights and conditions.
Steps for cleaning the air filters.
How to attach the lens cover.
How to clean the projector lens.
How to clean the projector cabinet.
Step-by-step guide to replace the projection lamp.
Information for ordering replacement lamps.
How to reset the lamp replacement counter.
Safety precautions for handling projector lamps.
Common problems and their solutions.
Troubleshooting steps for no sound.
Troubleshooting display issues.
Troubleshooting PIN code prompt.
Troubleshooting remote control issues.
Visual representation of menu structure for computer/video input.
Visual representation of menu structure for setting options.
Interpreting indicator lights for projector status.
List of compatible computer resolutions and frequencies.
Detailed technical specifications of the projector.
List of included accessories.
List of optional parts available for purchase.
Pinout diagrams for terminal connectors.
Section to record PIN codes.
Information about the lamp replacement label.
Physical dimensions of the projector.
| Projection distance | 13.2 m |
|---|---|
| Vertical scan range | 50 - 100 Hz |
| Horizontal scan range | 15 - 100 kHz |
| Projection technology | LCD |
| Contrast ratio (typical) | 400:1 |
| Screen size compatibility | 40 - 300 \ |
| Projector native resolution | XGA (1024x768) |
| Keystone correction, vertical | -20 - 20 ° |
| Focus | Manual |
| Digital zoom | 1.2 x |
| Focal length range | 22.5 - 27 mm |
| Video out | D-Sub15 |
| Aspect ratio | 4:3 |
| RS-232 ports | 1 |
| Dimensions (WxDxH) | 330 x 237 x 100 mm |
| Power requirements | 100-240 V |
| Lamp type | UHP |
| Lamp power | 200 W |
| Light source type | Lamp |
| Service life of light source | 2000 h |
| Service life of light source (economic mode) | 3000 h |
| Noise level | 30 dB |
| Dot clock scanning frequency | 140 MHz |
| RMS rated power | 1 W |
| PC Audio in | Yes |
| Serial interface type | RS-232 |
| Power consumption (standby) | 9 W |
| Power consumption (typical) | 250 W |
| Weight | 2900 g |
|---|