EasyManua.ls Logo

Sauder Heritage Hill Lateral File 102702 User Manual

Sauder Heritage Hill Lateral File 102702
32 pages
To Next Page IconTo Next Page
Page #1 background imageLoading...
Page #1 background image
Need help? Visit Sauder.com to view video assembly tips or chat with a live rep.
Prefer the phone? Call 1-800-523-3987.
Share your journey!
sauder.com
NOTE: THIS INSTRUCTION
BOOKLET CONTAINS IMPORTANT
SAFETY INFORMATION.
PLEASE READ AND KEEP FOR
FUTURE REFERENCE.
Enlish p 1-22
Français p 23-25
Español p 26-28
Lot # 361775 04/10/14
Purchased: __________________
Be sure to ive us a rin before
makin any returns. 1-800-523-3987
Lateral File
Heritae Hill Collection | 102702
Get all organized
and stu .
Question and Answer IconNeed help?

Do you have a question about the Sauder Heritage Hill Lateral File 102702 and is the answer not in the manual?

Sauder Heritage Hill Lateral File 102702 Specifications

General IconGeneral
Product NameSauder Heritage Hill Lateral File 102702
CategoryIndoor Furnishing
TypeLateral File Cabinet
MaterialEngineered Wood
Number of Drawers2
Assembly RequiredYes
Drawer SlidesMetal Runners
Drawer InterlocksYes
FinishClassic Cherry
File SizeLetter / Legal
Locking MechanismYes
Weight Capacity per Drawer40 lbs

Summary

Getting Started and Safety Notes

Important Safety Information

The instruction booklet contains crucial safety information for future reference.

Assembly Tools and Part Identification

Required Tools for Assembly

Lists essential tools needed to assemble the furniture.

Component Part List

Lists all parts with references for easy identification.

Part Identification Diagrams

Visual Assembly Component Guide

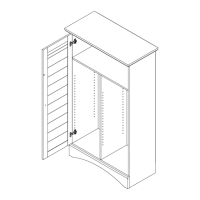
Illustrates the placement and identification of furniture parts.

Hardware Identification - Part 1

Extension Slides and Rails

Identifies extension rails, slides, and related hardware.

Fasteners and Specialty Hardware

Details locks, actuators, pulls, and twist-lock fasteners.

Hardware Identification - Part 2

Screws and Nails Identification

Identifies specific types of screws and nails for assembly.

Assembly Instructions

Step 1: Prepare Unit Base with Fasteners

Attach Sauder Twist-Lock fasteners to the unit's end and base panels.

Assembly Instructions

Step 2: Install Safety Feature Actuators

Insert cabinet actuators into the right end panel for safety.

Assembly Instructions

Step 3: Attach Interlock Tracks to Actuators

Connect interlock tracks to cabinet actuators using a spacer.

Assembly Instructions

Step 4: Install Extension Rails and Brackets

Fasten extension rails and angle brackets to end panels.

Assembly Instructions

Step 5: Attach Top Molding and Base

Secure top molding and base using angle brackets and screws.

Assembly Instructions

Step 6: Assemble Left Side Panels

Fasten left end, large back, and bottom panels using twist-lock fasteners.

Assembly Instructions

Step 7: Assemble Right Side Panels

Connect right end panel to top, large back, and bottom.

Assembly Instructions

Step 8: Attach Small Back Panel and Base

Secure small back panel with nails and attach base to ends.

Assembly Instructions

Step 9: Construct Drawer Boxes

Assemble drawer sides, bottom, and back using screws.

Assembly Instructions

Step 10: Install Drawer Slides and Cams

Insert slide cams and fasten extension slides to drawer sides.

Assembly Instructions

Step 11: Install Drawer Actuators and Slides

Attach drawer actuators and extension slides to drawer sides.

Assembly Instructions

Step 12: Mount File Guides and Brackets

Attach file guides and brackets to drawer sides and back.

Assembly Instructions

Step 13: Assemble File Hanging System

Connect file rods, bars, and guides for hanging files.

Assembly Instructions

Step 14: Attach Drawer Pulls

Fasten pull mounts and drawer pulls to the drawer fronts.

Assembly Instructions

Step 15: Install Drawer Lock Assembly

Secure lock pack to the upper drawer front as shown.

Assembly Instructions

Step 16: Insert Drawers into Unit

Slide the assembled drawers into the main unit until fully inserted.

Assembly Instructions

Step 17: Adjust Drawer Front Alignment

Fine-tune drawer front alignment by adjusting cam screws.

Safety and Usage Guidelines

Overloaded Drawers and Stability Warnings

Warnings about overloaded drawers, tipping, and TV placement.

User Safety Precautions

General Furniture Safety Cautions

Cautions regarding overloading, moving, and improper use of furniture.

Product Warranty Information

5-Year Limited Warranty Details

Outlines the 5-year warranty coverage, exclusions, and service.

Final Information and Support

Customer Service and Registration

Information on customer support, product registration, and contact details.

Certificate of Conformity

Details product compliance and manufacturing information.
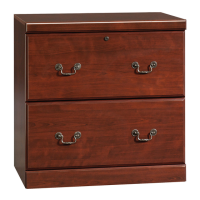
Related product manuals