HST-STUDIO55WS-SUR | 009-1878-00 | 191108 45 Perseverance Way, Hyannis, MA 02601
Copyright © 2019 Savant Systems, LLC 1 of 2 Savant.com | 508.683.2500
Box Contents
(1) Smart Series WiSA Soundbar (HST-STUDIO55WS-SUR)
(1) Soundbar (093-3183-xx)
(1) Standard Grille (093-3181-xx)
(1) Power Cord (064-0480-xx)
(2) 6-Pin Control Connector (028-9352-xx)
(1) Install Kit (075-0241-xx)
(2) Wall Mounting Bracket (071-1130-xx)
(1) 3mm Allen Wrench (015-0222-xx)
(4) M5x10mm hex screw (039-0440-xx)
(4) 25mm Washer 10mm ID (039-0438-xx)
(2) Rubber Feet (073-0007-xx)
(1) IR Learner (064-0511-xx)
(1) Product Regulatory Insert (009-1873-xx)
(1) Quick Reference Guide (this document)
Optional Accessories (sold separately)
– Smart Audio Soundbar TV Mount Hardware
(MNT-STUDIO55WS-TV-xx)
– Custom Grilles matched to Flat Panel TV’s
Specifications
Environmental
Temperature 32° to 104° F (0° to 40°C)
Humidity 10% to 90% (non-condensing)
Dimensions and Weights
Height
4.17 in (10.59 cm)
4.61 in (11.71 cm) with included Grille
Width 53.41 in (135.65 cm)
Depth
2.25 in (5.71 cm)
2.40 in (5.93 cm) with included Grille
Weight
Net: 21.7 lbs (9.9 kg) with included Grille
Shipping: 27.9 lb (12.7 kg)
Power
Input 120/240V AC (50/60 Hz) 3.6A
Maximum 250W
Operating Parameters
Frequency
Response
80 Hz - 40 kHz +/- 3 dB
Sensitivity 89 dB @ 2.83V/1 meter
Networking
Supported
Standards
IEEE 802.1 AVB/TSN
WiSA
Regulatory
Safety and
Emissions
FCC Part 15 CE C-Tick
UL
RoHS Compliant
Minimum Supported Release
Savant Software
da Vinci 9.2
Studio 3.1
Savant® Smart Series WiSA Soundbar [HST-STUDIO55WS-SUR-xx]
Quick Reference Guide
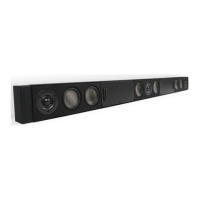
Front Panel
A
Front Tweeters (3) 25 mm Vifa XT Super Audio Tweeters
B
Midrange/
Woofers
(6) 89 mm Long Throw Carbon Fiber
Midrange/Woofers
Side and Bottom Panel
A
B
A
Stage Tweeters (2) 19mm Silk Tweeters
B
Mounting Slide (2) Captive M5 threaded bracket
Installation
Wall Mount
1. Attach the Wall Mounting Brackets to the wall using the appropriate
fasteners to account for the weight of the soundbar.
NOTE: The two wall brackets must be far enough apart so the
soundbar does not wobble on the wall.
2. Make the power and control connections before the soundbar is
attached to the brackets.
3. Attach the Soundbar
Rubber Feet
The included rubber feet must be used with the included grille.
1. Align the foot with the mounting slide.
2. Remove the waxed paper from the adhesive
3. Use one of the included hex screws to attach the foot to the
mounting slide.
4. Repeat for the second rubber foot.
Host Mode
Host mode can be disabled/enabled from the device’s Web UI. For
more information see the IP Audio Products with Integrated Host
Deployment Guide (009-1839-xx)
Further Product Information
To view available documentation, detailed product specs, and more:
– Visit the Savant Knowledge tab via the Savant Customer
Community to search all Savant documentation.