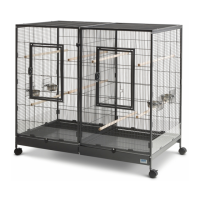
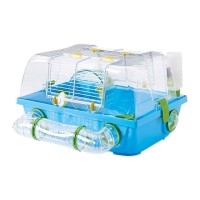
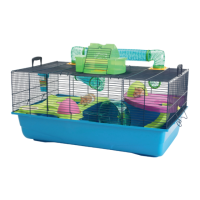
This document provides assembly instructions for the Savic Geneva hamster cage, a "pets' favourite" product designed for small rodents. The cage is characterized by its modern design, featuring a combination of wire mesh and a transparent plastic tank, allowing for clear visibility of the pet.
Function Description:
The Savic Geneva cage serves as a habitat for hamsters, providing a secure and comfortable environment for them to live, play, and sleep. It is designed to accommodate the natural behaviors of hamsters, offering space for burrowing, exercising, and feeding. The cage's modular design allows for easy assembly and maintenance, ensuring a hygienic living space for the pet.
Important Technical Specifications and Components:
The Geneva cage consists of several key components that form its complete structure and functionality:
- A - 1 cage: This refers to the main wire mesh structure that forms the upper part of the habitat, providing ventilation and climbing opportunities for the hamster.
- B - 2 side panels: These are the structural sides of the cage, likely made of durable plastic, which connect the wire cage part to the base and provide stability.
- C - 1 plastic tank: A transparent, deep plastic base that serves as the primary living area for the hamster. Its depth is crucial for allowing hamsters to burrow, a natural and essential behavior for their well-being.
- D - 1 cage platform: An elevated platform within the wire cage part, offering an additional level for the hamster to explore or rest.
- E - 1 ladder: A ramp or ladder that connects different levels within the cage, typically from the plastic tank to the cage platform, facilitating movement for the hamster.
- F - 1 exercise wheel: An essential accessory for hamsters, providing an outlet for their high energy levels and need for running. This helps prevent boredom and promotes physical health.
- G - 1 feeding bowl: A designated container for food, ensuring a clean and accessible feeding spot for the hamster.
- H - 1 water bottle + holder: A specialized water dispenser that provides a continuous supply of fresh water without spillage, crucial for the hamster's hydration. The holder secures the bottle in place.
- I - 1 connector for side panels: A component used to securely join the side panels, ensuring the structural integrity of the cage.
- J - 4 non-slip feet: These are attached to the bottom of the cage to prevent it from sliding on surfaces and to protect furniture.
Usage Features:
The assembly process is designed to be straightforward, involving a series of "click" actions to secure components.
- Non-slip feet assembly: The four non-slip feet are attached to the connector, providing stability.
- Side panel and connector attachment: One of the two side panels is attached to the connector, forming the initial structural base.
- Wire cage part integration: The wire cage part is clicked into the side panel, ensuring a secure fit. The remaining side panel is then assembled to the cage and the connector, completing the main structure.
- Cage floor installation: The cage floor is installed, likely referring to the platform or the base of the wire cage section.
- Plastic tank placement: The transparent plastic tank is placed below the assembled cage part, forming the lower habitat.
- Accessory installation: The water bottle is filled completely and attached to the side of the cage at a height accessible from the floor. The feeding bowl is also filled and placed. The exercise wheel and ladder are attached to the cage part and cage floor, respectively.
- Bedding preparation: The plastic tank is filled halfway with a layer of wood flakes, creating a suitable environment for the hamster to burrow and nest.
Maintenance Features:
The manual highlights specific maintenance instructions for the water bottle:
- Filling: Always fill the water bottle 100% to avoid leakage. This suggests that a full bottle creates a vacuum seal that prevents drips.
- Spout rinsing: Before first use, the spout of the water bottle should be rinsed with hot water (up to 40°C). This ensures hygiene and proper function of the spout mechanism.
The design with a removable plastic tank and wire top likely facilitates easy cleaning, allowing for thorough sanitization of both sections. The transparent tank also allows for easy monitoring of the bedding and the hamster's activities, aiding in timely cleaning and care. The modular nature of the cage implies that individual parts can be detached for cleaning or replacement if necessary.