16 І 36
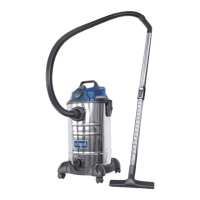
• Assemble the plastic extension tubes (20) by push-
ing them together.
• Connect the assembled plastic extension tubes
with the bent end of the suction hose (15).
• Fit the oor nozzle (18) or joint nozzle (19) to the
other end of the assembled plastic extension tubes.
8. Operation
m WARNING!
Switch the device off if liquid or foam emerges with
the exhaust air during wet vacuuming.
Switch on / switch off / automatic (g. 13-14)
The ON/OFF switch (12) has three settings:
1 switch setting 0: Off
2 switch setting II: On
• Press the on/off switch (12) to switch on.
• Press the on/off switch (12) again to switch the de-
vice off.
3 switch setting I: Automatic mode (the vacuum
cleaner will be switched on by an electric tool).
• Plug your electrical tool’s cable into the automatic
socket (g. 17).
• Connect the suction hose to the suction connection
on your electrical tool.
• Check that the connection is secure and airtight.
• Set the switch on the vacuum system to position “I”
= Automatic mode.
Dry vacuuming (Fig. 3+9)
Use the paper bag (17) for dry vacuuming. Always
ensure that the lters are correctly mounted.
Wet vacuuming (g. 3+8)
Use the foam lter (16) for wet vacuuming. Ensure
that the foam lter (16) is correctly tted.
If the stainless steel container (9) is full, the safety
oat valve (14) closes the suction port and suction
operation is interrupted.
m IMPORTANT!
The device is not suitable for vacuuming ammable
liquids. For wet vacuuming, use the only the foam lter
(16) provided.
Water drain plug (8) (g. 15)
The stainless steel container (9) is equipped with a
water drain plug (8) in order to make it easier to drain.
Open the water drain plug (8) by turning it counter-
clockwise and drain out the liquid.
9. Maintenance and cleaning
m WARNING!
Prior to any adjustment, maintenance or service
work disconnect the mains power plug!
Cleaning
It is recommended to clean the device after each use.
Do not spray the device with water or clean it under
the accessories from the stainless steel container (9).
Installing the castor mounts (5) (g. 4+5)
• Turn the stainless steel container (9) upside-down
(the machine head (2) must be removed).
• Push the castor mounts (5) into the cut-outs pro-
vided on the wheel mounting base (7). (4x)
• Fasten the castor mounts (5) with a screwdriver
(not included in the delivery) and one screw each
(21). (4x)
Installing the castors (6) (g. 6)
• Press the four castors (6) into the holes in the wheel
mounting base (5).
Installing the machine head (2) and the handle (1)
(Fig. 7)
• Place the machine head (2) on the stainless steel
container (9). Secure the machine head (2) with
the locking hooks (4). When installing the machine
head (2), ensure that the locking hooks (4) latch into
place correctly.
• Place the handle (1) on the machine head (2) and
fasten it with two screws (21) with a screwdriver
(not included in the delivery).
Installing the foam lter (16) (g. 3+8)
Never use the device without lter! Always ensure
that the lters are correctly tted!
• Installing the foam lter (16): For wet vacuuming,
slide the foam lter (16) provided over the lter bas-
ket with safety oat valve (14).
Installing the paper lter bag (17) (g. 3+9)
It is recommended to use an additional paper lter
bag (17) when vacuuming ne, dry dirt.
• Slide the paper lter bag (17) over the suction open-
ing in the stainless steel container (9). The paper
lter bag (17) is only suitable for dry vacuuming.
The paper lter bag (17) makes it easier to dispose
of the dust collected.
Installing the suction hose (15) (g. 3+10+11)
Connect the suction hose (15) to the corresponding
port, depending on the desired use, on the wet and
dry vacuum.
Vacuuming:
Connect the suction hose (15) to the suction hose port
(10). To do so, slide the end of the suction hose (15)
with the two nipples into the suction hose port (10)
(A). Insert the two nipples into the recesses. Once
the suction hose is fully inserted, turn it clockwise (B).
Blowing:
Connect the suction hose (15) to the blowing func-
tion connection port (13). Slide the end of the suction
hose (15) with the two nipples into the blowing func-
tion connection port (13). Insert the two nipples into
the recesses. It is not necessary to turn it here.
Installing the plastic extension tubes (20), suc-
tion hose (15) and nozzles (18/19) (g. 12)
 Loading...