www.scheppach.com
34
|
GB
• Type of current for the motor
• Data of machine type plate
• Motor data - type plate
13. Cleaning and maintenance
Attention!
Disconnect the mains plug before carrying out any
maintenance work.
Cleaning
• Keep protective devices, air vents and the motor
housing as free of dust and dirt as possible. Rub
the device clean with a clean cloth or blow it o with
compressed air at low pressure. We recommend
that you clean the device directly after every use.
• Clean the device at regular intervals using a damp
cloth and a little soft soap. Do not use any cleaning
products or solvents; they could attack the plastic
parts of the device. Make sure that no water can
penetrate the device interior. Water entering a pow-
er tool will increase the risk of electric shock.
General maintenance tasks
Wipe swarf and dust o the machine from time to time
with a cloth.
Do not oil the motor.
Do not use corrosive cleaning agents for cleaning the
plastic.
Maintenance
Brush inspection (Fig. 22)
If the machine is new, check the carbon brushes after
the rst 50 operating hours or if a new brush has been
mounted. After the initial check, check every 10 oper-
ating hours.
If the carbon is worn down to a length of 6 mm, or the
spring or the shunt wire is burnt or damaged, both
brushes must be replaced. If the brushes are found to
be usable after removal, they can be reinstalled.
1. To service the carbon brushes, open both locks
(as shown in gure 22) counterclockwise.
2. Then remove the carbon brushes.
3. Re-insert the carbon brushes in reverse order.
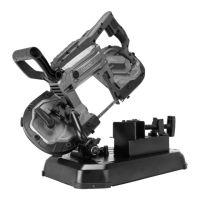
Replacing the saw band (Fig. 7-11)
Attention!
Disconnect the mains plug before carrying out any
maintenance work.
1. Rotate the tightening lever for the saw band (13)
in a clockwise direction up to the stop, in order
to relieve the saw band tension (see Figure 7).
2. Turn the metal band saw over and place it down
on a workbench or table like this.
3. Loosen the Phillips screws (a) and remove the
saw band guard (9) (left/right) by sliding to the
left or right.
4. Start to remove the saw band at the top part
of the saw band guard (14) and continue right
around the drive unit of the saw band (16). When
removing the saw band, the tension may be re-
lieved and the saw band may jump o. SAW
BANDS ARE SHARP. WEAR PROTECTIVE
GLOVES WHEN HANDLING THEM.
5. Check the guide rollers (18) and remove all
coarse chips that may be in here. Jammed chips
may prevent the guide rollers (18) from turning
and lead to at spots.
6. Rubber belts (17) are located on the pulleys (13).
The rubber belts should be checked for loose-
ness or damage when changing the saw band.
Wipe chips o the rubber belts (17).
7. Position the saw band (11) such that the teeth
are on the base and are angled in the direction
of the workpiece stop (10), as shown in Figure 9.
8. Slide the saw band (11) into the guide rollers (18),
as shown in Figure 10.
9. Hold the saw band (11) in the guide rollers (18)
and place it around both drive units (16).
10. Tension the saw band (11) using the tightening
lever for the saw band (13).
11. Push the saw band guard (left/right) (9) back on-
to the metal band saw and screw it tight again.
12. Attention! Do not operate the metal band saw
without the saw band guard!
13. Switch the metal band saw on and o a few
times, to ensure that the saw band is sitting cor-
rectly.
m CAUTION:
Maintain physical distance from the saw band
area during this test.
 Loading...