6
REMOVING THE CROWN LINER
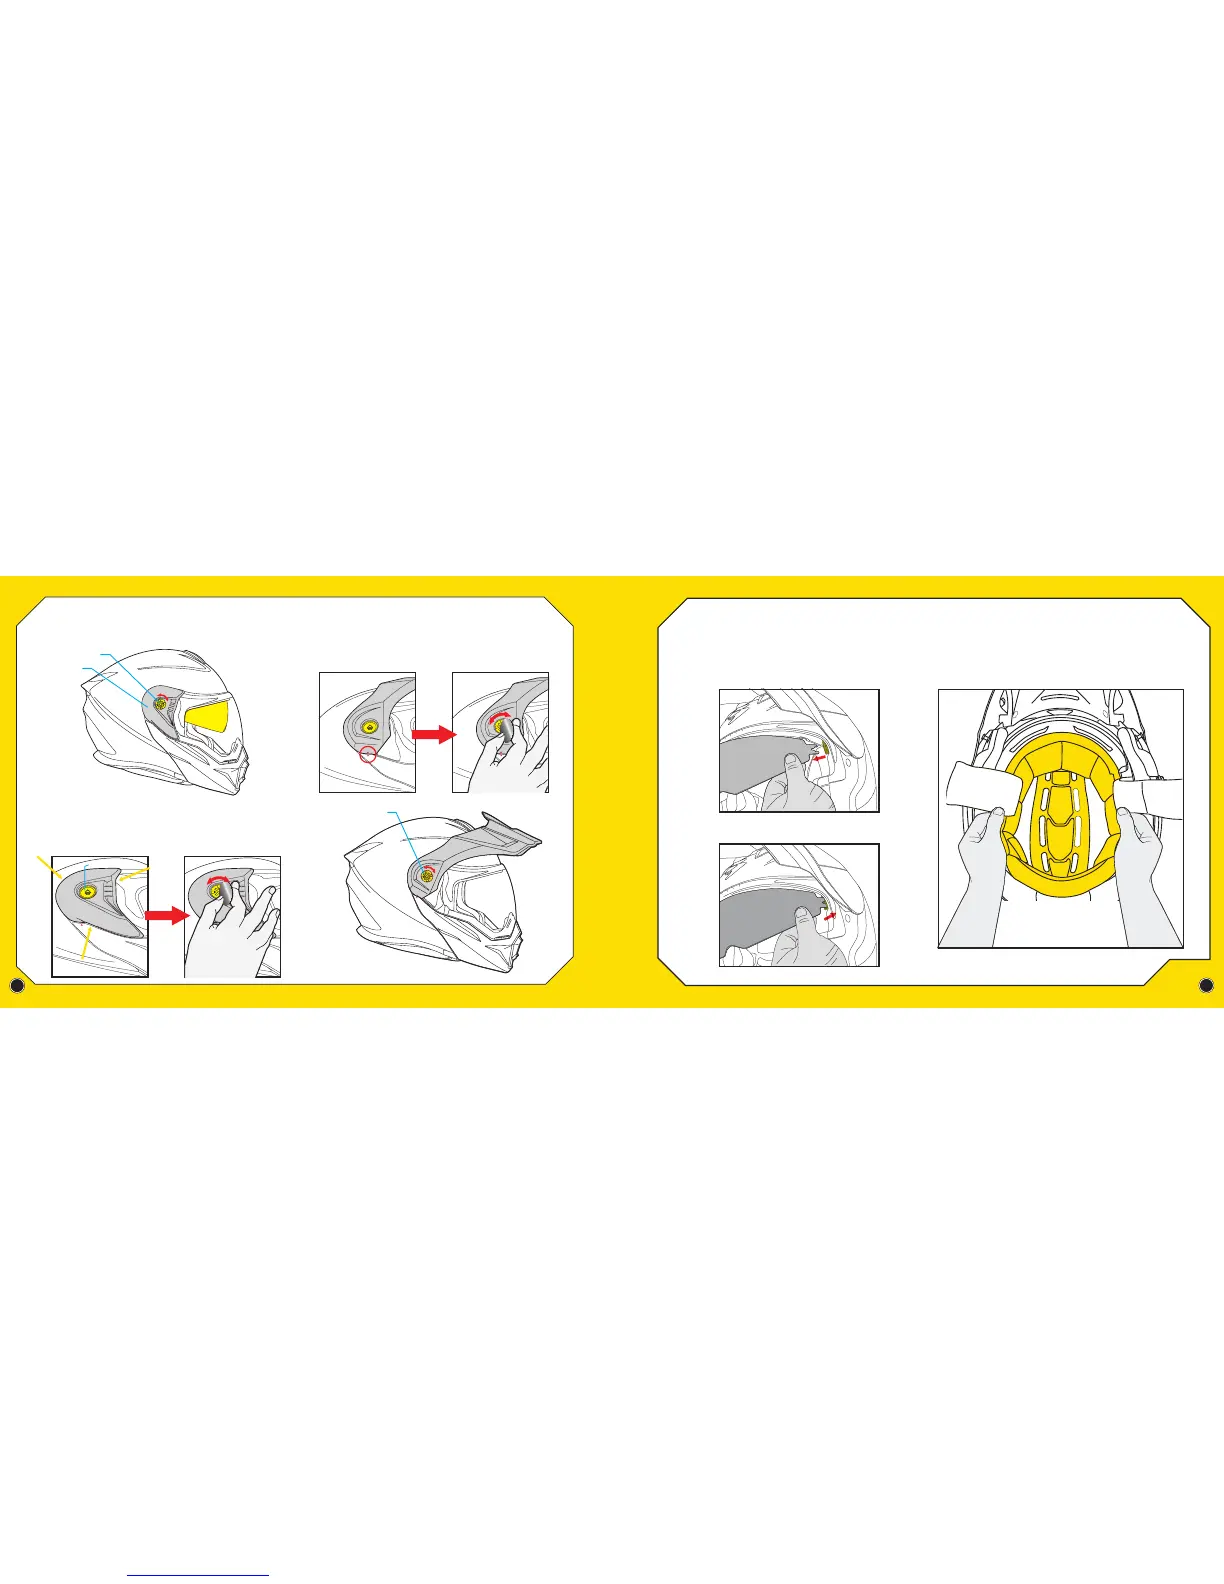
REMOVING THE SIDE COVERS
INSTALL SIDE COVERS
After removing the cheek pads, reach into the helmet and pull
out the Crown-liner shown below. The front part of the liner is
snapped to the helmet liner frame. Gently detach it from the
forehead channel and pull away from interior of helmet.
To remove the side covers, first make sure chin bar is closed. Then twist off
each of the 2 Peak Visor screws from both sides. Gently lift off helmet.
To install the Side Covers, first remove the Peak Visor. Then align each side cover
over the faceshield side (see yellow arrows) and with the peak visor screw hole.
Insert Peak Visor screws into each side and firmly tighten both sides by hand
tightening the screw and then using a coin to give it an additional 1/4 turn.
INSTALL PEAK VISOR
To install the Peak Visor, align the visor in the upright position and line-up the
arrows on the chin bar and peak visor (circled in red). Insert Peak Visor screws
into each side and firmly tighten both sides by hand tightening the screw and
then using a coin to give it an additional 1/4 turn.
REMOVAL OF SPEEDVIEW®
SUNVISOR FOR CLEANING
OR REPLACEMENT
NOTE: FIRST, OPEN OUTER SHIELD TO THE HIGHEST POSITION.
THEN LOWER THE SUNVISOR TO LOWEST POSSIBLE POSITION.
(See page 4)
Firmly hold the sunvisor with your hand and gently pull one side out
away from the helmet to release. Repeat to release the opposite side.
Reverse process for installation.
Peak Visor Screw
Peak Visor Screw
Side Cover
Peak Visor Screw Hole
Hand tighten screw then use
a tool (like a coin) to give it
an additional 1/4 turn.
6
REMOVING THE CROWN LINER
REMOVING THE SIDE COVERS
INSTALL SIDE COVERS
After removing the cheek pads, reach into the helmet and pull
out the Crown-liner shown below. The front part of the liner is
snapped to the helmet liner frame. Gently detach it from the
forehead channel and pull away from interior of helmet.
To remove the side covers, first make sure chin bar is closed. Then twist off
each of the 2 Peak Visor screws from both sides. Gently lift off helmet.
To install the Side Covers, first remove the Peak Visor. Then align each side cover
over the faceshield side (see yellow arrows) and with the peak visor screw hole.
Insert Peak Visor screws into each side and firmly tighten both sides by hand
tightening the screw and then using a coin to give it an additional 1/4 turn.
INSTALL PEAK VISOR
To install the Peak Visor, align the visor in the upright position and line-up the
arrows on the chin bar and peak visor (circled in red). Insert Peak Visor screws
into each side and firmly tighten both sides by hand tightening the screw and
then using a coin to give it an additional 1/4 turn.
REMOVAL OF SPEEDVIEW®
SUNVISOR FOR CLEANING
OR REPLACEMENT
NOTE: FIRST, OPEN OUTER SHIELD TO THE HIGHEST POSITION.
THEN LOWER THE SUNVISOR TO LOWEST POSSIBLE POSITION.
(See page 4)
Firmly hold the sunvisor with your hand and gently pull one side out
away from the helmet to release. Repeat to release the opposite side.
Reverse process for installation.
Peak Visor Screw
Peak Visor Screw
Side Cover
Peak Visor Screw Hole
Hand tighten screw then use
a tool (like a coin) to give it
an additional 1/4 turn.