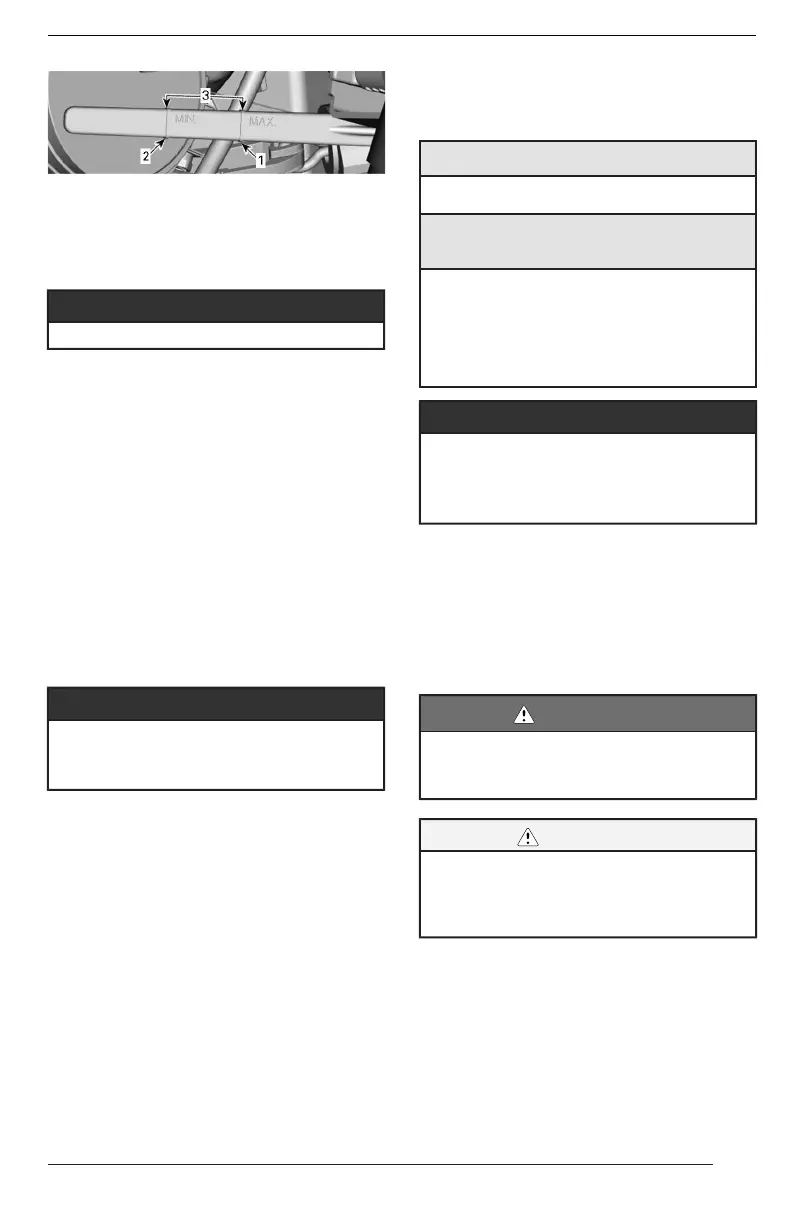
105
1. Maximum
2. Minimum
3. Operating range
9. Add oil to ensure the level is be-
tween marks as required.
NNOOTTIICCEE
DDoo nnoott oovveerrffiillll..
To add oil:
– Place a funnel in the oil neck
opening.
– Add the recommended oil to
the proper level.
NNOOTTEE::
Every time oil is added in the engine,
the complete procedure explained in
this section must be carried out again.
Otherwise, you will obtain a false oil
level reading.
10.Properly reinstall dipstick and RH
access cover.
NNOOTTIICCEE
EEnnssuurree tthhaatt ooiill ffiilllleerr ccaapp iiss ttiigghhtteenn
pprrooppeerrllyy.. OOtthheerrwwiissee eennggiinnee ooiill ccaann
ssppiillll oouutt..
EEnnggiinnee OOiill CChhaannggee aanndd OOiill FFiilltteerr
RReeppllaacceemmeenntt
The oil change and filter replacement
may be performed by an authorized
Sea-Doo dealer, repair shop, or per-
son of your own choosing.
EEnnggiinnee CCoooollaanntt
RReeccoommmmeennddeedd EEnnggiinnee CCoooollaanntt
XXPPSS RReeccoommmmeennddeedd CCoooollaanntt
Extended life pre-mixed coolant
If the Recommended XPS Coolant
is Not Available
Use a low silicate, extended life
ethylene-glycol premixed coolant
(50%-50%) specifically formulated
for internal combustion aluminum
engines.
NNOOTTIICCEE
AAllwwaayyss uussee eetthhyylleennee--ggllyyccooll aannttii--
ffrreeeezzee ccoonnttaaiinniinngg ccoorrrroossiioonn iinnhhiibbii--
ttoorrss ssppeecciiffiiccaallllyy ffoorr iinntteerrnnaall
ccoommbbuussttiioonn aalluummiinnuumm eennggiinneess..
To prevent antifreeze deterioration, al-
ways use the same brand and grade.
Never mix different brands or grades
unless cooling system is completely
flushed and refilled.
EEnnggiinnee CCoooollaanntt LLeevveell
WWAARRNNIINNGG
CChheecckk ccoooollaanntt lleevveell wwiitthh eennggiinnee
ccoolldd.. NNeevveerr aadddd ccoooollaanntt wwhheenn eenn--
ggiinnee iiss hhoott..
CCAAUUTTIIOONN
MMaannyy ccoommppoonneennttss iinn tthhee eennggiinnee
ccoommppaarrttmmeenntt mmaayy bbee vveerryy hhoott.. DDii--
rreecctt ccoonnttaacctt mmaayy rreessuulltt iinn sskkiinn
bbuurrnn..
To access the expansion tank, turn
the LH access cover knob 1/4 turn
clockwise, then pull out to unsnap the
rear portion and slide rearward to
remove.
MAINTENANCE PROCEDURES
 Loading...