Do you have a question about the Sealey SA9302 and is the answer not in the manual?
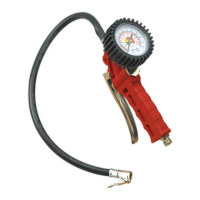
Details product specifications including range, maximum air supply, inlet, connector, and hose type for models SA9302 and SA9312.
Details air supply pressure recommendations and requirements for both gauge models.
Instructions on how to attach the gauge connector to a tyre valve for models SA9302 and SA9312.
Procedure for inflating and deflating tyres using the gauge's operation lever.
Guidelines for weekly operation checks and quarterly calibration checks for gauge accuracy.
This document describes the professional airline gauges, models SA9302 and SA9312, which are designed for accurate tyre pressure measurement and inflation. These tools are intended for correct and careful use, as failure to do so may result in damage, personal injury, and invalidation of the warranty. Users are advised to read the instructions carefully and keep them for future reference.
The SA9302 and SA9312 are professional airline gauges used for measuring and adjusting tyre pressure. Both models feature a composite body and a dial-type gauge with a rubber protector, calibrated in bar/psi. They are equipped with a 500mm rubber hose, but differ in their connector types. The SA9302 uses a single clip-on connector, while the SA9312 features a twin push-on connector. These gauges are designed to be connected to an air supply for inflation and to tyre valves for pressure readings. The operation lever allows for both inflation and deflation of tyres.
Before use, it is crucial to ensure the gauge is in good condition and that all parts are present and undamaged. The gauge should be disconnected from the air supply before any maintenance or accessory changes. It should be used in a clean, tidy, and well-lit work area, free from unrelated materials. Children and unauthorised persons should be kept away from the work area.
To attach the adaptor to a tyre valve: For the SA9302, the user should squeeze the thumb clip on the connector, push the connector onto the tyre valve, and then release the clip. This action locks the connector in place. For the SA9312, the user should push and hold the connector onto the tyre valve, utilising the most convenient side of the twin valve connector. The connector will then lock in place.
To inflate a tyre: The operation lever should be momentarily depressed fully. Releasing the lever will display the tyre pressure. For accurate readings, the gauge should be held "flat" with respect to the eye to minimise error. To inflate further, the operation lever should be fully depressed for an appropriate period. Over-inflation should be avoided by frequently releasing the lever to check the pressure.
To deflate a tyre: The lever should be depressed half-way until air can be heard escaping. This should be done for an appropriate period. To display the new pressure, the lever should be momentarily fully depressed and then released. It is important to always fully depress the lever momentarily before reading the tyre pressure to ensure accuracy.
The air supply to the gauge should be clean and dry, with a suitable filter/water trap if necessary. The ideal supply pressure at the gauge inlet is 10 bar (145 psi). The maximum tyre inflation pressure cannot exceed the supply pressure.
Safety precautions are paramount. Users should never direct the gauge outlet at themselves, other persons, or animals. The gauge should not be carried by the hose, nor should the hose be yanked from the air supply. It is not designed for tasks other than tyre pressure management. Operating the gauge while tired, or under the influence of alcohol, drugs, or intoxicating medication, is strictly prohibited. If any parts are missing or damaged, the gauge should not be operated, as this could lead to failure or personal injury.
To ensure long service life and continued accuracy, periodic checks and maintenance are recommended.
The gauge's operation should be checked weekly. This includes verifying smooth lever operation and fast, smooth gauge movements. The user should also inspect for leaks from tyre connector seals and check for chafing or wear of the flexible hoses. Any issues identified during these checks should be rectified immediately.
The accuracy of the gauge should be checked against a calibrated 'master' gauge every three months, or more frequently depending on the operator's specific quality procedures.
If any parts are damaged, they should be replaced or repaired using only recommended parts. Using unauthorised parts can be dangerous and will invalidate the warranty. The gauge should be kept clean for best and safest performance. For any servicing or repairs, an authorised service agent should be consulted.
The manufacturer reserves the right to continually improve products and may alter data, specifications, and component parts without prior notice. The warranty period is 12 months from the purchase date, and proof of purchase is required for any claim.
| Model No | SA9302 |
|---|---|
| Category | Measuring Instruments |
| Type | Digital Multimeter |
| Current Measurement | 10A |
| Resistance Measurement | 40MΩ |
| Frequency Measurement | 10MHz |
| Display | LCD |
| Battery | 9V |
| Safety Rating | CAT III 600V |
| Operating Temperature | 0°C to 40°C |
| Range | Auto Range |
| Voltage Measurement | 1000V DC, 750V AC |