Do you have a question about the Sealey VS301 and is the answer not in the manual?
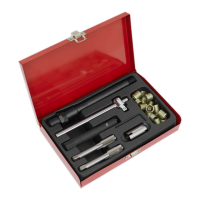
Remove spark plug, insert plug tap into wrench, attach T-bar, and run tap down the hole.
Use step tap to cut M16x1.25 thread, then use seat cleaner with plug tap to clean the seat.
Screw insert onto drive, apply thread locker, install insert into cylinder head, and remove drive.
Clean debris, test internal thread, remove tools, and store kit safely.
This document describes the Sealey Spark Plug Thread Repair Kit, Model No: VS301.V2, a comprehensive and time-saving kit designed for repairing deep-seated spark plug thread configurations.
The VS301.V2 kit is specifically engineered to address damaged spark plug holes in cylinder heads. It facilitates the creation of new, robust threads, ensuring proper seating and sealing of spark plugs. The kit includes specialized tools such as taper and plug taps with integrated reams, stepped taps for correct alignment, and extension tools for easy access to deep plug recesses. The process involves removing the damaged spark plug, tapping a new, larger thread into the cylinder head, and then installing a threaded insert to restore the original spark plug thread size. The stepped tap ensures that the seat cleaner is correctly aligned with the existing spark plug hole, while the integrated ream helps to prepare the surface. Extension tools are provided to reach deep-seated plug configurations, making the repair process accessible even in challenging engine designs. The kit also includes a seat cleaner to ensure a clean and proper seating surface for the spark plug, which is crucial for optimal engine performance and preventing leaks.
The kit is designed for practical use in a workshop environment. Key usage features include:
| Brand | Sealey |
|---|---|
| Model | VS301 |
| Category | Racks & Stands |
| Language | English |