- 6 - Copyright © 2019, Fast ČR, a.s. 09/2019
EN
Coffeemaker
User'smanual
■
Prior to using this appliance, please read the user'smanual thoroughly,
even in cases, when one has already familiarised themselves with
previous use of similar types of appliances. Only use the appliance in
the manner described in this user’smanual. Keep this user'smanual in
asafe place where it can be easily retrieved for future use.
■
We recommend saving the original cardboard box, packaging
material, purchase receipt and responsibility statement of the vendor
or warranty card for at least the duration of the legal liability for
unsatisfactory performance or quality. In the event of transportation,
we recommend that you pack the appliance in the original box from
the manufacturer.
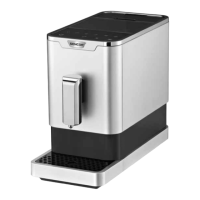
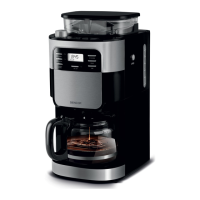
DESCRIPTION OF THE APPLIANCE
A1
Permanent removable filter lid
A2 Permanent removable filter
A3 Removable filter holder
A4 Lockable Drip-Stop valve
A5 Steam chamber with filter
holder support
A6 Glass kettle with lid
A7 Grinding fineness
adjustment knob
A8 Coffee bean hopper lid
A9 Coffee bean hopper
A10 Water tank lid
A11 Steam chamber open button
A12 Water tank with water level
mark
A13 Control panel
A14 Hotplate
DESCRIPTION OF THE CONTROL PANEL
B1 PROGRAM button for
automatic start of the
coffeemaker
B2 PROGRAM function indicator
light
B3 Display
B4 2 - 12 CUPS button for
setting the number of cups
of coffee
B5 HOUR button for setting the
hours
B6 MIN button for setting the
minutes
B7 Coffeemaker Power On
indicator light
B8 ON / OFF button (On / Off)
B9 STRENGTH CONTROL
button for setting coffee
intensity
B10 GRIND OFF indicator light
B11 GRINDOFF for turning off
the coffee grinding phase
BEFORE FIRST USE
■
Before first use, take the appliance and its accessories out of the
packaging material and remove all promotional labels and stickers.
Check that neither the appliance nor any of its parts is damaged.
■
Press button A11 and open the steam chamber A5. Take out the
permanent filter lid A1, permanent filter A2, filter holder A3 and,
together with the glass kettle A6, thoroughly wash these parts in
warm water with asmall amount of dishwashing detergent. Rinse
under clean running water and dry well. Put these parts back into
the coffeemaker. Ensure that all the accessories are completely dry.
■
Wipe the coffeemaker with asoft sponge lightly dipped in warm
water. Then wipe with adry wiping cloth.
Setting the clock
1.
Insert the power plug into apower socket and "12:00" will start
flashing on the display B3.
2. Repeatedly press the HOUR B5 button and set the current hours.
3. Then repeatedly press the MIN B6 and set the current minutes.
4. The set time will be saved in the memory of the coffeemaker.
Note:
The clock on the coffeemaker uses a24-hour system.
The coffeemaker can also be operated without the time
being set. However, if you wish to use the automatic start
function, it is important to set the correct time.
Putting the coffeemaker into operation
Before first use or after an extended period of time when the coffeemaker
was not used, it is important to clean the coffeemaker with clean water
without any ground coffee in the filter A2. Proceed as follows:
1.
Open the lid A10 and pour clean cold water into the water tank
A12 up to the maximum level mark. Never fill the water past the
maximum mark.
2.
Insert the filter holder A3, the permanent filter A2 and the permanent
filter lid A1 into the steam chamber A5. Check that all the parts
are correctly inserted in the steam chamber A5. Close the steam
chamber A5.
3. Place the glass kettle A6 on to the hotplate A14.
4.
Insert the power plug into apower socket and the time will start
flashing on the display B3 if it was set previously, otherwise "12:00"
will start flashing.
5. Press the GRIND OFF B11 button to skip the coffee grinding phase.
Indicator light B10 will turn on.
6.
Press the ON / OFF B8 button. The Power On indicator light B7
will be lit.
7.
After ashort moment the water will start dripping into the kettle A6.
8.
Wait until all the water in the water tank flows through the filter
into the glass kettle.
9. As soon as the water tank is empty, the coffeemaker will beep and
automatically switch to the coffee heating mode.
10. Repeat this process two to three times.
Then the coffeemaker is clean, warm and ready for use.
Note:
During the cleaning and coffee brewing process, you will
hear arattling noise. This noise is made by the pump and
this is normal.
OPERATING THE COFFEEMAKER
Brewing coffee from coffee beans
1.
Open the lid A10 and pour clean cold water into the water tank
A12 up to the maximum level mark. Never fill the water past the
maximum mark.
2. Press button A11 and open the steam chamber A5. Insert the filter
holder A3, the permanent filter A2 and the permanent filter lid A1
into the brew head A5. Check that all the components are properly
inserted.
3. Close the steam chamber A5. Correct closure is indicated by aclick.
4. Place the glass kettle A6 on to the hotplate A14.
5. Lift the lid of the coffee bean hopper A8 and pour freshly roasted
coffee beans into the hopper A9. To brew quality coffee, always use
freshly roasted coffee beans. The maximum capacity of the hopper
A9 is 200g. Put the lid A8 back on.
Warning:
Do not overfill the coffee bean hopper. Always use
properly roasted coffee beans.
6.
Insert the power plug into apower socket and the time will start
flashing on the display B3 if it was set previously, otherwise "12:00"
will start flashing.
7. Use the 2 - 12 CUPS B4 button to set the number of coffee cups to
be brewed in the range from 2 to 12. The set number is shown on
the display B3. The default number is 12 cups.
Note:
If the number of cups to be brewed is not set using the
2-12 CUPS B4 button, the coffeemaker will brew the
default number – 12 cups.
8.
Always check that the amount of water in the water tank corresponds
to the number of cups of coffee set using the 2 - 12 CUPS B4 button.
The coffeemaker will always consume all the water in the water
tank A12.
9.
Use knob A7 to set the fineness of the ground coffee. It is
recommended to select the middle setting and then adjust as
necessary later.
10.
Press the STRENGTH CONTROL B9 button to set the intensity of the
brewed coffee. The respective symbol is shown on the display B3.
11. Press the ON / OFF B8 button. Indicator light B7 will be lit and after
ashort moment the coffee grinding process will start and will be
followed by the coffee brewing process. When the coffee brewing
 Loading...