Getting started
8
Choose a place for the electronic interface of the
XT1 which is clean, dry and protected from direct
sunlight. Ensure that all cables are placed safely
and all regulations are fulfilled.
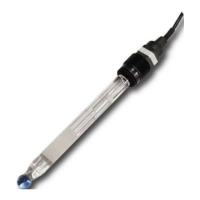
1. Connect the cable of the electrode with the electronic
sensor interface (BNC-plug).
2. Connect the blue marked plug of the cable with your
control unit at one of the sensor input ports. Your
SENECT control unit will automatically recognize the
sensor and starts the measurement.
3. Remove the cap of the electrode and rinse it with tab
water.
4. Pour a small amount of the calibration solution in
another vessel and dip the sensor tip into the solution
and move it gently.
If the ORP value displayed with your control unit is close to
the value of the calibration solution (±5 mV), you can directly
install the electrode. If the deviation is larger, please
calibrate the sensor (see chapter calibration)
5. Mount the electrode at the measurement location. The
electrode shaft including the active glass tip must be
submerged and placed into the water flow. The electrode
must be mounted vertical (angle > 80°).