INSTALLATION INSTRUCTIONS
THE READER HEAD/S
The reader head comes pre-wired with a 2m cable connected to it. If the cable is to be replaced
with a longer cable, please note the following restriction:
Maximum cable lengths: - 5 meters unshielded cable
15 meters shielded cable
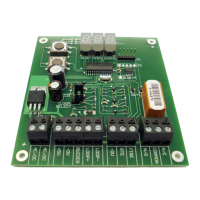
Wiring from the reader is as follows:
BLUE - Buzzer (BUZ)
RED - Supply (+5V)
BLACK - Ground (-0V)
YELLOW - Loop +
GREEN - Loop -
Two screws and two wall plugs are supplied with the reader head for mounting onto a wall.
The following steps should be followed:
INSTALLING THE READER HEAD
1. Use the READER HEAD to mark off the holes to be drilled on the wall where
the reader is to be mounted. (Note: The holes should only be deep enough to accept
the wall plugs.)
2. Once the holes have been drilled insert wall plugs.
3. Mount the reader head and fasten the screws, making sure that the cable is run
correctly.
4. Place reader head sticker onto the reader head and align the reader head sticker
LED hole with the LED on the reader head.
5. Installing two reader heads – It is possible to install two reader heads on this system.
Please note that this is a single door system and there is only one output relay. The two
heads will therefore be fitted to the ENTRY and EXIT points on a single door.
6. The two reader heads will be wired in parallel in the controller as per the instructions
overleaf.
7. Jumper LOOP SELECT must be OPEN if one reader head is installed. ● ●
Jumper LOOP SELECT must be FITTED if two reader heads are installed. ●▬●