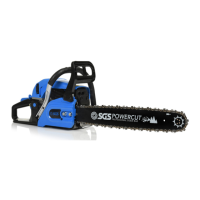
6. INSTALLING GUIDE BAR & SAW CHAIN
Power unit
Bar protector
Guide bar
Saw chain
Screwdriver for
carburettor
adjustment
Plug
wrench
Open the box and install the guide bar and the saw
chain on the power unit as follows:
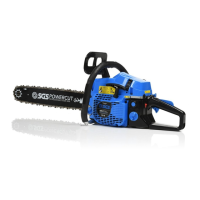
1. Pull the chain brake towards the front handle to check that
the chain brake is not engaged. You’ll know you’ve done
this sucessfully as the chain brake will move back and forth
(15mm) with very little effort.
2. Unbolt the brake plate (the opposite side of the pull mecha-
nism) with the provided plug wrench. Remove the two bolts
and the brake plate to reveal the drive gear.
4. Take the guide bar and place it over the two exposed bolts
on the power unit. Slide the bar as close to the drive gear as
possible.
6. Now, with the chain in place, pull the end of the bar away
from the chainsaw to add tension and tighten the chain to
the bar. Be careful to ensure the chain is still aligned within
the groove of the bar, all the way around.
5. To fit the chain; wrap the chain around the drive gear and
carefully drape it over the top of the guide bar. The teeth of
the chain face outwards. There’s a small chain marking on
the chain bar which will help you position the chain in the
right direction. Make sure the prongs in the bottom of the
chain are in the goove of the guide bar.
The saw chain has very sharp edges. Use
thick protective gloves for safety.
Mounting screws
WARNING
6. INSTALLING GUIDE BAR & SAW CHAIN
3. Install the bump spike
to the power unit. The
bump spike will be with
two small bolts in your
toolkit.
Pay attention to the correct direction of the
saw chain.
The chain brake can
be very stiff. You may
find it easier to pull
back with the plate
removed and held
between your feet.
ZZ
NOTE
ZZ
NOTE