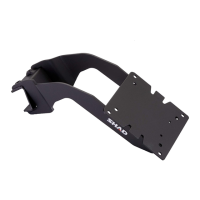
Abrir el asiento (A). Desmontar la tapeta
embellecedora trasera (B). Colocar la plantilla
según dibujo y realizar los cortes según plantilla
para dejar paso al soporte KIT TOP.
Open the seat (A). Dismantle the back cover (B).
Place the template as shown on the picture and
make a hole according to the template, so as to let
the KIT TOP support through.
Démonter le siège (A). Démantelez la couverture
arrière (B). Placez le descripteur comme affiché
sur l'image et faites les trou selon le descripteur,
afin de laisser le DESSUS de KIT supporter à
travers.
Öffnen Sie den Sitz (A). Bauen Sie die hintere
Abdeckung (B) ab. Platzieren Sie die Schablone
wie gezeigt auf die Abbildung und lassen Sie ein
Loch entsprechend der Schablone, damit die
AUSRÜSTUNGS-SPITZE durch.
Aprire il sedile (A). Smontare il corpechio
ornamentale posteriore (B). Collocare la sagoma
dove indicano i segni e fare li bucos in base al
modello in modo da lasciare che il supporto KIT
TOP attraverso.
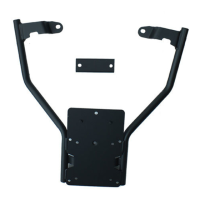
Montar el soporte Kit Top (1) mediante los
tornillos (2) y las arandelas (3).
Assemble the Kit Top support (1) with the screws
(2) and the washers (3).
Monter le support Kit Top (1) avec les vis (2) et
les rondelles (3).
Die Top-Ausstattung (1) an den hinteren Bereich
des Stützstabes (2) mit den Schrauben (3).
Montar el soporte Kit Top (1) mediante le viti (2)
e le rondelli (3).
Montar la tapeta embellecedora trasera (B).
Assemble the back cover (B).
Monter le couvercle arrière (B).
Setzen Sie die hintere Abdeckung (B).
Montare il corpechio ornamentale posteriore (B).
YAMAHA X-MAX 125/250 ‘10
KIT TOPMASTER
Y0XM20ST
1.
2.
3.
CONSEJO PARA UN CORRECTO MONTAJE DEL KIT: No apretar los tornillos del todo hasta asegurarse que el KIT esté correctamente colocado y alineado.
PROPER KIT ASSEMBLY: Do not fully tighten the screws until it is ensured that the KIT is correctly attached and aligned.
CONSEIL POUR UN MONTAGE CORRECT DU KIT: Ne pas serrer les vis complètement jusqu’à s’être assuré que le KIT est correctement placé et aligné.
RATGEBER FUR EINE KORREKTE MONTAGE DES KIT: Ziehen Sie die Schrauben nicht ganz fest, bevor Sie sich nicht vergewissert haben, daß der
Bausatz korrekt eingestellt und ausgerichtet ist.
CONSIGLI PER UN CORRETTO MONTAGGIO DEL KIT: Non stringere del tutto le viti finché non si è controllato che il Kit è situato e allineato correttamente.