The Battering Ram requires a standard 2x8 pin Eurorack power cable.
Make sure that the red stripe on the cable aligns with the -12V side of
the Battering Ram's power header.
Installation
Basics
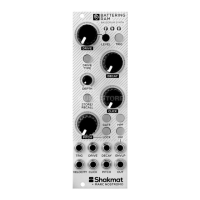
Like every percussion module, the Battering Ram requires a trigger or
gate signal patched into the trigger input [1]. Alternatively, you can
directly trigger the kick drum by pressing the Trigger button [C]
The Battering Ram's sound is influenced by five key parameters:
Pitch: The pitch potentiometer [I] spans a range of two octaves from
C1 to C3, with C2 in the middle. It can be further modulated using the
V/oct input [7], accepting CV signals from 0 to 5 volts. This input
allows you to use the Battering Ram as a bassline or tom/mid-percus-
sion generator. Note it is possible to expand the pitch potentiometer
range to five octaves. To do so, refer to the Advanced Options section
of this manual.
Decay: The decay potentiometer [E] and CV input [3] affect the
length of the decay.
Click: The click potentiometer [H] controls the amount of envelope
applied to the pitch, adding a clicky transient to the bass drum. This
parameter also features a dedicated CV input [6].
Depth: The depth parameter [F] regulates the decay of the pitch
envelope, impacting the kick drum's pitch. At its minimum value, the
envelope becomes very clicky, while increasing it makes the
envelopes resemble a typical 909 kick drum.
Drive: The Battering Ram offers two distinct types of drive/distortion.
The first type (indicated by a green Drive button) features a complex
two-stage wavefolder that adds harmonics and compression to the
sound without excessive distortion.
 Loading...