17
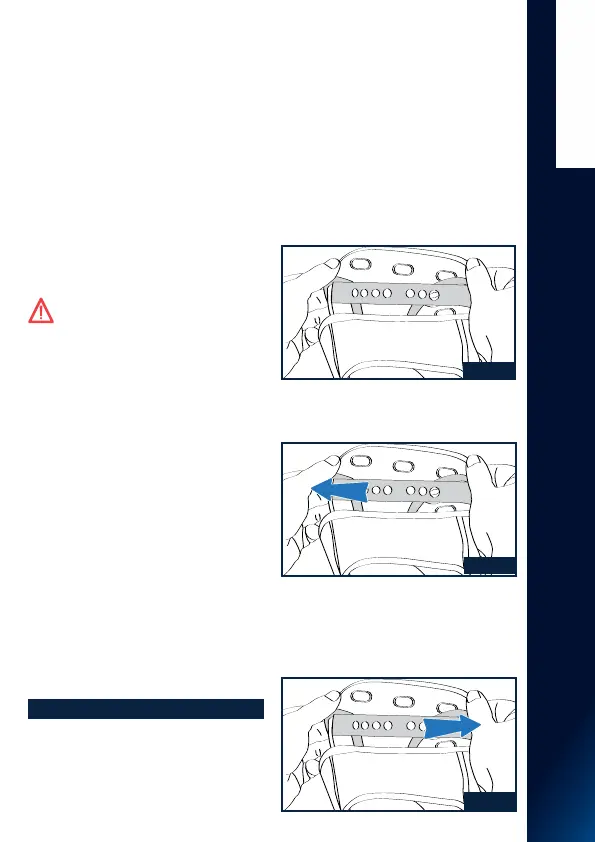
Fig. 23
Fig. 24
Fig. 25
I N T E R I O R F O A M S
ENGLISH
Insert the chin strap into the cavity in
the cheek padding and press near the
rear snap fasteners located on the back
to fasten it to the relevant seat in the
polystyrene cheek pad (Fig.16).
6.3 Check whether the fasteners are
correctly fastened by slightly pulling
the cheek pad towards the inside of
the helmet and checking that it keeps
adhering to the polystyrene cheek pad.
6.4 Follow these operations with the right
cheek pad padding.
Warning: the buttons are not fastened
until a click is heard. Check that the strap
comes out properly from the cheek pad
padding.
6.5 Insert the chin strap band into the
elastic loop on the cheek pad strap (Fig.
15).
ATTENTION : if your helmet is
equipped with the D-Ring retention
system, close it as described in the attached
D-Ring instruction label available under
www.nolan-helmets.com
- Remove the inner comfort padding only
when cleaning or washing is required.
- Never use the helmet if the inner comfort
padding and the cheek pads have not been
correctly and completely tted.
Carefully wash by hand and use only mild
soap and water at 30 °C max.
- Rinse using cold water and dry at room
temperature, away from direct sunlight.
- Never machine-wash the inner comfort
padding.
- The inner polystyrene is an easily
deformable material. It is intended to
change or get partially destroyed to help
absorb shocks.
- Do not modify or alter the internal
polystyrene components in any way.
- Clean the inner polystyrene components
using a damp cloth only and allow them to
dry at room temperature away from direct
sunlight.
- Never use tools or equipment to carry out
the operations described above.
LINER POSITIONING CONTROL (LPC)
1 ADJUSTING THE LINER POSITION
The different anatomic shape of riders
heads at times requires the position of the
helmet to be adapted to the specific head.
The LINER POSITIONING CONTROL
(LPC) enables the position of the liner
to be adjusted. This means that, unlike
a standard helmet, the position of the
helmet on the rider’s head can be changed
without changing
the size of the helmet, making it adaptable
to multiple needs.
To adjust the liner, deactivate the
VPS, open the chin strap (see relevant
instructions) and proceed as follows.
1.1 Overturn one side of the upper part of
the padding and unhook the front circular
button for adjusting the liner below it
from the underlying longitudinal plastic
support with seven holes (Fig. 23).
1.2 Move the circular button along the
longitudinal plastic support and re-hook it in
one of the two following holes (Fig.24).
1.3 Repeat the process of points 1.1 and
1.2 with the rear circular button located
below the padding (Fig.25). By pulling the
two adjustment snaps of the liner, the
helmet is gradually positioned higher on
the head.