2
1
3
5
1
4
6
3
1. Press the mode button to select a
steam setting.
2. Tilt the handle down to activate the brushroll
and start cleaning.
Note: Without sufficient water supply in the tank, steam will not be generated.
2
STEAM LEVEL
1
2
The Three (3) Year Limited Warranty applies to purchases made from authorized retailers of SharkNinja Operating LLC. Warranty coverage applies to the original owner
and to the original product only and is not transferable. SharkNinja warrants that the unit shall be free from defects in material and workmanship for a period
of one (1) year from the date of purchase when it is used under normal household conditions and maintained according to the requirements outlined in the Owner’s
Guide, subject to the following conditions and exclusions:
What is covered by this warranty?
1. The original unit and/or non-wearable parts deemed defective, in SharkNinja’s sole discretion, will be repaired or replaced up to one (1) year from the original
purchase date.
2. In the event a replacement unit is issued, the warranty coverage ends six (6) months following the receipt date of the replacement unit or the remainder of the
existing warranty, whichever is later. SharkNinja reserves the right to replace the unit with one of equal or greater value.
What is not covered by this warranty?
1. Normal wear and tear of wearable parts (such as a Squeegee), which require regular maintenance and/or replacement to ensure the proper functioning of your
unit, are not covered by this warranty. Replacement parts are available for purchase at sharkaccessories.com.
2. Any unit that has been tampered with or used for commercial purposes.
3. Damage caused by misuse (e.g., vacuuming up water or other liquids), abuse, negligent handling, failure to perform required maintenance, or damage due to
mishandling in transit.
4. Consequential and incidental damages.
5. Defects caused by repair persons not authorized by SharkNinja. These defects include damages caused in the process of shipping, altering, or repairing the
SharkNinja product (or any of its parts) when the repair is performed by a repair person not authorized by SharkNinja.
6. Products purchased, used, or operated outside North America.
How to get service
If your appliance fails to operate properly while in use under normal household conditions within the warranty period, see the Troubleshooting section of this Owner’s
Guide for possible solutions. For more help, visit sharkclean.com/support to use our online self-help tools. Our Customer Service Specialists are also available at
1-800-798-7398 to assist with product support and warranty service options, including the possibility of upgrading to our VIP warranty service options for select product
categories. So we may better assist you, please register your product online at registeryourshark.com and have the product on hand when you call.
SharkNinja will cover the cost for the customer to send in the unit to us for repair or replacement. A fee of $25.95 (subject to change) will be charged when SharkNinja
ships the repaired or replacement unit.
How to initiate a warranty claim
You must call 1-800-798-7398 to initiate a warranty claim. You will need the receipt as proof of purchase. We also ask that you register your product online at
registeryourshark.com and have the product on hand when you call, so we may better assist you. A Customer Service Specialist will provide you with return and packing
instruction information.
How state law applies
This warranty gives you specific legal rights, and you also may have other rights that vary from state to state. Some states do not permit the exclusion or limitation of
incidental or consequential damages, so the above may not apply to you.
TECHNICAL SPECIFICATIONS:
Voltage: 120V, 60Hz
Watts: 1080W
Water Capacity: 420mL (14.2oz)
TROUBLESHOOTINGPREPARING TO USE
USING YOUR STEAM PICKUP
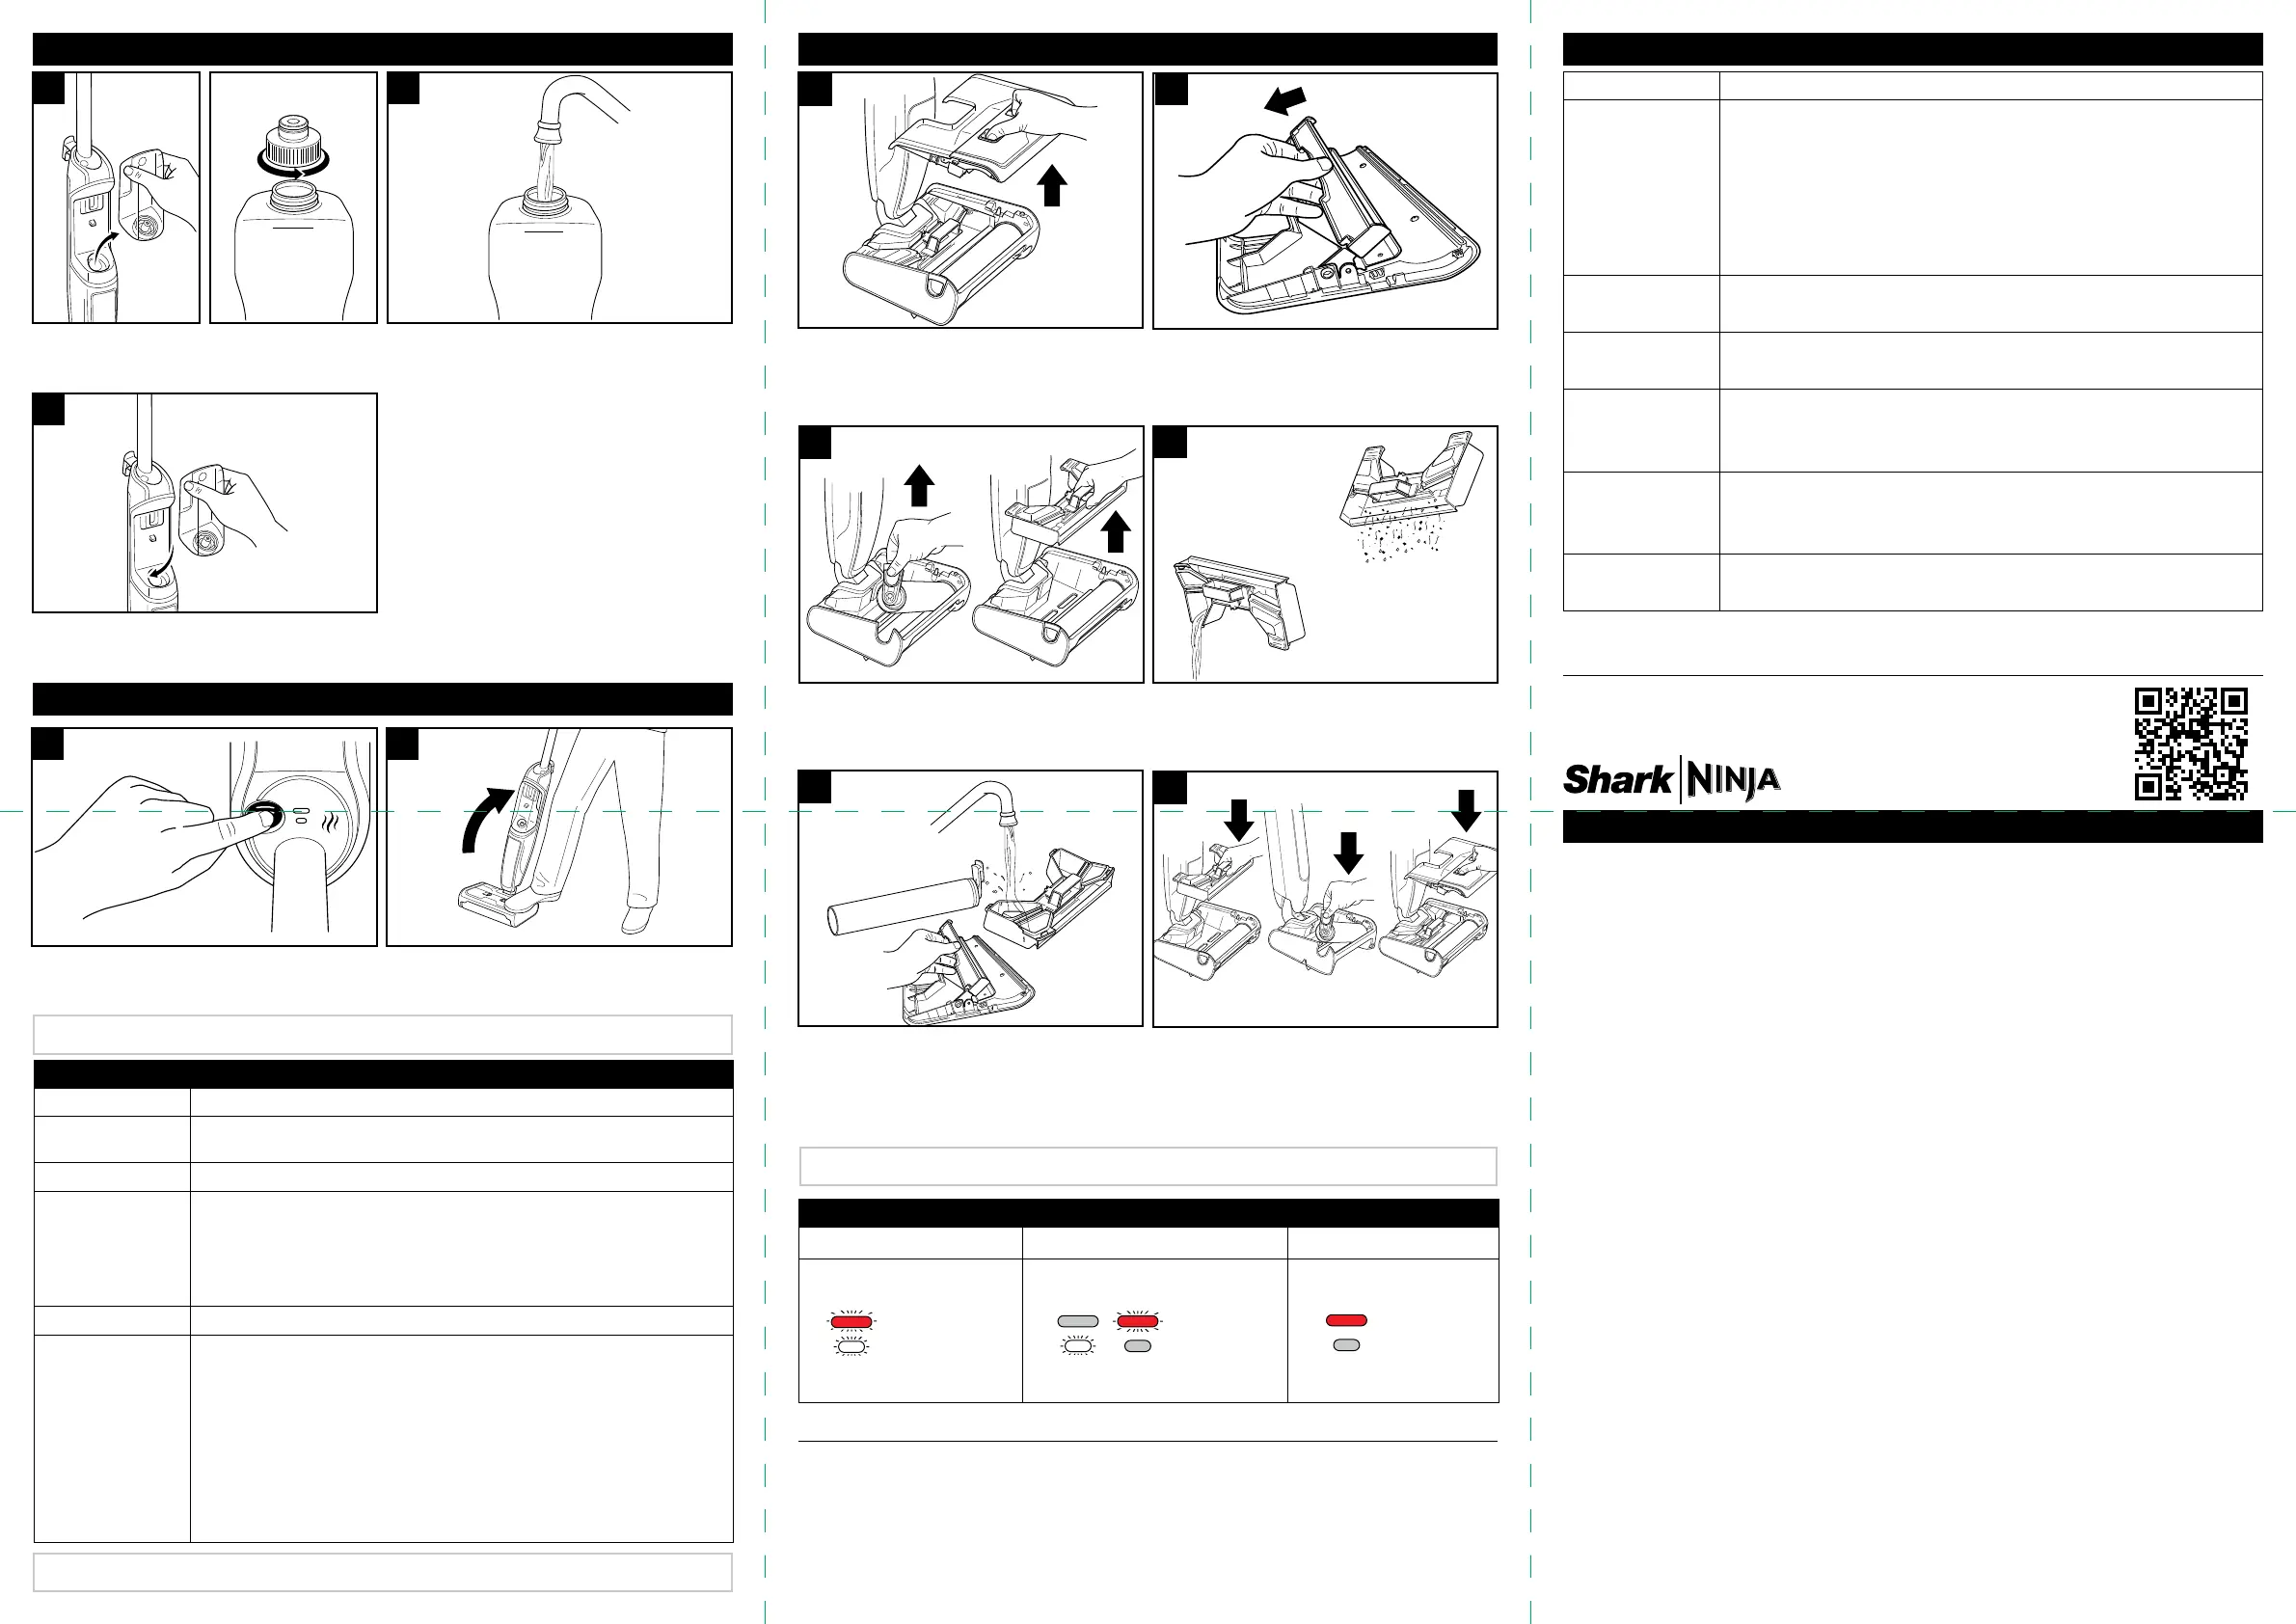
1. Pull out the clean water tank and unscrew
the cap.
2. Fill tank with water to MAX FILL line.
Only use with water. DO NOT use any
cleaning solution.
3. Screw on the cap. Reinstall the clean water tank
into the unit until it clicks securely into place.
Note: When edge cleaning, use the left and right sides of the floor nozzle for maximum pickup.
MAINTAINING YOUR STEAM PICKUP
MAX FILL
ERROR MESSAGES
LIQUID HOLDER FULL COVER NOT ATTACHED BRUSHROLL JAM
All lights blinking
WHITE and RED
Alternating
blinking WHITE
and RED
SOLID RED
(No Blinking)
PROBLEM POSSIBLE REASONS AND SOLUTIONS
The unit isn’t
producing any steam.
The Steam Pickup should be securely plugged into an electrical outlet. Check your fuse or
circuit breaker or try a dierent outlet.
Make sure the water tank is full, the unit is plugged in, and the mode button is illuminated.
If the settings lights are o, try a dierent electrical outlet.
If the settings lights are blinking, press the mode button to select a steam setting. If the
settings lights are illuminated steadily, wait 20 seconds for the unit to warm up.
The unit is producing
intermittent steam.
This is normal. For more consistent steam, select the NORMAL setting. Also make sure
the water tank is full.
I can’t select a steam
setting.
Make sure the Steam Pickup is plugged in and the settings lights are flashing.
Floors are cloudy,
streaky, or spotty
after cleaning.
The brushroll might be dirty. Remove brushroll and clean it with warm water and
soap.
Due to accumulated soap or grease residue, the floor may require several cleanings.
Messes are not being
picked up.
The debris tank might be full. Remove debris tank and dispose of all waste from the
debris tank and brushroll. Make sure to clear any blockages in the tank and floor
nozzle openings.
The unit is not
powering on.
Make sure the power cord is plugged into a working outlet. Check for error messages
and resolve any issues. The unit will not function in error mode.
© 2024 SharkNinja Operating LLC.
SHARK is a registered trademark of SharkNinja Operating LLC.
SD200_IB_MP_REV5
NOTE: These parts are NOT dishwasher safe.
CHECKING FOR BLOCKAGES
If you run over a hard or sharp object or notice a noise change while using your unit, check for
blockages or objects caught in the brushroll, nozzle chamber, or debris tank.
1. Turn off the power.
2. Remove the brushroll cover, brushroll, and debris tank.
3. Check the openings and remove all debris.
4. When finished, reinstall the brushroll and the debris tank.
5. Wash the Brushroll, Debris Tank, and Nozzle
Cover thoroughly with warm tap water. Wipe
all parts of any leftover debris and allow to
air-dry for at least 24 hours.
6. Insert all parts securely back into unit. Make
sure debris tank, brushroll, and nozzle cover
all click securely into place.
1. Remove the Nozzle Cover: Press both tabs
and lift off the cover.
2. Hold the cover over a sink or trash bin, then carefully
turn it over to dump out waste. Pull back the Debris
Plate to clean off any remaining liquid and debris.
CLEANING TIPS
Floor Types Only use on sealed hard floors such as laminate, tile, hardwood, vinyl, stone, and marble.
Dry Debris
Run the floor nozzle slowly over the debris several times, then hold it in place over the mess with the brushroll
running until the debris is completely removed.
Wet Debris + Spills Slowly run the nozzle over wet messes. Repeat until the wet mess is picked up.
Stain Cleaning
You may have to pause the floor nozzle in place over some stains to saturate them with steam in order to
remove them.
Dry stains: Pause the floor nozzle over the stain for 5 seconds, then run the nozzle slowly over the stain
with repeated passes until the stain is gone.
Sticky or thick stains: Pause the floor nozzle over the stain for 10 seconds, then run the nozzle over the
stain repeatedly until it is removed.
Mopping Run the nozzle over the floor as with a standard Steam Pickup.
Sanitize Floors
1. Select LIGHT and NORMAL steam mode and wait at least 20 seconds for the unit to begin producing
steam.
2. To ready the unit for sanitization, start mopping with a forward and backward motion on an
appropriate sealed hard floor surface for three minutes.
3. Move the Steam Pickup slowly and evenly over the area to be sanitized. Slowly repeat for 15 strokes,
making sure to cover the entire area.
Sanitization studies were conducted under controlled test conditions. Be certain to follow all directions
for use carefully to fully sanitize in LIGHT and NORMAL mode. Successful sanitization results have been
demonstrated in laboratory studies performed using the following species of bacteria: Pseudomonas
aeruginosa, Staphylococcus aureus, Escherichia coli, Salmonella enterica (typhi), and Klebsiella
pneumoniae.
3. Remove the Brushroll and Debris Tank: Grip the side
tab and lift out the brushroll, then remove the debris
tank by pulling up on the handle.
4. First, dump out solid waste (fig. 1) then
open the pull tab and pour out liquid waste
(fig. 2).
fig. 1
fig. 2
MAX FILL
Contact Customer Service at 1-800-798-7398 or visit sharkclean.com.
ORDERING REFILLS AND PARTS
Replace the brushroll every 6 months. Use only water in the tank. To order brushrolls or other parts
and accessories, please visit sharkclean.com or scan the QR code.
THREE (3) YEAR LIMITED WARRANTY
 Loading...