G
B
K
C
H I
D
E
F
SAVE THESE INSTRUCTIONS.
READ ALL INSTRUCTIONS BEFORE USING THIS SPOT CLEANER.
IMPORTANT SAFETY INSTRUCTIONS – FOR HOUSEHOLD USE ONLY
A
J
L
M
N
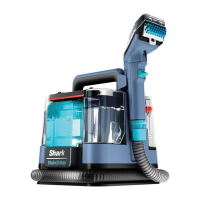
PARTS
For Wet Stains, follow the Stain Guide located on
the hand tool. Turn ON using the power button and
vacuum up the liquid mess. Spray the stain area. Scrub
stain with the bristles, then tilt hand tool forward
and drag across stain area to extract liquid. Repeat if
needed. To avoid longer dry times, do not over spray.
6. Attach hand tool of your choice to the crevice
tool. Plug the power cord into an electrical outlet
and unwrap the hose. Turn ON unit to begin
cleaning. Combining both formulas will give you
the best stain cleaning results.
For Dry Stains, follow the Stain Guide located on
the hand tool. Turn ON using the power button.
Scrub stain with bristles, extract liquid and then
spray the stain area. Scrub stain again, then tilt
hand tool forward and drag across stain area to
extract liquid. Repeat if needed. To avoid longer
dry times, do not over spray.
PX200
SERIES
2. Add water to the CarpetXpert Tank up to the
Water fill line. Then add Shark Deep Clean
Pro Formula to the Concentrate fill line. Do
not use water hotter than 140°F (60°C).
WATER
CONCENTRATE
2
GETTING STARTED WITH YOUR SPOT CLEANER
6
5. Reinstall the StainStriker tank until it clicks into
place.
1
WARNING
To reduce the risk of fire, electric
shock, Injury, or property damage:
1.
Do not put any object into openings. Do not use with any
opening blocked; keep free of dust, lint, hair, and anything
that may reduce air flow.
2.
DO NOT modify the plug provided with the appliance. If the
grounded plug does not fit fully into the outlet, reverse the
plug. If it still does not fit, contact qualified electrician.
3.
DO NOT force into outlet or try to modify it.
4.
DO NOT pull, close door, or wrap around sharp edges or
corners on the cord. To unplug, grasp the plug, not the cord.
Keep cord away from heated surfaces.
5.
To reduce the risk of fire or electric shock due to internal
component damage, use ONLY Shark CarpetXpert/StainStriker
formula in the correct tanks, as intended for use with this
appliance. See Instructions below.
6.
The areas around where you are cleaning may become wet,
use care to avoid slipping and falling.
7.
Use care when removing and reattaching the hand tool to
the Spot Cleaner to avoid accidental activation of the cleaning
solution.
8.
DO NOT spray solution on your skin or in your eyes.
9.
DO NOT fill solution tanks while installed on the appliance.
Remove before filling.
10.
DO NOT operate if there is any wetting of the exterior surfaces
of the appliance. If the appliance is wet, dry with a cloth
before use.
11.
To reduce the risk of shock and unintended operation, turn
off and unplug Spot Cleaner before any adjustment, cleaning,
maintenance, or troubleshooting.
12.
Before each use, carefully inspect each part for damage
or wear. If a part is damaged or worn out, immediately
discontinue use. DO NOT use if any part is damaged or if Spot
Cleaner is not working as it should, has been dropped, left
outdoors, or dropped into water.
13.
DO NOT immerse or spray water on the body of the Spot
Cleaner. To clean the surface, wipe with a dry cloth.
14.
DO NOT allow to be used by children or as a toy. Close
supervision is necessary when used near children.
15.
DO NOT handle plug or Spot Cleaner with wet hands.
16.
DO NOT use without the dirty water tank, clean solution tank,
or filter in place.
17.
Use only identical replacement parts. Only use Shark®
branded filters and accessories.
18.
If plugging unit into extension cord, ensure cord is no more
than 50' to prevent damage to the motor.
19.
DO NOT place Spot Cleaner on uneven surfaces.
20.
DO NOT use to pick up:
a)
Large objects
b)
Hard or sharp objects (glass, nails, screws, or coins)
c)
Large quantities of dust (e.g., drywall dust).
d)
Smoking or burning objects (hot coals, cigarette butts,
or matches)
e)
Flammable or combustible materials (lighter fluid,
gasoline, or kerosene)
f)
Toxic materials (chlorine bleach, ammonia, or drain
cleaner)
21.
DO NOT use the following areas:
a)
Poorly lit areas
b)
Outdoor areas
c)
Spaces that are enclosed and may contain explosive or
toxic fumes or vapors (lighter fluid, gasoline, kerosene,
paint, paint thinners, mothproofing substances, or
flammable dust).
22.
Do not leave appliance when plugged in. Unplug from outlet
when not in use and before servicing.
23.
Keep hair, loose clothing, fingers, and all parts of the body
away from openings and moving parts.
24.
Use extra care when cleaning on stairs.
25.
GROUNDING INSTRUCTIONS: This appliance must be
grounded. If it should malfunction or break down, grounding
provides a path of least resistance for electric current to
reduce the risk of electric shock. This appliance's cord has an
equipment-grounding conductor and a grounding attachment
plug. This appliance is for use on a nominal 120V circuit. Make
sure that the appliance is connected to an outlet with the
same configuration as the plug that is properly installed and
grounded in accordance with all local codes and ordinances. No
adapter should be used with this appliance.
Grounded
Outlet Box
Grounded
Outlet
ounding
26.
Do not store unit where temperatures reach freezing levels to
avoid damaging internal parts.
27.
First aid keep out reach of children. Causes skin and serious
eye irritation. If in eyes, rinse continuously with water for
minutes. Remove contact lenses if present and easy to do so.
Continue rinsing. If on skin, wash with soap and water. If skin
and eye irritation persists, seek medical attention.
28.
Please recycle container. Dispose of contents/container
with licensed waste disposal site in accordance with the
requirements of the local waste disposal authority. Do not
dispose in drains or watercourses in concentrate form.
A
CarpetXpert Tank
B
Dirty Water Tank
C
StainStriker Tank
D
Crevice Tool
E
3.5" Hand Tool
F
Hose-Cleaning Tool
G
Reversible Bristles
H
6 oz. Deep Clean
Pro Formula
I
12 oz. OXY Multiplier
J
Spray Trigger
K
Power Button
L
Detach Button
M
7" Hand Tool
N
Pet Mess Tool
Tips
1. For cleaning softer fabrics and easy ability to clean hair and debris from bristles, use the rubber
side of the Reversible Bristles.
2. To rinse carpet or upholstery after cleaning, remove or empty the StainStriker tank and fill the
CarpetXpert tank with water ONLY before spraying.
5
3. Reattach the cap, then reinstall the tank
until it clicks into place.
3
Tip: For smaller stains, use the 3.5" Hand Tool Attachment. For larger areas, use the 7" Attachment.
Crevice Tool - Best for removing stains in tight spaces and spraying directly on the stain.
3.5" Hand Tool - Excellent for cleaning small stain areas on carpet and upholstery.
7" Hand Tool - Great for cleaning larger stain areas.
Pet Mess Tool - Collects pet messes and keeps them out of the interior of the unit.
NOTE: Not all accessories come with all units. Tools may vary by model. For additional accessories
available, please visit sharkaccessories.com
1. Lift CarpetXpert Tank by the handle to
detach it, then remove the cap.
1
IMPORTANT: Vacuum with traditional vacuum cleaner first before using Spot Cleaner.
4
4. Lift StainStriker Tank by its sides to
remove it, and fill with Shark OXY
Multiplier. Replace the cap and tighten it.
SPRAY SCRUB EXTRACT