Part
names
A,
B,
C, D: Select 4 preset favorite channels
in
4 different
categories. (See page
25
for details.)
While watching, you can toggle
the
selected channels by pressing
A,
B, C and
D.
27
FAVORITE: Set the favorite channels. (See page 25.)
28
CC: Display captions from a
closed-caption
source. (See
page
39.)
29
AV MODE: Select an audio
or
video setting.
(When
the
input source is
TV,
INPUT
1,2
or
3: STANDARD,
MOVIE, GAME, USER, DYNAMIC (Fixed), DYNAMIC. When the
input source
is
INPUT
4,5,6
or
7:
STANDARD, MOVIE, GAME,
PC, USER, DYNAMIC (Fixed), DYNAMIC) (See
page
38.)
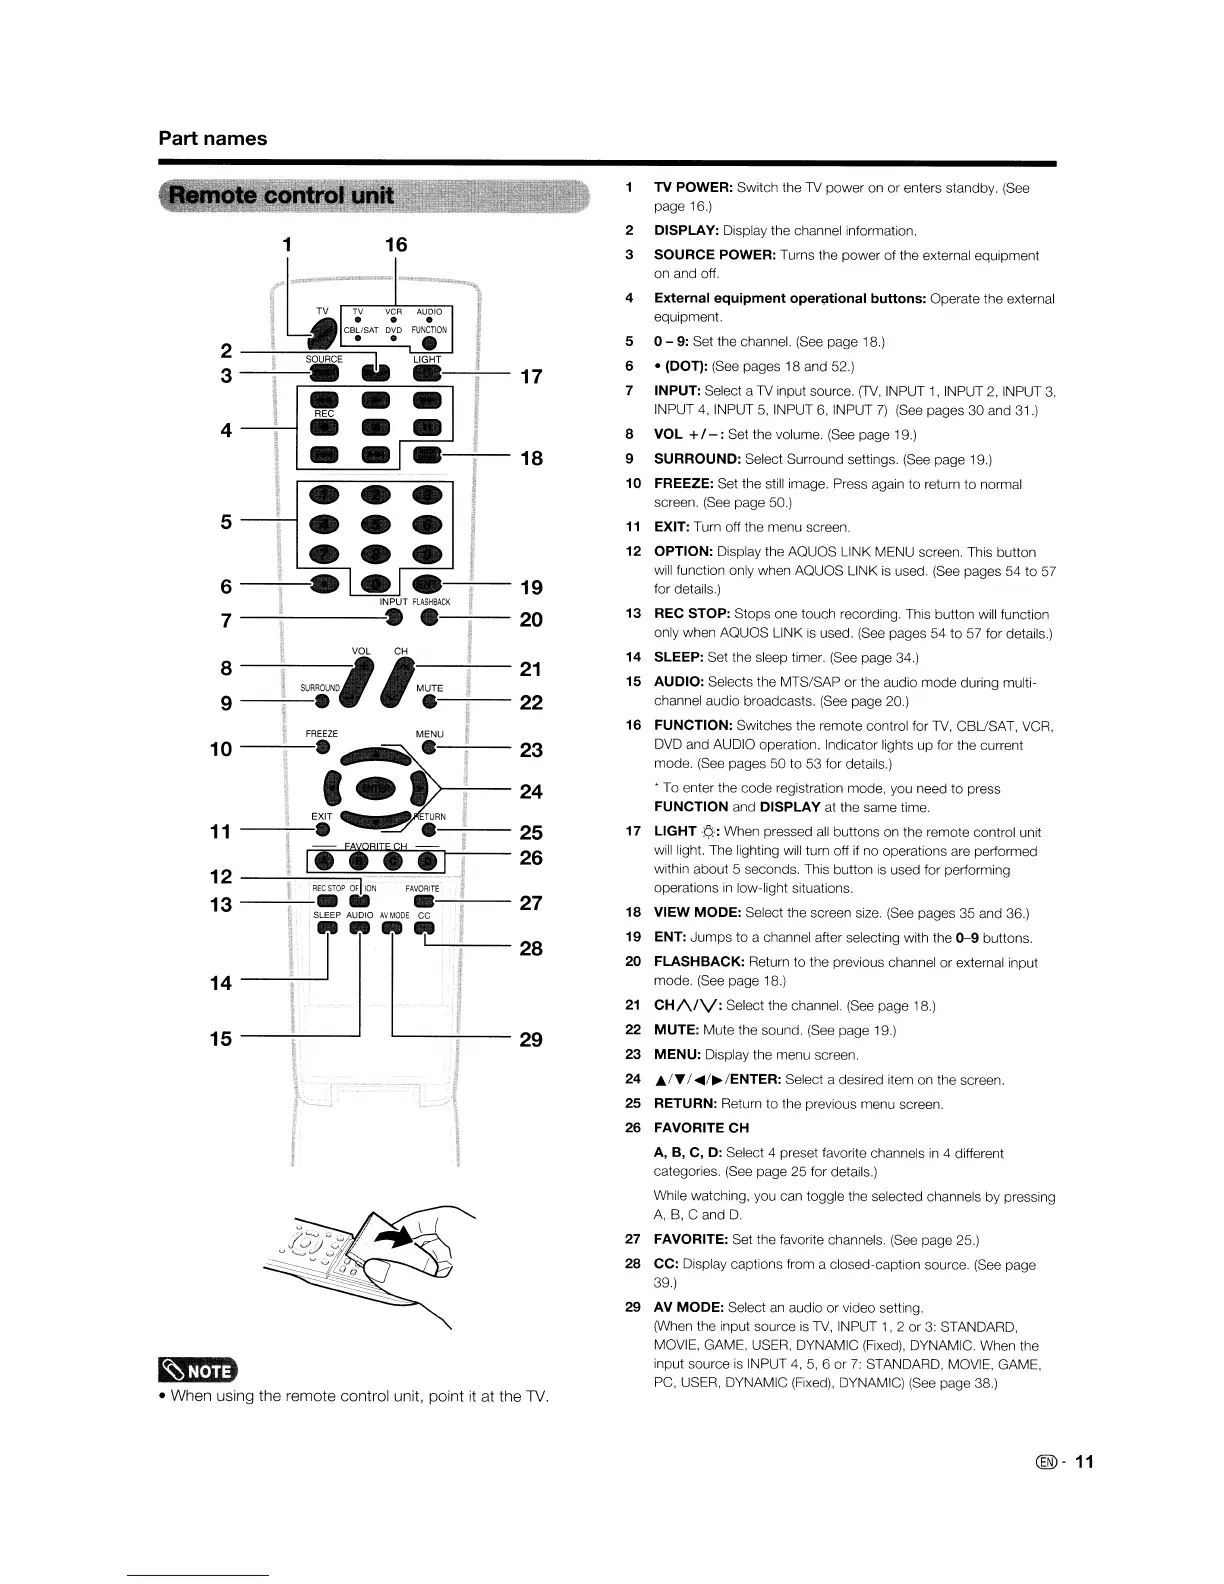
TV
POWER: Switch
the
TV
power
on
or
enters standby. (See
page
16.)
2
DISPLAY: Display the channel information.
3
SOURCE POWER: Turns the
power
of
the external
equipment
on and off.
4
External
equipment
operational
buttons:
Operate the external
equipment.
5 0 - 9: Set
the
channel. (See
page
18.)
6 • (DOT): (See pages
18
and 52.)
7
INPUT: Select a
TV
input source.
(TV,
INPUT 1, INPUT 2, INPUT
3,
INPUT 4, INPUT
5,
INPUT
6,
INPUT
7)
(See pages
30
and 31.)
8
VOL
+/-:
Set the volume. (See
page
19.)
9
SURROUND: Select Surround settings. (See page 19.)
10
FREEZE: Set the still image. Press again
to
return
to
normal
screen. (See
page
50.)
11
EXIT: Turn off the menu screen.
12
OPTION: Display the
AQUOS
LINK MENU screen. This
button
will function only when
AQUOS
LINK is used. (See pages
54
to
57
for details.)
13
REC STOP:
Stops
one
touch
recording. This
button
will function
only when AQUOS LINK
is
used. (See pages
54
to
57
for
details.)
14
SLEEP: Set the sleep timer. (See page 34.)
15
AUDIO: Selects
the
MTS/SAP
or
the audio
mode
during multi-
channel audio broadcasts. (See
page
20.)
16
FUNCTION: Switches the remote control for
TV,
CBUSAT,
VCR,
DVD and AUDIO operation. Indicator lights
up
for the current
mode. (See pages
50
to
53
for details.)
* To enter
the
code
registration mode, you need
to
press
FUNCTION and DISPLAY at the same time.
17
LIGHT
-\5.-:
When pressed
all
buttons
on the remote control unit
will light. The lighting will turn off if
no
operations are performed
within
about
5 seconds. This
button
is
used for performing
operations
in
low-light situations.
18
VIEW MODE: Select the screen size. (See pages
35
and 36.)
19
ENT:
Jumps
to
a channel after selecting with the
0-9
buttons.
20
FLASHBACK: Return
to
the previous channel
or
external input
mode.
(See page 18.)
21
CH/\/V:
Select the channel. (See page 18.)
22
MUTE:
Mute
the sound. (See
page
19.)
23
MENU: Display the menu screen.
24
,./T
I
.....
/~/ENTER:
Select a desired item on the screen.
25
RETURN: Return
to
the
previous menu screen.
26
FAVORITE CH
17
18
""------
29
16
• •
•
19
20
VOL CH
21
22
23
24
25
26
27
28
1
4
6
7
2
-----~~-......,
3
5
8
9----
..
15
14
12
----!.--===~~~:::'
..........................••.••
13--~·"
10
11
• When using the remote control unit, point
it
at the
TV.
@)-
11
Part
names
A,
B,
C, D: Select 4 preset favorite channels
in
4 different
categories. (See page
25
for details.)
While watching, you can toggle
the
selected channels by pressing
A,
B, C and
D.
27
FAVORITE: Set the favorite channels. (See page 25.)
28
CC: Display captions from a
closed-caption
source. (See
page
39.)
29
AV MODE: Select an audio
or
video setting.
(When
the
input source is
TV,
INPUT
1,2
or
3: STANDARD,
MOVIE, GAME, USER, DYNAMIC (Fixed), DYNAMIC. When the
input source
is
INPUT
4,5,6
or
7:
STANDARD, MOVIE, GAME,
PC, USER, DYNAMIC (Fixed), DYNAMIC) (See
page
38.)
TV
POWER: Switch
the
TV
power
on
or
enters standby. (See
page
16.)
2
DISPLAY: Display the channel information.
3
SOURCE POWER: Turns the
power
of
the external
equipment
on and off.
4
External
equipment
operational
buttons:
Operate the external
equipment.
5 0 - 9: Set
the
channel. (See
page
18.)
6 • (DOT): (See pages
18
and 52.)
7
INPUT: Select a
TV
input source.
(TV,
INPUT 1, INPUT 2, INPUT
3,
INPUT 4, INPUT
5,
INPUT
6,
INPUT
7)
(See pages
30
and 31.)
8
VOL
+/-:
Set the volume. (See
page
19.)
9
SURROUND: Select Surround settings. (See page 19.)
10
FREEZE: Set the still image. Press again
to
return
to
normal
screen. (See
page
50.)
11
EXIT: Turn off the menu screen.
12
OPTION: Display the
AQUOS
LINK MENU screen. This
button
will function only when
AQUOS
LINK is used. (See pages
54
to
57
for details.)
13
REC STOP:
Stops
one
touch
recording. This
button
will function
only when AQUOS LINK
is
used. (See pages
54
to
57
for
details.)
14
SLEEP: Set the sleep timer. (See page 34.)
15
AUDIO: Selects
the
MTS/SAP
or
the audio
mode
during multi-
channel audio broadcasts. (See
page
20.)
16
FUNCTION: Switches the remote control for
TV,
CBUSAT,
VCR,
DVD and AUDIO operation. Indicator lights
up
for the current
mode. (See pages
50
to
53
for details.)
* To enter
the
code
registration mode, you need
to
press
FUNCTION and DISPLAY at the same time.
17
LIGHT
-\5.-:
When pressed
all
buttons
on the remote control unit
will light. The lighting will turn off if
no
operations are performed
within
about
5 seconds. This
button
is
used for performing
operations
in
low-light situations.
18
VIEW MODE: Select the screen size. (See pages
35
and 36.)
19
ENT:
Jumps
to
a channel after selecting with the
0-9
buttons.
20
FLASHBACK: Return
to
the previous channel
or
external input
mode.
(See page 18.)
21
CH/\/V:
Select the channel. (See page 18.)
22
MUTE:
Mute
the sound. (See
page
19.)
23
MENU: Display the menu screen.
24
,./T
I
.....
/~/ENTER:
Select a desired item on the screen.
25
RETURN: Return
to
the
previous menu screen.
26
FAVORITE CH
17
18
""------
29
16
• •
•
19
20
VOL CH
21
22
23
24
25
26
27
28
1
4
6
7
2
-----~~-......,
3
5
8
9----
..
15
14
12
----!.--===~~~:::'
..........................••.••
13--~·"
10
11
• When using the remote control unit, point
it
at the
TV.
@)-
11
 Loading...