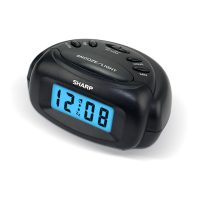
SPC237A Qi Wireless Charging Alarm Clock
Instruction Manual & Warranty
Thank you for your purchase of this quality clock. The utmost care has gone into the design and
manufacture of your clock. Please read these instructions and store them in a safe place for future
reference.
CONTROLS
1. PM indicator
2. Qi indicator
3. AL. VOL HI/LO switch
4. ALARM 1 button
5. ALARM 2 button
6. SNOOZE/DIMMER button
7. HOUR button
8. MIN button
9. TIME button
10. Alarm 1 indicator
11. Alarm 2 indicator
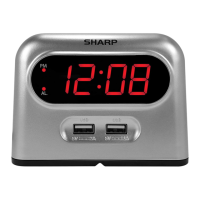
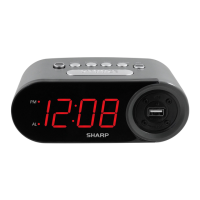
12. USB charging ports
13. Qi wireless charging area
CONNECTING TO THE POWER SUPPLY
Begin by plugging in the power cord into a standard household outlet. The display will flash indicating
the time is ready to be set.
INSTALLING THE TIME & ALARM BACK UP BATTERY
The clock time and alarm (if set) can be main
tained during a power failure by 2 x AAA batteries (not
supplied). Once the power is restored, check the time to make sure it is accurate and re-set if necessary.
INSERTING THE BATTERY
1. Open the battery compartment at the back of the unit by pressing on the catch and removing the cover.
2. Insert 2 x AAA battery (preferably alkaline batteries) into the battery compartment, following the
polarity as shown on the diagram inside the compartment.
3. Replace the battery compartment cover.
Qi WIRELESS CHARGING
- Place your wireless device on top of the clock, charging will begin on contact.
- When wireless charging, the Qi indicator is continuously solid.
Note:
- When the phone is being charged your phone charging indicator will show as normal.
- For maximum charging efficiency, the phone must be aligned with the center of the charging area.
USB CHARGING
To charge, connect your USB dev
ice to the USB port of this clock.
Note:
- Use only with devices that require 5V USB power.
- Each USB port provides 2,000mA recharging current. Devices requiring more than 2,000mA should not
be used.
- Charging time may vary for different devices.
- This device is to be used ONLY for SMARTPHONES. Charging TABLETS & LAPTOPS will void the warranty.
SETTING THE CLOCK
- Press and hold the TIME button down to activate time setting.
- While holding down the TIME button, press the HOUR button to advance to the correct hour. The PM
indicator will light when the hour is advanced into the PM time.
- While holding down the TIME button, press the MIN button to advance to the correct minute.
- Release the TIME button when the correct time is shown on the display.
SETTING THE ALARM
- Press and hold the ALARM 1/2 button down to activate alarm setting.
- While holding down the ALARM 1/2 button, press the HOUR button to advance to the correct hour.
The PM indicator will light when the hour is advanced into the PM time.
- While holding down the ALARM 1/2 button, press the MIN button to advance to the correct minute.
- Release the ALARM 1/2 button when the correct alarm time is shown on the display.
USING THE ALARM FUNCTION
- Press the ALARM 1/2 button to activate the alarm and the alarm indicator will light up the display.
- Slide the AL. VOL HI/LO switch to adjust the alarm volume from high to low.
- Press the ALARM 1/2 button again to deactivate the alarm and the alarm indicator will no longer be visible.
CARE OF YOUR CLOCK
- Replace the back up battery annually, or store the clock without a battery when not in use.
- A soft c
loth or a paper towel may be used to clean your clock.
- Do not use any corrosive cleanser or chemical solutions on the clock.
- Keep your clock dry; if it gets wet, wipe it dry immediately. Keep your clock away from dust and dirt.
Handle your clock carefully; do not drop it.
- Do not subject the clock to excessive force, shock, dust, temperature, or humidity. Any of these
conditions may shorten the life of the clock.
- Do not tamper with any of the internal components of this clock. This will invalidate the warranty and
may cause damage.
Qi COMPATIBLE WITH:
- Samsung Galaxy: S20 Ultra, S20 Plus, S20, Note 10 Plus 5G, Note 10 Plus, Note 10, S10 5G,
S10 Plus, S10, S10e, Note 9, S9, S9+, Note 8, S8, S8+, S7, S7 Edge
- Apple iPhone: SE 2020, 11 Pro Max, 11 Pro, 11, XS Max XS, XR, 8, 8 Plus and all Qi-enabled
smartphones!
SNOOZE FUNCTION
- Pressing the SNOOZE button after the alarm sounds will cause the alarm to pause and the alarm will
sound again in 9 minutes. This will happen each time the SNOOZE button is pressed.
DIMMER FUNCTION
- Press the DIMME
R button to adjust the brightness of the LED display.
The dimmer has three levels of brightness; High, Medium & Low
SAFETY WARNING:
Only place Qi approved charging devices onto the charging pad. Please
do not place keys, coins or other metal objects onto the charging pad.
The “Qi” symbol is a trademark of the Wireless Power Consortium.
The product is designed for Qi Certificate.
1
12
2
3
4
5
6 7 8 9
10
11
13