EasyManua.ls Logo

Sharpal 191H - User Manual

Sharpal 191H
3 pages
Print Icon
To Next Page IconTo Next Page
Loading...
User Manual
Item No. 191H
BEFORE SHARPENING:
Place the sharpener on a flat surface. (See Fig. 1)
To prevent the sharpener and table from being cut by knife or scissors, place the sharpener as close as possible to the
table edge while sharpening. (See Fig. 2)
Press down the black lever securing the suction pad on surface. When you finish sharpening, pull the lever up, the
sharpener will be separate from the table. (See Fig. 3)
KNIFE SHARPENING INSTRUCTION:
Knife includes all knives of double-beveled edge. This sharpener is not suitable for single-beveled edge knives.
1. Insert blade fully and vertically into appropriate sharpening slot at a 90-degree angle to the sharpener. Gently pull
the knife blade with light pressure from heel to tip in direction of indicator arrows. (See Fig. 4)
No. 1 V-Notch slot (Coarse CARBIDE) - Quickly set a new edge
No. 2 V-Notch slot (Fine CERAMIC) - Hone for a smooth finished edge
Note: Light pressure is sufficient when using the knife sharpener. Heavy pressure might cause to lose control of the
knife and could cause possible injury. Carefully and gradually increase pressure until the desired result is achieved.
The No. 2 CERAMIC slot is for fine honing of slightly dull edge. The The No. 1 CARBIDE slot is for dull or damaged edge
that requires new edge setting. Try to sharpen with No. 2 CERAMIC slot firstly for your valuable knives.
Use No. 2 CERAMIC slot only to sharpen your serrated edge knife. (See Fig.5)
Question and Answer IconNeed help?

Do you have a question about the Sharpal 191H and is the answer not in the manual?

Summary

Sharpening Preparation

Sharpener Placement and Securing

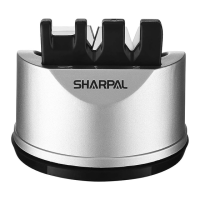
Place sharpener on flat surface, near table edge, and secure suction pad using the lever.

Knife Sharpening Guide

Knife Compatibility and Slot Usage

Suitable for double-beveled knives only. Use slot 1 for coarse sharpening, slot 2 for fine honing.

Sharpening Technique and Pressure

Insert blade vertically at 90 degrees. Pull heel to tip with light, consistent pressure.

Sharpening Serrated Knives

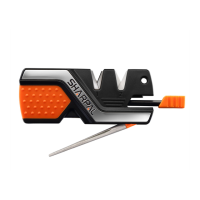
Use the No. 2 CERAMIC slot only to sharpen serrated edge knives.

Scissors Sharpening Instructions

Scissors Sharpening Technique

Sharpen only the beveled side of single-beveled scissors blades with light pressure.

Removing Sharpening Burrs

Remove burrs by opening and closing the sharpened scissors several times.

Maintenance and Safety

Care and Lubrication

Clean exterior with a damp cloth. No oil or lubricating liquid is necessary.

Safety Precautions

Wear gloves when sharpening. Do not place free hand on sharpener during use.

Product Warnings

This product is not a toy. Keep out of reach of children.

Overview

The SHARPAL Item No. 191H is a versatile sharpening tool designed for various cutting implements, including knives, scissors, and other blades. Its compact and user-friendly design makes it suitable for both household and non-industrial use.

Function Description

The device offers three primary sharpening functions:

  • Coarse Sharpening: Utilizes a CARBIDE V-notch slot (No. 1) to quickly set a new edge on dull or damaged knife blades.
  • Fine Honing: Employs a CERAMIC V-notch slot (No. 2) to hone for a smooth, finished edge on slightly dull knives or to refine an edge after coarse sharpening. This slot is also recommended for sharpening serrated edge knives.
  • Scissors Sharpening: Features a dedicated horizontal carbide sharpening blade for single-beveled scissors.

Usage Features

The SHARPAL 191H is designed for ease of use and safety:

  • Stable Placement: Before sharpening, the device should be placed on a flat surface. It incorporates a black lever that activates a suction pad, securely attaching the sharpener to the table. To release, simply pull the lever up.
  • Optimal Positioning: To prevent accidental cuts to the sharpener or table, it is recommended to place the sharpener as close as possible to the table edge during use.
  • Knife Sharpening:
    • Suitable for all double-beveled edge knives. Not recommended for single-beveled edge knives.
    • Insert the blade fully and vertically into the chosen V-notch slot at a 90-degree angle to the sharpener.
    • Gently pull the knife blade from heel to tip in the direction indicated by arrows, applying light pressure.
    • For valuable knives, it's advised to try the No. 2 CERAMIC slot first for fine honing. The No. 1 CARBIDE slot is for dull or damaged edges requiring a new edge.
    • Light pressure is sufficient; excessive pressure can lead to loss of control and potential injury. Pressure should be increased carefully and gradually until the desired result is achieved.
    • Always pull the blade through the slot; never move it back and forth.
  • Serrated Edge Knife Sharpening: Use only the No. 2 CERAMIC slot for sharpening serrated edge knives.
  • Scissors Sharpening:
    • Only sharpen the beveled side of each blade.
    • Open the scissors and lay the edge of the beveled side of one blade across the horizontal carbide sharpening blade (located above the scissors icon).
    • Ensure the open hinged scissors blade is all the way up to the horizontal carbide sharpening blade and angled so the bevel side fully leans on the sharpening blade.
    • With light pressure, pull the blade in the direction of the arrow with a downward motion, following the preset angle. Repeat several times until a sharp edge is achieved. Do not push the scissors blade over the sharpening blade.
    • After sharpening, burrs can be removed by setting the scissors back together and opening/closing them a few times.

Maintenance Features

  • Cleaning: The exterior of the sharpener can be cleaned with a damp, soft cloth.
  • Lubrication: Oil or other lubricating liquids are not necessary for this device.

Safety Warnings

  • It is recommended to wear gloves when sharpening a blade with this product.
  • There is no need to place a free hand on top of the sharpener during use.
  • This product is not a toy and should be kept out of the reach of children.

Warranty Information

Each SHARPAL product comes with a 3-year warranty from the date of purchase, covering defects in material and workmanship under normal wear and tear. This warranty excludes damage caused by misuse or alteration and applies only to non-industrial or non-commercial use. For warranty claims, contact SHARPAL via their website or email at warranty@sharpal.com.

For additional resources, a demo video is available on YouTube at bit.ly/191video. User manuals in Spanish and French can be downloaded from www.sharpal.com.

Sharpal 191H Specifications

General IconGeneral
BrandSharpal
Model191H
CategoryAccessories
LanguageEnglish

Related product manuals