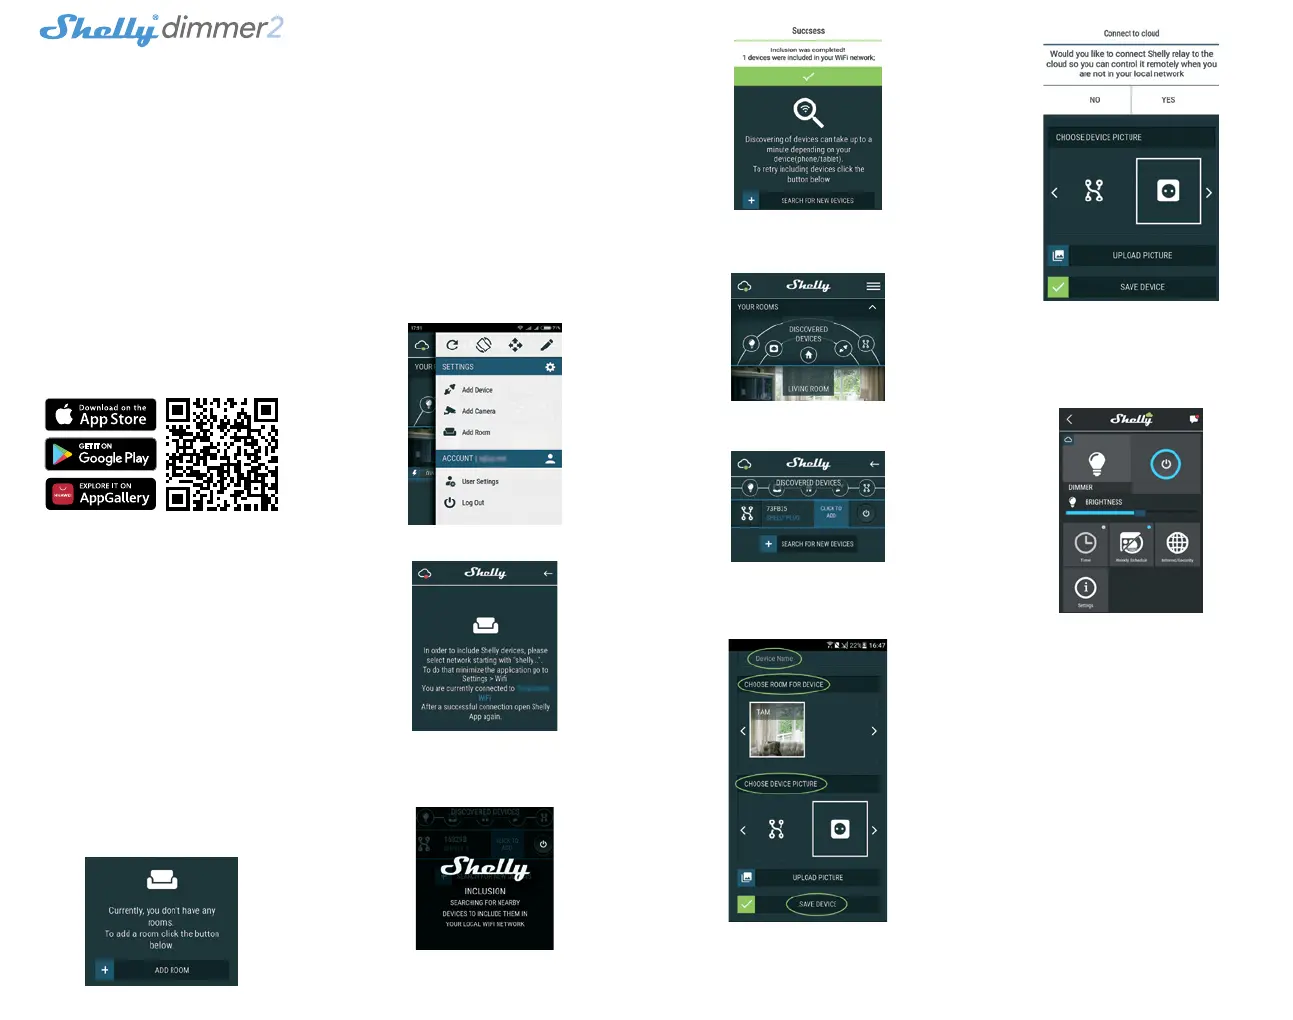
INITIAL INCLUSION
Before installing/mounting the Device ensure that the grid is
powered off (turned down breakers).
Connect the Device to the power grid and install it in the con-
sole behind the switch/power socket following the scheme
that suites the desired purpose.
• Connecting to a standard power grid with neutral – g. 1
• Connecting to a power grid without neutral, with a minimal
consumption of 10W – g. 2
• Connecting to a standard power grid with neutral, and
switches also connected to neutral – g. 3
• Connecting to a power grid without neutral, with no mini-
mal consumption and using Shelly Bypass – g. 4
You may choose if you want to use Shelly with the Shelly
Cloud mobile application and Shelly Cloud service. You can
also familiarize yourself with the instructions for Manage-
ment and Control through the embedded Web interface.
CONTROL YOUR HOME WITH YOUR VOICE
All Shelly devices are compatible with Amazon Echo and
Google Home. Please see our step-by-step guide on:
https://shelly.cloud/compatibility/Alexa
https://shelly.cloud/compatibility/Assistant
SHELLY APPLICATION
Shelly Cloud gives you opportunity to control and adjust all
Shelly® Devices from anywhere in the world. You only need
an internet connection and our mobile application, installed
on your smartphone or tablet.
Registration
The rst time you load the Shelly Cloud mobile app, you have
to create an account which can manage all your Shelly® de-
vices.
Forgotten Password
In case you forget or lose your password, just enter the e-mail
address you have used in your registration. You will then re-
ceive instructions to change your password.
⚠WARNING! Be careful when you type your e-mail address
during the registration, as it will be used in case you forget
your password.
First steps
After registering, create your rst room (or rooms), where you
are going to add and use your Shelly devices.
Shelly Cloud gives you opportunity to create scenes for auto-
matic turning on or off of the Devices at predened hours or
based on other parameters like temperature, humidity, light
etc. (with available sensor in Shelly Cloud).
Shelly Cloud allows easy control and monitoring using a mo-
bile phone, tablet or PC.
Device Inclusion
To add a new Shelly device, install it to the power grid fol-
lowing the Installation Instructions included with the Device.
Step 1
After the installation of Shelly following the Instalation In-
structions and the power is turned on, Shelly will create its
own WiFi Access Point (AP).
⚠WARNING! In case the Device has not created its own WiFi
network with SSID like shellydimmer2-35FA58 check if you
have connected Shelly correctly by the wiring schemes. If you
do not see an active WiFi network with SSID like shellydim-
mer2-35FA58, reset the Device. If the Device has been pow-
ered on, you have to power it off and on again. After turning the
power on, you have 60 seconds to press 5 consecutive times
either switch connected I1/I2. Or if you have physical access
to the Device, press and hold the reset button for 10 seconds.
Shelly should return to AP Mode. If not, please repeat or con-
tact our customer support at support@Shelly.cloud
Step 2
Choose “Add Device”. In order to add more Devices later, use
the app menu at the top right corner of the main screen and
click “Add Device”. Type the name (SSID) and password for
the WiFi network, to which you want to add the Device.
Step 3
If using iOS: you will see the following screen:
Press the home button of your iPhone/iPad/iPod. Open
Settings > WiFi and connect to the WiFi network created by
Shelly, e.g. shellyswitch25-35FA58. If using Android your
phone/tablet will automatically scan and include all new
Shelly Devices in the WiFi network that you are connected to.
Upon successful Device Inclusion to the WiFi network you will
see the following pop-up:
Step 4
Approximately 30 seconds after discovery of any new Devic-
es оn the local WiFi network, а list will be displayed by default
in the “Discovered Devices” room.
Step 5
Enter Discovered Devices and choose the Device you want to
include in your account.
Step 6
Enter a name for the Device (in the Device Name eld).
Choose a Room, in which the Device has to be positioned.
You can choose an icon or add a picture to make it easier to
recognize. Press “Save Device”.
Step 7
To enable connection to the Shelly Cloud service for remote
control and monitoring of the Device, press “YES” on the fol-
lowing pop-up.
Shelly devices settings
After your Shelly device is included in the app, you can control
it, change its settings and automate the way it works.
To switch the Device on and off, use the Power button.
To enter at the details menu of the Device, click on it’s name.
From the details menu you may control the Device, as well as
edit its appearance and settings.
Timer - Тo manage the power supply automatically, you may
use:
• Auto OFF: After turning on, the power supply will automat-
ically shutdown after a predened time (in seconds). A value
of 0 will cancel the automatic shutdown.
• Auto ON: After turning off, the power supply will be auto-
matically turned on after a predened time (in seconds). A
value of 0 will cancel the automatic power-on.
Weekly Schedule - This function requires an Internet con-
nection.
To use Internet, your Shelly has to be connected to a local
WiFi network with an active internet connection. Shelly may
turn on/off automatically at a predened time, at sunrise/
sunset, or at a specied time before or after sunrise/sunset.
Multiple schedules are possible.
Internet/Security
• WiFi Mode - Client: Allows the device to connect to an avail-
able WiFi network. After typing the details in the respective
elds, press Connect.
• WiFi Client Backup: Add a backup WiFi network, in case
your primary one becomes unavailable.
• WiFi Mode - Acess Point: Congure Shelly to create a Wi-Fi
Access point. After typing the details in the respective elds,
press Create Access Point.
Cloud - Enable or Disable connection to the Cloud service.
Restrict Login - Restrict the web interface of Shely with a Us-
ername and Password. After typing the details in the elds,
press Restrict Shelly.

 Loading...