5
55
5
5
55
5-
--
-2. Setting Method
2. Setting Method2. Setting Method
2. Setting Method
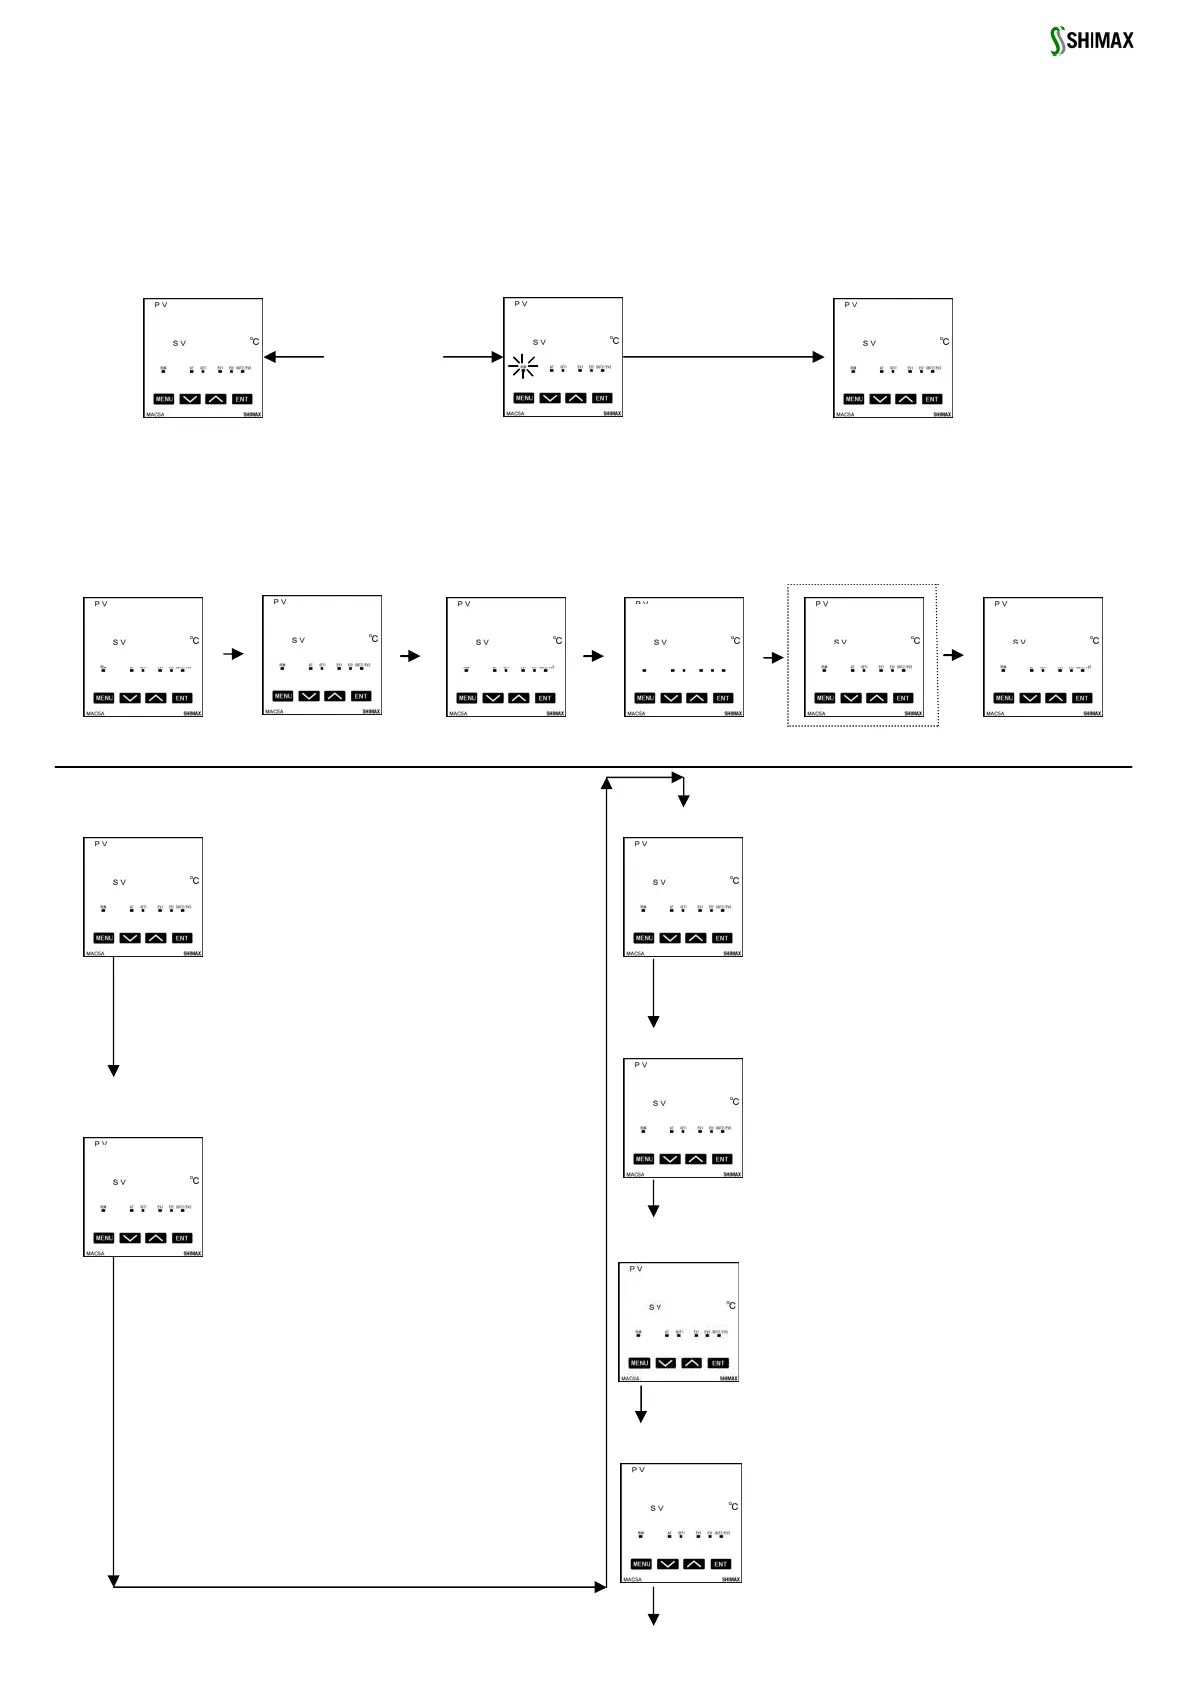
To change settings, display an appropriate screen and change the setting (value or function) by pressing or key.
On the output monitor screen of basic screens, you can change the control output from "Automatic" to "manual" ,and save its change of setting. Display the
output monitor screen, and then press key for three seconds to shift from Automatic to Manual. Then by pressing or key, you can adjust to the
desirable output value. In this case, no need to press key in order to determine the change of setting.
Press key for three seconds as well to shift back to Automatic. Excluding when a key lock is OFF, Automatic ⇔ Manual switchover does not work while
STBY<RST> and AT are in operation.
In the case of two-output type, the switchover between automatic and manual is operatable through output 1 and output 2. The setting is altered
simultaneously.
5
55
5-
--
-3. Power
3. Power3. Power
3. Power-
--
-on and initial screen display
on and initial screen displayon and initial screen display
on and initial screen display
At power-on, the display section shows each screen of initial screens for one second , then moves on to the basic screen.
Output monitor Output monitor Output monitor
Automatic screen Run LED right up Manual screen RUN LED blinks Manual screen RUN LED blinks
three seconds
or
All LED light up
Input type
Upper limit & lower
limit
Out 1 type
Out 2 type
Displays only optional addition
5
55
5-
--
-4. Monitoring screen
4. Monitoring screen 4. Monitoring screen
4. Monitoring screen
Basic screen
Executed SV initial value:Sensor input 0
Linear input Lower limit of scaring range
Setting range:Sensor input Within measuring range
Linear input With in scaring range
Within SV limiter besides
Targeted value (PV) is displayed on the upper row as
four-digit ,and targeted value (SV) is displayed on the
lower row also as four-digit. (Notes:hereinafter
measured value and targeted value are referred to
as"PV" and "SV")
At the time of FIX, execution SV is displayed and
change of setting is possible.
Initial value::(stanby)(Initial value at the time
of constant value control)
Setting range:: Control stop [Output OFF
(0%)] operation
conduct of control
operation Choose (RUN) by key. Decide by
key, then Monitor LED's RUN lights up to start control
operation.
Choose by key、Decide by key, Then
Monitor LED's RUN lights off and becomes control stop
[Output OFF (0%)] conducting.
When measuring range, a unit, scaling, and output
characteristics are changed it is initialized and
is displayed.
Priority is given to DI when RUN is allotted to external
control input.
DI. Key operation cannot be performed unless allotment
is canceled.
Action Mode1 screen
Manual output setting range: :0.0-100.0% (within
output limiter) At the time of automatic
output,monitor display only. Refer to Item 5-2 about
automatic ⇔ manual switch over, and setting
method at the time of manual operation. A manual
output is canceled when an operation mode is made
into When a power source is intercepted
and re-switched on, it returns to the condition just
before intercepting.
Out put 1 monitoring screen
Out put 2 monitoring screen
Contents are the same with that of an Output1.
Output 2 monitoring screen displayed only when
Output 2 option is added.
PID No, monitoring screen
Chosen PID № is displayed when FIX is in
operation.
PID № of output 1 is displayed in the first digital,
and PID № of output 2 is displayed in the third
digital. The third digital is shown as when there is
no output 2 option. This screen is not displayed in
the state of STBY .
SV No, monitoring screen
Chosen SV № is displayed when FIX is in operation.