EasyManua.ls Logo

Shure CVO-B/C User Manual

Shure CVO-B/C
2 pages
To Next Page IconTo Next Page
Page #1 background imageLoading...
Page #1 background image
©2013 Shure Incorporated
27A20378 (Rev. 3)
Model Variations
CVO-B/C: Cardioid, black
CVO-W/C: Cardioid, white
Centraverse Overhead Microphone
The Centraverse CVO is a professional low pro-
file electret condenser microphone designed for
overhead sound reinforcement applications. An in-
tegrated wire aiming hanger is included for optimal
placement above choirs and other ensembles with
minimal effort.
Note: Model availability depends on region.
See your local Shure dealer or distributor for
details.
CVO
4
5
Features
• Cardioid pickup pattern
• Commshield® technology guards against
unwanted RF interference from portable
wireless devices (smartphones, etc.)
• Superior Shure design and rugged, dependable
construction
• Attached 25 ft XLR cable
• Included snap-fit windscreen
Installation
1. Attach the wire hanger:
• Snap the wire into the groove on the microphone body.
• Guide the cable through the spiral at the end of the wire,
beginning at the bottom and working toward the exit.
2. Hang the microphone according to the guidelines for placement.
3. Aim the microphone toward the sound source by holding the wire
hanger in place and twisting the microphone body.
4. If necessary, tie a strong transparent thread or fishing line to the loop at
the end of the wire hanger and attach it to a ceiling anchor for additional
stability.
5. Connect the XLR cable to a mixer or P.A. system.
Note: This microphone requires +48V phantom power to operate.
.6 – 1 m
(2 – 3 ft.)
.6 – 1 m
(2 – 3 ft.)
1.8 – 3m
(6 – 9 ft.)
0.6 – 1m
(2-3 ft.)
Microphone Placement and Use
1. 3:1 Rule: If using multiple Shure Centraverse overhead micro-
phones, the distance between the microphones should be three
times greater than the distance between the microphone and the
sound source.
2. Choir Installations: Place the microphone in front of the choir, above
their heads and aimed at the back row.
3. Windscreen: Use the supplied snap-fit windscreen to eliminate wind
noise and plosives. To install the windsreen, snap it into the first groove
on the microphone head. To remove the windscreen, locate the gap
in the ring and use your fingernail to pull the windscreen off from the
right-hand side.
Centraverse™ Series
Installed Sound Microphones
CVO
Question and Answer IconNeed help?

Do you have a question about the Shure CVO-B/C and is the answer not in the manual?

Shure CVO-B/C Specifications

General IconGeneral
TypeCondenser
Polar PatternCardioid
Output Impedance150 Ohms
ColorBlack
Max SPL130 dB SPL
ConnectorXLR

Summary

Installation

Attach Wire Hanger

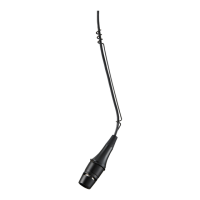
Snap the wire into the groove on the microphone body and guide the cable through the spiral.

Hang and Aim Microphone

Hang the microphone according to guidelines and aim it toward the sound source by twisting the body.

Secure and Connect

Optionally tie thread for stability and connect the XLR cable to a mixer or P.A. system.

Microphone Placement and Use

3:1 Rule for Multiple Microphones

Ensure distance between microphones is three times greater than distance to sound source.

Choir Installation Placement

Place microphones in front of choir, above heads, aimed at the back row.

Windscreen Installation

Snap windscreen onto the first groove of the microphone head to reduce noise.

Specifications Overview

Electrical and Performance Specs

Details cartridge type, polarity, frequency response, impedance, sensitivity, SPL, and noise.

Environmental and Power Specs

Covers operating conditions, humidity, power requirements, and microphone weight.

Accessories

Furnished Accessories

Lists included items: wire aiming hangers and windscreens in black/white.

Optional Accessories

Lists optional items: 4-pack windscreens in black or white.

Certifications

Compliance and Contact

Meets essential European Directives, eligible for CE marking, provides contact info.

Related product manuals