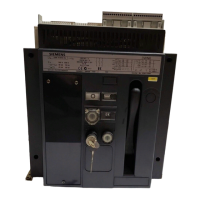
EasyManua.ls Logo

Siemens 3WX3623 Series - User Manual

Siemens 3WX3623 Series
10 pages
Print Icon
To Next Page IconTo Next Page
Loading...
1
3WN6
Betriebsanleitung/Operating Instructions Bestell-Nr./Order No.: 3ZX1812-0WX36-0FA0 / 9239 9821 422 0-
Inhalt der Packeinheit (Stückliste siehe Seite 3 / Contents of pack (see page 3 for list of parts) / Vérification du conte-
nu de l’emballage (liste des pièces, voir page 3) / Comprobar el contenido del paquete (Ver lista de piezas en página
3) / Contenuto della confezione (per la lista dei pezzi vedere pag.3) / Förpackningens innehåll (stycklista se sidan 3)
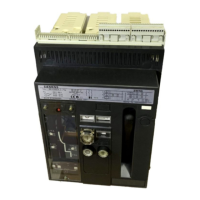
Anschlußschienen für Einschubrahmen Baugröße I 3WX3623-...00
Connecting bars for guide frame size I
Pièces de raccordement pour châssis de guidage taille I
Barras de conexión para bastidor guía tamaño I
Sbarre di allacciamento per parte fissa grandezza costruttiva I
Anslutningsskenor för utdragskassett storlek I
1 Waagerechter Anschluß 1000 A
2 Waagerechter Anschluß 1600 A
3 Vertikalanschluß 1000 A
4 Vertikalanschluß 1600 A
5 Frontanschluß 1000 A
6 Frontanschluß 1600 A
7 Frontanschluß mit DIN-Lochbild 1000 A
8 Frontanschluß mit DIN-Lochbild 1600 A
9 Sechskantschraube M6 x 25 - 8.8 DIN 933
10 Sechskantschraube M6 x 35 - 8.8 DIN 933
11 Spannscheibe 6 DIN 6796
1 Horizontal connection 1000 A
2 Horizontal connection 1600 A
3 Vertical connection 1000 A
4 Vertical connection 1600 A
5 Front connection 1000 A
6 Front connection 1600 A
7 Front connection with DIN hole pattern 1000 A
8 Front connection with DIN hole pattern 1600 A
9 Hexagon screw M6 x 25 - 8.8 DIN 933
10 Hexagon screw M6 x 35 - 8.8 DIN 933
11 Strain washer 6 DIN 6796
1 Prise à plat 1 000 A
2 Prise à plat 1 600 A
3 Prise sur chants 1 000 A
4 Prise sur chants 1 600 A
5 Prise avant 1 000 A
6 Prise avant 1 600 A
7 Prise avant avec schéma de perçages DIN, 1 000 A
8 Prise avant avec schéma de perçages DIN, 1 600 A
9 Vis à tête hexagonale M6 x 25 - 8.8 DIN 993
10 Vis à tête hexagonale M6 x 35 - 8.8 DIN 993
11 Rondelle Belleville 6 DIN 6796
1 Conexión horizontal 1000 A
2 Conexión horizontal 1600 A
3 Conexión vertical 1000 A
4 Conexión vertical 1600 A
5 Conexión frontal 1000 A
6 Conexión frontal 1600 A
7 Conexión frontal con plantilla de agujeros DIN 1000 A
8 Conexión frontal con plantilla de agujeros DIN 1600 A
9 Tornillo de cabeza hexagonal M6 x 25 - 8.8 DIN 933
10 Tornillo de cabeza hexagonal M6 x 35 - 8.8 DIN 933
11 Arandela tensora 6 DIN 6796
1 Horisontal anslutning 1000A
2 Horisontal anslutning 1600A
3 Vertikal anslutning 1000 A
4 Vertikal anslutning 1600 A
5 Frontal anslutning 1000 A
6 Frontal anslutning 1600 A
7 Frontal anslutning med DIN hålschema 1000 A
8 Frontal anslutning med DIN hålschema 1600 A
9 Sexkantskruv M6 x 25 - 8.8 DIN 933
10 Sexkantskruv M6 x 35 - 8.8 DIN 933
11 Spännbricka 6 DIN 6796
T9
T1 T3 T5 T7
T10 T11
T2
T4
T6 T8
1 Allacciamento posteriore orizzontale fino 1000A
2 Allacciamento posteriore orizzontale fino 1600A
3 Allacciamento posteriore verticale fino 1000A
4 Allacciamento posteriore verticale fino 1600A
5 Allacciamento anteriore fino 1000A
6 Allacciamento anteriore fino 1600A
7 Allacciamento anteriore con due fori per 1000A
8 Allacciamento anteriore con due fori per 1600A
9 Vite a testa esagonale M6 x 25 - 8,8 DIN 933
10 Vite a testa esagonale M6 x 35 - 8,8 DIN 933
11 Rondella elastica 6 DIN 6796
Italiano
Français
Español
Svenska
English
Deutsch
Alle Rechte vorbehalten. All rights reserved. Tous droits réservés. Reservados todos los derechos. Tutti i diretti riservati. All rätt forbehålles.
© Siemens AG 1998

Other manuals for Siemens 3WX3623 Series

Questions and Answers

  • J
    Joseph WelchAug 15, 2025
    What to do if Siemens Industrial Equipment breaker won't close electrically?
    • S
      Samantha WilliamsAug 16, 2025
      If your Siemens Industrial Equipment breaker will not close electrically, but the ready-to-close indicator is OK, consider the following: * The operating voltage of the stored-energy activation solenoid might be incorrect or unavailable: Check or apply the correct voltage. * The circuit-breaker may be in the disconnected position in the guide frame: Crank the circuit-breaker into the test or connected position. * The auxiliary circuit plug may be taken out: Plug in the auxiliary circuit plug.
  • A
    Amanda WellsAug 20, 2025
    Why can't I fit the crank for racking my Siemens Industrial Equipment?
    • C
      Cheryl BeckAug 20, 2025
      If you cannot fit the crank for racking on your Siemens Industrial Equipment, check the following: 1. Ensure the OFF push button is pressed: Press the OFF pushbutton and move the slide simultaneously to the right. 2. Verify the switchgear cabinet door is completely closed: Close the switchgear cabinet door. 3. Check for obstructions in the crank hole: Remove any padlocks that may be closing the crank hole.
  • A
    Antonio MartinezAug 26, 2025
    What to do if Siemens Industrial Equipment breaker is stuck in maintenance position?
    • R
      Robert PollardAug 26, 2025
      If the Siemens Industrial Equipment breaker cannot be moved from the maintenance position to the disconnected position, consider these causes: 1. The racing-in mechanism of the breaker is not in the disconnected position: Crank the mechanism into the disconnected position. 2. An attempt was made to fit a breaker with a different rated current in the guide frame: Only insert a circuit-breaker with the same rated current data as the guide frames. 3. The coding of the breaker and guide frame do not match: Only insert circuit-breaker with the same rated current data as the guide frames.
  • K
    Kayla AllenAug 30, 2025
    Why can't I pull out the guide rails on my Siemens Industrial Equipment?
    • R
      Richard JacksonAug 30, 2025
      If the guide rails of your Siemens Industrial Equipment cannot be pulled out for fitting a circuit-breaker, it might be because the shutter is locked with one or two padlocks. Remove the padlocks to resolve this issue.
  • L
    Lisa SanchezSep 4, 2025
    What causes resistance when cranking Siemens Industrial Equipment from disconnected to test?
    • D
      Deborah LinSep 4, 2025
      If you feel strong resistance immediately after leaving the disconnected position when cranking your Siemens Industrial Equipment from the disconnected into the test position, it may be because the breaker is not pushed right in, and the lateral latches are not yet engaged. Push the breaker as far as the stop into the disconnected position until the latches at the side engage.
  • N
    Nicole EllisNov 9, 2025
    How to fix Siemens Industrial Equipment breaker that won't close?
    • M
      Matthew GloverNov 9, 2025
      If the Siemens Industrial Equipment breaker cannot be closed mechanically or electrically, and the ready-to-close indicator is on, consider these potential causes: 1. The spring may not be charged: Charge the spring. 2. The undervoltage release may not be excited: Energize the undervoltage release. 3. The mechanical reclosing lock-out may be effective: Rectify the cause of overcurrent tripping and press RESET. 4. The electrical closing interlock may be effective: Shut off control voltage for interlocking. 5. The mechanical OFF push-button may be blocked off: Clear the pushbutton. 6. Lockout against closing with switchgear cabinet door open effective: Close switch gear cabinet door. 7. Mutual mechanical breaker interlocks effective: Open second breaker or crank into disconnected pos...

Siemens 3WX3623 Series Specifications

General IconGeneral
Suitable for circuit breakerYes
Trip characteristicC
Type of electrical connectionScrew connection
Mounting typeDIN rail
StandardsIEC 60898-1

Related product manuals