PROGRAMMING INSTRUCTIONS
Front Panel Layout
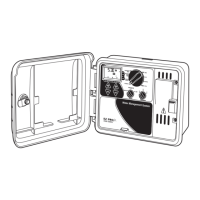
Looking at the front panel (see figure 3), you see a large LCD, 4 rubber
buttons, one large rotary dial, and two small rotary dials. The rubber
buttons are marked SELECT and ADJUST and are the core of
Signature’s exclusive SELECT&ADJUST programming. The keys are
identified with ‘+’ or ‘–’ for increasing or decreasing the segment
you’re working on.
SELECT&ADJUST works on the principle that you first SELECT what
you want to set, and ADJUST the variables of what you selected. For
example, if you want a run time of 10 minutes on zone 5, you would
use the SELECT keys to select zone 5 and, once on zone 5, you would
use the ADJUST keys to set the run time to 10 minutes.
There are instances when only SELECT or only ADJUST are required.
They will be explained in this guide where appropriate.
PROGRAMMING INSTRUCTIONS
FIGURE 3
NOTE: The MODE dial must be in the PROGRAM position.
NOTE: Every time the ‘+’ or ‘–’ key is pressed, the display will
increase or decrease one unit. Hold the ‘+’ or ‘–’ key for
three seconds to initiate a fast scroll.
NOTE: Please refer to the Technical Data section for an explanation
of the LCD segments.
12 13
 Loading...