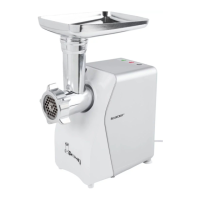
The SilverCrest SFW 350 E5 is an electric mincer designed for domestic use, primarily for preparing food in household quantities. This appliance is versatile, allowing for mincing fresh meat, making sausages with natural or artificial casings, and producing biscuits. It is not intended for processing frozen or hard foodstuffs like bones or nuts, nor for commercial or industrial environments.
Function Description:
The core function of the SFW 350 E5 is to process food using various attachments. The appliance consists of a motor unit (5) that powers different accessories.
For mincing meat, the meat grinder casing (6) is assembled with a transport screw (7), a spring (8), a cross blade (9), and a cutting disc (10) (for coarse or fine mincing). Meat is fed into the feeding tray (3) and pushed down with the stodger (2) into the grinder, where it is minced and expelled through the cutting disc.
For making sausages, the meat grinder casing (6) is assembled with the transport screw (7), spring (8), cross blade (9), and a sausage disc (13). The sausage stuffer attachment (12) is then placed in front of the sausage disc. Prepared sausage meat is pressed through this attachment into a sausage skin.
For making biscuits, the biscuit attachment (1) is used. This attachment includes pattern strips (1) that allow for different biscuit shapes. Dough is fed into the meat grinder casing (6) and pushed through the selected pattern on the biscuit attachment.
The appliance is controlled via a simple interface on the motor unit (5), featuring a “<” button (16) for reverse operation, a “0” button (17) for off, and an “I” button (18) for on. The reverse function is particularly useful if the drive becomes blocked by accumulated food, allowing the food to be moved backward to clear the obstruction.
Important Technical Specifications:
- Voltage: 220 - 240 V ~ (AC), 50 Hz
- Power consumption: 250 - 350 W
- Protection class: II / (Double insulation)
- C.O. Time (Continuous Operation): 15 minutes
- Food-safe parts: All parts of the appliance that come into contact with food are food-safe.
The C.O. Time indicates the maximum continuous operating duration before the motor needs to cool down to prevent overheating and damage. After 15 minutes of continuous use, the appliance must be switched off for approximately 30 minutes.
Usage Features:
The SFW 350 E5 is designed for straightforward assembly and operation.
Before first use, all accessories are coated with a thin film of oil to protect against corrosion and must be thoroughly cleaned. After cleaning, metallic components should be lightly coated with cooking oil.
Assembling the meat grinder:
- Coat all metal parts with cooking oil.
- Place the transport screw (7) in the meat grinder casing (6).
- Place the spring (8) onto the transport screw (7).
- Fit the cross blade (9) with the sharp side pointing away from the spring (8), ensuring its square opening aligns with the square axle.
- Select the desired cutting disc (10) and place it into the meat grinder casing (6), aligning its fixings with the openings.
- Screw the ring clamp (11) on hand-tight.
- Connect the assembled meat grinder casing (6) to the motor unit (5) by aligning the symbols and turning until the locking button (15) clicks into place.
- Place the feeding tray (3) on top.
Assembling the sausage stuffer attachment:
- Remove the meat grinder casing (6) and disassemble all parts.
- Coat all metal parts with cooking oil.
- Reassemble the transport screw (7), spring (8), and cross blade (9) into the casing (6).
- Insert the sausage disc (13) and then the sausage stuffer attachment (12).
- Screw the ring clamp (11) on hand-tight.
- Reassemble the meat grinder casing (6) to the motor unit (5).
Assembling the kubbe attachment:
- Remove the meat grinder casing (6) and disassemble all parts.
- Note that the cross blade (9), spring (8), and cutting/sausage discs (10/13) are not required for the kubbe attachment. Remove them if present.
- Coat all metal parts with cooking oil.
- Insert the two plastic parts of the kubbe attachment (14) into the meat grinder casing (6), aligning the fixings.
- Screw the ring clamp (11) on hand-tight.
- Reassemble the meat grinder casing (6) to the motor unit (5).
Assembling the biscuit attachment:
- Remove the meat grinder casing (6) and disassemble all parts.
- Note that the cross blade (9), spring (8), and cutting/sausage discs (10/13) are not required for the biscuit attachment. Remove them if present.
- Coat all metal parts with cooking oil.
- Pull the pattern strips (1) from the front of the biscuit attachment (1).
- Place the plastic disc, then the metal disc of the biscuit attachment (1) into the meat grinder casing (6), aligning the fixings.
- Screw the ring clamp (11) on hand-tight.
- Replace the pattern strips (1) into the front of the biscuit attachment (1), ensuring the grip points away from the appliance.
- Reassemble the meat grinder casing (6) to the motor unit (5).
Operation:
- Place the appliance on a stable surface.
- Place food in the feeding tray (3) and a collection container under the exit opening.
- Press the “0” button (17) to ensure the appliance is off before plugging it in.
- Insert the plug into a mains power socket.
- Press the “I” button (18) to start the appliance.
- Use only the stodger (2) to push food into the feeding shaft, never fingers or other objects.
- Avoid pressing so hard that the motor audibly slows down, as this can overload and damage the machine.
Maintenance Features:
Cleaning:
- Motor block (5): Disconnect from power. Clean external surfaces and power cable with a damp cloth and mild detergent if needed. Wipe with a clean, damp cloth to remove detergent residues, then dry thoroughly. Never immerse the motor block in water or other liquids.
- Accessories: Clean all food-contact accessories with hot soapy water and a food-safe household detergent.
- Dishwasher-safe parts: The plastic part of the biscuit attachment (1), the stodger (2), the sausage stuffer attachment (12), and the kubbe attachment (14) are dishwasher safe. Place them in the upper basket and ensure they are not jammed to prevent deformation.
- Cross blade (9): Handle with extreme care due to its sharpness.
- Drying: Dry all parts thoroughly before re-using the appliance.
- Lubrication: After each cleaning, lightly coat all metallic components with cooking oil to prevent discoloration and corrosion.
Storage:
- Wind the mains cable clockwise around the cable retainer (4) on the underside of the appliance and fasten it to protect it from damage.
- Store the appliance in a dry location.
- Lightly coat metal attachments with cooking oil after drying if not used immediately, to protect against corrosion.
- Store the appliance out of reach of children and individuals requiring supervision.
Troubleshooting (Non-functionality):
- Blocked drive: Press “0” (17) to stop. Press and hold “<” (16) for reverse to clear the blockage. Release “<” (16) when clear, then press “I” (18) to restart. If unsuccessful, clean the appliance.
- Motor stops suddenly: This may be due to the internal overload fuse. Switch off and allow to cool for 30 minutes. If it still doesn't work, wait another 15 minutes. If the problem persists, contact customer service.
- Damaged power cable or accessories: Immediately press “0” (17) to switch off. If unsafe, unplug from the mains. Arrange for repairs by customer service before re-using.