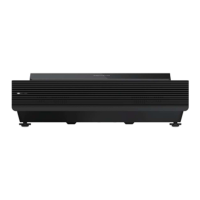
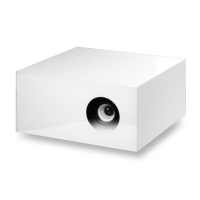
This document provides instructions for the SIM2 DOMINO DTV S laser projector.
Function Description
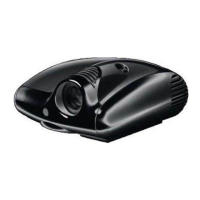
The SIM2 DOMINO DTV S is a Class I laser projector designed for home theater and display applications. It utilizes a trichromatic RGB laser system for its light source and Digital Light Processing (DLP 0.47) technology with a 1-chip DLP type, supporting 4K resolution (3840 x 2160). The projector is capable of displaying images with a diagonal screen size ranging from 90 to 130 inches. It features a motorized digital focus adjustment and dedicated menus for geometric corrections, including 8-point adjustments for Keystone, Parallelogram, and Pincushion. The device runs on Android 9.0 and includes internal speakers.
Important Technical Specifications
Model: DTV S
Projection Type: Digital Light Processing (DLP 0.47), 1-chip DLP Type: 4K, 3840 x 2160
Light Source: Trichromatic RGB laser system
Expected Lifetime: Approximately 25,000 hours (equivalent to over 10,000 films/2 hours per film)
Focus: Motorized - digital adjustments
Geometry Adjustments: Dedicated menu for 8 points (H, V): Keystone, Parallelogram, Pincushion
Image Resolution: 4K UHD@60Hz
Color Gamut: REC 2020 with powerful P7 color adjustments
HDR Video Quality: Dedicated Display Modes
Contrast: Adaptive
Brightness: Up to 2,400 Ansi lumens
Active Screen Size: 90-130 inches
Screen Resolution: VGA (640x480) to 4K UHD (3840x2160)
Power Supply: AC220V 50Hz 2.0A max, standby ≤ 0.5W
Audible Noise: 26dB
Operating System: Android 9.0
Memory: 3GB/128GB
Audio Power: 10W * 2
Dimension: 520mm * 323 mm * 159 mm
Weight: 9.0kg
Laser Safety Parameters:
- Laser Safety Standard: Class I laser product, meeting GB 7247.1.2012
- Maximum Output of Laser Radiation: ≤ 66mW
- Emission Wavelength:
- Blue ray: 459-471nm
- Green ray: 519-531nm
- Red ray: 635-651nm
Inputs/Outputs:
- 2x HDMI Inputs: HDMI1/HDMI2 2.0, high-speed interface. HDMI1 supports ARC return, 4K UHD@60Hz / 1080p@120Hz.
- Audio Output: Optical fiber, ARC return from HDMI1.
- Ethernet: RJ45 for internet access and software updates.
- WiFi: 2.4G/5G 802.11c for internet access and software updates.
- USB 2.0: For hard disk or flash drive, audio/video contents.
- Bluetooth 4.0: For external audio pairing devices.
- USB 1: 5V, 0.5A.
- M: (Function not specified in the provided text, likely a service port).
Usage Features
Installation and Placement:
The projector should be placed on a flat and stable surface. Adequate ventilation is crucial, with a minimum of 20cm space around the device. Avoid placing it in direct sunlight, near heating devices, in moist or dusty environments, or in poorly ventilated/enclosed spaces. When moving the machine, avoid shocks and protect the light-emitting lens. The manufacturer recommends placing protective materials (cardboard or glass plate) under the projector to prevent slight corrosion on cabinet surfaces due to chemical reactions with the rubber pads.
Feet Adjustment for Display Calibration:
The projector's feet can be rotated to adjust the image to fit the screen. This includes moving the projector forward/backward to adjust image width, moving it left/right to shift the image horizontally, and rotating the feet clockwise/counterclockwise to adjust the image's vertical position and parallelism with the screen. Specific instructions are provided for adjusting the length of the left/right sides and top/bottom of the image, as well as for parallelizing the bottom of the image with the screen.
Focus Adjustment:
Focus can be adjusted via the "Settings - Optical Machine - Focus" menu using the Up/Down buttons on the remote control.
Keystone Correction:
Keystone correction is available under "Settings - Optical Machine - Keystone Correction." Users can select a point for adjustment using the Up/Down/Left/Right buttons and press "OK" to adjust the selected point. A "Reset" option is also available.
Remote Control:
The remote control includes buttons for On/Off, Display Mode, Media, Settings, OK/ENTER, Info Menu, Audio Settings, Home Main Menu, Screen Shot, Signal Resource, Return/Back, Mute, and Volume +/-.
- Pairing: For first-time use, press the Home Main Menu button to access the pairing interface, then press any key other than Standby to start pairing. The remote should be paired within 3m of the projector when powered on. If the indicator light flashes red, it means pairing failed; press and hold the Menu button for 3 seconds until the blue light flashes 3 times to re-pair.
- Battery Replacement: The remote uses two AAA 1.5V alkaline batteries. Instructions are provided for opening the battery cover, inserting batteries, and re-securing the cover.
- Effective Range: The remote control works at a distance of 8m from the front and within a 30-degree horizontal or 15-degree vertical angle at a distance of 6m.
Control Panel:
The control panel includes an indicator light, remote control receiver, standby button, and eye protection sensor.
- Indicator Light: White when powered on, breathing white during standby (if effect is on), off during standby (if effect is off), and flashes red in case of fault.
- Standby Button: Powers the projector on or off.
- Eye Protection Sensor: When enabled, automatically closes the screen and gives a voice prompt when a user approaches, protecting eyes from the laser beam.
First Start and Local Settings:
- Power On/Off: Connect the power cord to a 220V AC power socket. Press the Standby button on the remote control to turn on. Pressing Standby again puts it into standby mode. Disconnect power when not in use for a long time. After DC shutdown, wait at least 5 seconds before restarting to prevent abnormalities.
- Adjusting Settings: Use the Settings button on the remote control to access the settings interface. Arrow buttons select items, OK confirms operations or accesses sub-menus, Left/Right buttons adjust values, Up/Down buttons adjust options, and Return goes back or exits the menu.
OSD Menu (On-Screen Display):
The OSD menu allows for extensive adjustments:
- Image: Image mode (Natural, User, Bright, Sport, Cinema), User settings (Brightness, Contrast, Chroma, Tone, Sharpness), Advanced settings (Pure motion, Noise reduction, Dynamic contrast, Gamma, Color temperature, White balance, Color correction, MPEG, Game mode, HDR mode), Zoom mode (Auto, 4:3, Movie expand 16:9), and Reset. HDR settings are available when the input source is HDR.
- Light Source: Light settings (standard, custom), Geometric corrections, Projection mode (Front-Projection, Rear-Desktop, Front-Ceiling, Rear-Ceiling), Focus, and Test pattern.
- Audio: Audio mode (Natural, Music, Cinema, Sport, User), Equalizer Detail (120Hz, 500Hz, 1.5KHz, 5KHz, 10KHz), Advanced settings (Bass, Treble, Sound balance, AVC), Output device (Proj.'s speakers, Bluetooth, HDMI ARC, Optical), Audio output format (PCM, Bypass), and Reset.
- Network: Wireless network, Wired network, Network diagnosis.
- Bluetooth: BT Switch, Management, Network diagnosis.
- General: Power setting, Language, Time, Input method, Eye care, Menu time.
- About: Information, Update, Restore.
Connecting to Network:
- Wireless: Select "Wireless Network" in the Network menu, choose an available network, enter the password, and click OK. If the network is not listed, select "Add a New Network" and manually enter details.
- Wired: Insert the network cable. The device will automatically get an IP address. If connection fails, try again or use manual input in "Network Information."
Ceiling Installation:
For ceiling installation, a bracket allowing tilt, yaw, and forth/back adjustments is recommended. The projector should be hung using the four holes in the center of the underneath panel, with dimensions 170mm x 130mm. Do not use the feet for ceiling installation.
Maintenance Features
General Safety and Precautions:
- Do not open the casing without authorization due to high voltage. Non-professional personnel should not repair the product or open the internal optical machine.
- Unplug the power plug during thunderstorms or if not using the product for a long time.
- If abnormal sound/smell occurs, or if there's sound but no image, turn off, unplug, and contact after-sales personnel.
- Do not place objects on power cords or signal wires.
- Do not overload power sockets.
- Keep away from exposed flame sources, high temperatures, and heating objects.
- Avoid exposure to water droplets/splashes; do not place liquid-filled objects on the machine.
- If foreign objects/liquids fall into the machine, unplug and contact after-sales.
- Beware of children standing on or climbing on the machine.
- Allow 24 hours for condensation to dry if moved from a cold to warm area.
- Do not look directly at the lens when powered on to avoid eye damage.
- Do not expose batteries to sunlight, fire, or overheating.
Cleaning:
- If the device gets dirty, unplug it and wipe with a semi-dried soft cloth dipped in a small amount of diluted neutral detergent. Do not wipe repeatedly to avoid scratching.
- Avoid using alcohol, gasoline, acid, alkali, volatile oil, or other solvents, as these may damage materials or painted surfaces.
- Do not directly wipe the light-emitting lens with hands, ordinary cleaning paper, or cloth. For oil stains/fingerprints, professionals should use optical cleaning cloth, lens wiping paper, or professional cleaning solution to avoid damaging the optical coating.
Energy Saving Tips:
- When not in use, select AC shutdown after standby and unplug the power plug to reduce energy consumption.
Troubleshooting Tips (Simple Fault Solving):
The manual provides a table of common phenomena and their solutions:
- No sound or image: Check power cord, wall socket, power/standby button, volume settings, mute mode.
- Image normal but no sound: Check volume settings, mute mode.
- No image or black and white image: Adjust image settings, check color system.
- Sound and image interfered: Turn off/unplug connected devices not in use.
- Image blurry or distorted: Check if light-emitting lens is dirty (when powered off, ask professionals to clean).
- Horizontal/vertical stripes or image shake: Check for nearby interference sources (electrical appliances, power tools).
- Device casing "clicks": Normal noise due to temperature-induced expansion/shrinkage of casing.
Environmental Protection:
- The product complies with environmental protection requirements for hazardous substances.
- During its environmental protection use period (10 years for the device, 1 year for remote control batteries), hazardous substances will not leak.
- Waste recycling tips: Dispose of the product and batteries through local manufacturers with recycling qualifications.
Product Warranty:
Disassembling or repairing any part of the device by yourself will invalidate the product warranty.