Do you have a question about the Singer 8060 and is the answer not in the manual?
Warning to reduce the risk of electric shock by unplugging the machine after use and before cleaning.
Safety precautions to reduce risks of burns, fire, electric shock, or injury during operation.
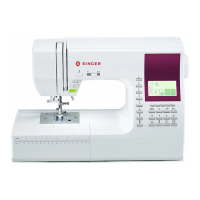
Description of the start/stop button operation, monitor lamp indicators, and deactivation when foot controller is connected.
Explanation of the Liquid Crystal Display (LCD) showing stitch information, patterns, and modes.
Location and function of the pattern chart, detailing utility and decorative stitches and letters.
Steps to remove the bobbin cover and the bobbin from the machine.
Detailed procedure for winding thread onto the bobbin, including threading guides and tension disc.
Steps to prepare the machine for threading, including raising the presser foot and setting the needle position.
Instructions for threading the needle eye, including using the needle threader and manual threading.
Instructions for placing the thread spool on the spool pin correctly, including spool caps.
How to bring the bobbin thread up to the surface after inserting the bobbin, creating a loop.
Step-by-step guide for threading the upper thread through the machine's guides and into the needle eye.
Steps for starting a seam, placing fabric, holding threads, and ending the seam with thread cutting.
How to use reverse stitching to reinforce the ends of seams, including stitch count and pattern notes.
Using the TACK button to automatically sew reinforcement stitches at the beginning and end of a stitch.
Explanation of the machine's automatic thread tension setting and how to identify it.
How increased thread tension affects the bobbin thread appearance on the fabric.
How decreased thread tension affects the upper thread appearance on the fabric.
How to select basic utility stitch patterns directly using the selection buttons.
Steps for selecting utility stitch patterns using the Utility button and scroll buttons.
How to adjust stitch width and length using function buttons, including needle position changes for straight stitches.
Instructions for sewing a straight stitch with center or left needle position using the All-Purpose Foot.
How to use the buttonhole foot for sewing various types of buttonholes, including marking and setting the button.
Instructions for sewing on buttons using stitch No. 13 and the Button Sewing Foot, including stitch width adjustment.
How to select decorative and letter stitch groups and individual patterns from the LCD.
How to apply mirror/reverse effects to patterns, changing stitch orientation and flip direction.
How to adjust stitch width and length for selected patterns, including needle position changes for straight stitches.
How to elongate patterns to different sizes using the function button, noting limitations.
How to adjust thread tension for all combined patterns, noting pre-set values and auto mode.
How to combine tack stitches or letters at the end of patterns, causing the machine to stop automatically.
Instructions for cleaning lint and thread bits from the hook race, feed dogs, and bobbin holder for smooth operation.
| Built-in Stitches | 60 |
|---|---|
| Buttonhole Styles | 6 |
| LCD Screen | Yes |
| Automatic Needle Threader | Yes |
| Drop Feed | Yes |
| Weight | 6.3 kg (13.89 lbs) |
| Adjustable Stitch Length | Yes |
| Adjustable Stitch Width | Yes |
| Free Arm | Yes |
| Bobbin System | Top Drop-In |
| Speed Control | Yes |
| LED Lighting | Yes |
| Type | Electronic |