20
Water purication system
WPUA700
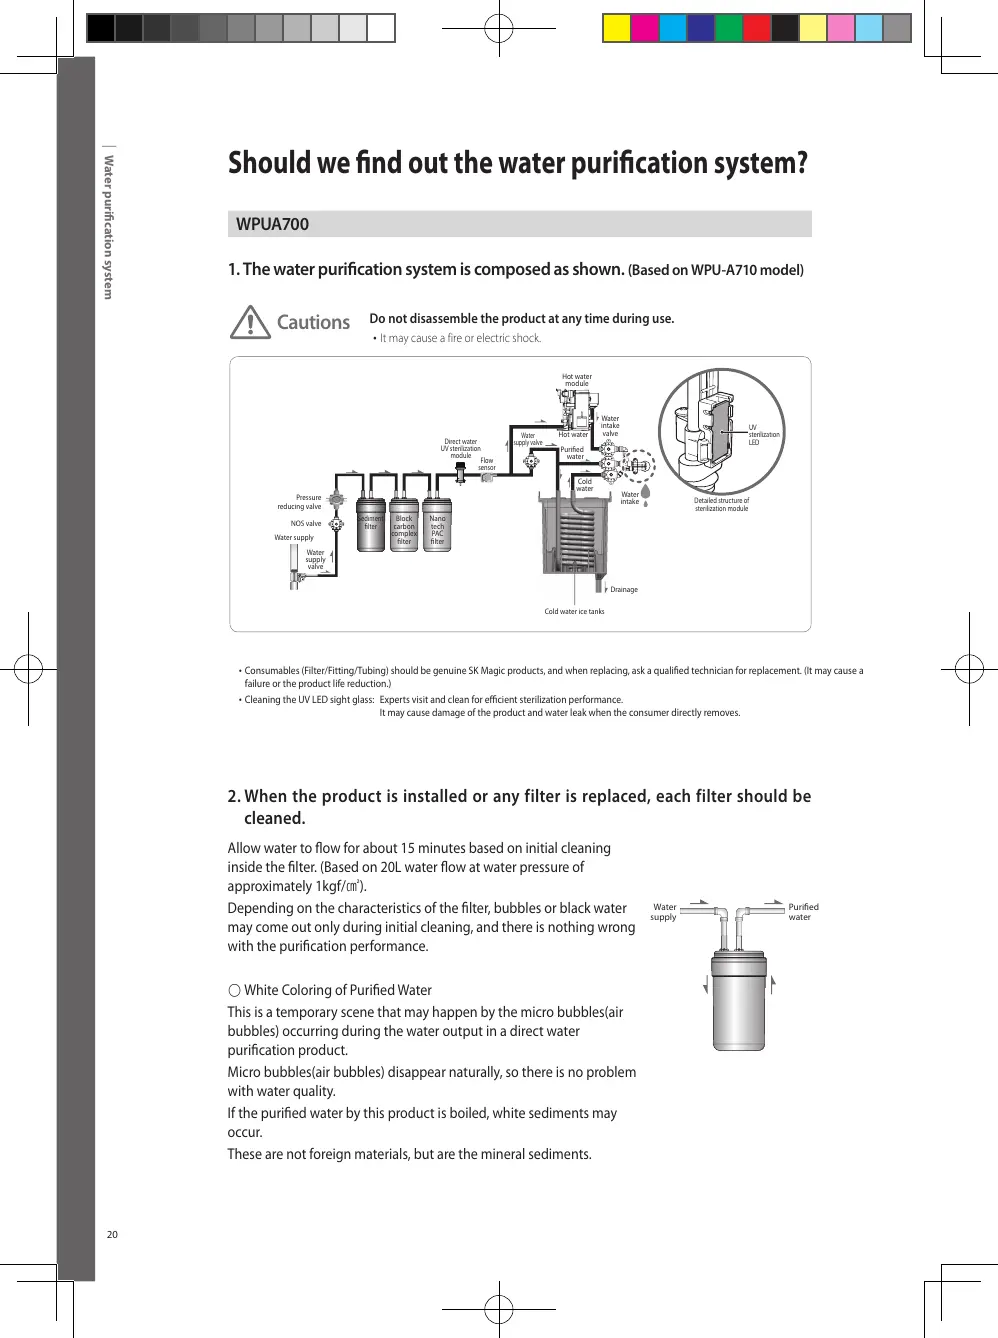
1. The water purication system is composed as shown.
(Based on WPU-A710 model)
2. When the product is installed or any filter is replaced, each filter should be
cleaned.
Allow water to ow for about 15 minutes based on initial cleaning
inside the lter. (Based on 20L water ow at water pressure of
approximately 1kgf/㎠).
Depending on the characteristics of the lter, bubbles or black water
may come out only during initial cleaning, and there is nothing wrong
with the purication performance.
○ White Coloring of Puried Water
This is a temporary scene that may happen by the micro bubbles(air
bubbles) occurring during the water output in a direct water
purication product.
Micro bubbles(air bubbles) disappear naturally, so there is no problem
with water quality.
If the puried water by this product is boiled, white sediments may
occur.
These are not foreign materials, but are the mineral sediments.
• Consumables (Filter/Fitting/Tubing) should be genuine SK Magic products, and when replacing, ask a qualied technician for replacement. (It may cause a
failure or the product life reduction.)
•Cleaning the UV LED sight glass: Experts visit and clean for ecient sterilization performance.
It may cause damage of the product and water leak when the consumer directly removes.
Should we nd out the water purication system?
Cautions
Do not disassemble the product at any time during use.
• It may cause a fire or electric shock.
NOS valve
Sediment
lter
Direct water
UV sterilization
module
Flow
sensor
Water
supply valve
Hot water
module
Water
intake
valve
UV
sterilization
LED
Detailed structure of
sterilization module
Hot water
Cold
water
Water
intake
Drainage
Puried
water
Block
carbon
complex
lter
Nano
tech
PAC
lter
Water supply
Water
supply
valve
Pressure
reducing valve
21
Filter Replacement
Open
Close
Water supply valve
Open
Close
Water supply valve
Fitting
Fitting
Separator
Fitting
Fitting
Separator
How do I replace the lter?
Cautions
Do not disassemble the product at any time during use.
•It may cause a fire or electric shock.
※ Filter replacement cycle.
: The filter replacement cycle is when the filter is expected to perform well.
The replacement period may be shorter in areas with poor quality inlet water, or in cases of heavy use.
Filter Replacement
1
Close Water Supply Valve.
2
Remove the power cord.
3
Separate Filter Cover as the gure shows.
4
After separating ttings from the lters
by using the tool for tting separation,
replace the lters.
5
Assemble Filter, Fitting and Filter
Cover together following the reversed
separation order.
6
Open Water Supply Valve and check for
any water leak on the lter connections.
Then, connect the power cord.
• To purchase or replace filters, please contact the Customer Service Center (Customer Service Center: 1600-1661).
• The filter replacement management will be contacted 2-3 days ago through our computer management network to inform
you of the filter replacement cycle.