15
!
- cut high brushwood in layers (always start from the top)
• Line feeding
p
- tap button R lightly on a solid surface while the motor
is running
- the cutting line will be released and cut o to the correct
length by line cutting blade F
!
- feed the lines regularly to maintain full cutting circle
- when the motor runs without load and no grass is cut,
the cutting lines are worn or broken; rewind or replace
the spool
• Replacing spool
a
!
- remove old spool and mount new spool as illustrated
- only use SKIL spool 2610S00868 with this tool
(
)
- after replacing the spool test-run the tool for at least
one minute without load to ensure that the tool is
operating properly
• Rewinding spool
s
In case the cutting lines fail to protrude from spool cap
AG
!
- take out spool from spool cap AG
- tightly rewind both cutting lines evenly in layers
- insert both lines into spool slots and ensure that they
are securely in place (leave sucient length of line)
- mount spool in spool cap AG, release the lines from the
spool slots and guide the lines trough the openings
- mount spool cap AG on tool
• Reversing/changing cutting blade
- the cutting blade has cutting edges on both sides;
reverse the blade, when one side has become blunt
- replace the cutting blade when both sides are blunt
!
- remove/mount old/new cutting blade as illustrated
- only use SKIL cutting blade 2610S00867 with this tool
(
)
- after replacing the cutting blade test-run the tool for at
least one minute without load to ensure that the tool is
operating properly
- when necessary, have the cutting blade sharpened by
a specialist
MAINTENANCE / SERVICE
• This tool is not intended for professional use
• Regularly check the condition of the cutting mechanism
and the tightness of nuts, bolts and screws
• Regularly check for worn or damaged components and
have them repaired/replaced when necessary
• Always switch o the tool, remove battery pack, and
ensure that all moving parts have come to a complete
standstill
• Always keep tool and cord clean (especially ventilation
slots AH )
- clean the tool with a damp cloth (do not use cleaning
agents or solvents)
- clean line cutting knife F and cutting guard S after each
use
• Battery protection
The tool is suddenly being switched o or prevented from
being switched on, when
- --> remove load and restart
-
--> 2
levels of the battery level indicator start ashing when
pressing button AJ
r
c; wait until battery has returned
within the allowable operating temperature range
-
--> a low battery level or ashing low
battery level
r
b is shown by the battery level indicator
when pressing button AJ; charge battery
!
damaged
• On/o safety switch
u
Prevents the tool from being switched on accidentally
- switch on tool by rst pressing safety switch A and then
pulling trigger switch B
- switch o tool by releasing trigger switch B
!
continues to rotate for a few seconds
- allow the cutting mechanism to stop rotating before
switching on again
!
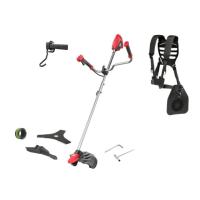
• Holding and guiding the tool
i
- always use the tool while carrying it with harness AD
- put the harness on your body and insert the two parts
of the strap buckle AE into each other
- adjust the length of the harness so that the hook is
approximately 15 cm below the waist
- connect loop AC on the tool to the hook of the harness
- hold tool rmly with both hands, so you will have full
control of the tool at all times
- maintain a stable working position
- always hold the tool on the right side of your body
- to remove the harness from loop AC open the securing
clip AF by pressing it
!
• Operating the tool
o
!
!
- do not overload the tool
WHEN USING TOOL AS LINE TRIMMER
!
- cut long grass in layers (always start from the top)
- only trim with the tip of the cutting line
- do not cut damp or wet grass
- prevent the cut grass from clogging the spool (do not
make heavy cuts)
- carefully cut around trees and bushes, so that they do
not come into contact with the cutting lines
- keep the tool away from solid objects in order to protect
the cutting lines against excessive wear
- for cutting long grass slowly swing the tool from right to
left and vice versa
- for cutting shorter grass tilt the tool as illustrated
WHEN USING TOOL AS BRUSH CUTTER
!
!