Do you have a question about the SKLZ HOME RANGE GOLF NET and is the answer not in the manual?
Read instructions, check for wear, ensure adult assembly, and contact customer service if parts are missing.
Consult physician, handle tension carefully, avoid pinching, check for damage, use in clear areas, and keep others clear.
Keep away from heat, do not leave outdoors, disassemble and store after use, use in clear areas to avoid damage.
Warranty covers defects, excludes misuse. Valid in USA. Proof of purchase needed for claims.
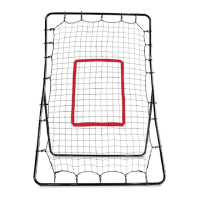
Lay out base frame pieces and connect center back bar with angled back bars.
Connect side bars to the angled back bars of the base frame.
Connect two lower fiberglass poles to the base frame and repeat for the opposite side.
Slide net sleeves over connected lower fiberglass poles and insert poles into the base frame.
Connect top fiberglass poles and attach white net loops to the top of the poles.
Attach the bottom of the net using black loops to the side bars of the base frame.
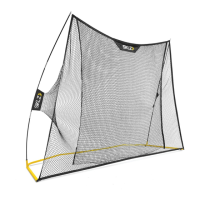
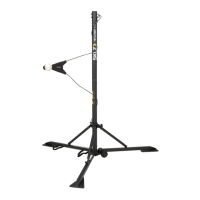
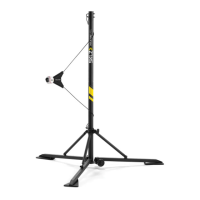
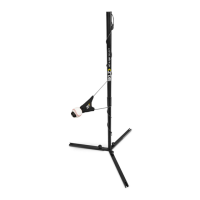
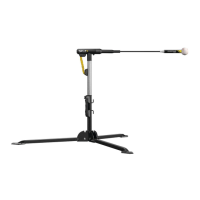
The SKLZ Home Range Golf Net is a training aid designed to help golfers practice their swing and ball striking in a convenient home setting. This product allows users to hit golf balls into a net, providing a safe and contained environment for practice without the need for a full golf course or driving range. The net is designed to capture golf balls, preventing them from traveling long distances and allowing for easy retrieval, which makes it suitable for use in backyards, garages, or other open spaces.
The primary function of the SKLZ Home Range Golf Net is to serve as a ball containment system for golf practice. It is constructed to withstand repeated impacts from golf balls, absorbing their energy and preventing them from ricocheting or escaping the practice area. The net features a dual return net design, which is intended to gently return the golf ball to the user after impact, minimizing the need to constantly retrieve balls and allowing for a more continuous practice session. This return mechanism is a key feature that enhances the efficiency and enjoyment of practice.
The structure of the golf net is built around a sturdy frame, which provides stability and ensures the net remains upright during use. The frame components, including base frame pieces, side bars, and fiberglass poles, are designed for easy assembly and disassembly, making the net portable and storable. The use of fiberglass poles allows for flexibility and tension in the net, which is crucial for absorbing the force of golf ball impacts effectively.
The net is intended for individual use, providing a dedicated space for a golfer to focus on their technique, swing mechanics, and ball contact. It can be used with various types of golf clubs, from drivers to irons, allowing for a comprehensive practice experience. The contained nature of the net makes it an ideal solution for golfers who want to practice regularly but have limited access to traditional golf facilities or desire the convenience of practicing at home.
The SKLZ Home Range Golf Net is designed with user convenience and safety in mind. Assembly is a straightforward process, involving connecting various frame components using push pins and sliding sleeves. The manual provides clear, step-by-step instructions with accompanying images to guide users through the setup. The base frame pieces, side bars, and fiberglass poles are color-coded or distinctly shaped to ensure correct assembly.
One of the notable usage features is the dual return net. This design element is engineered to return golf balls to the user after they hit the net, reducing interruptions in practice. This means less time spent collecting balls and more time focused on hitting them, which can significantly improve the quality and duration of a practice session. The net's ability to absorb impact and return balls gently is a testament to its thoughtful design.
The net is portable, thanks to its easy disassembly and the inclusion of a carry bag. This feature allows users to transport the net to different locations or store it compactly when not in use. The portability makes it versatile for use in various outdoor or indoor settings, provided there is sufficient clear space.
Safety is a paramount consideration in the design and recommended usage of the SKLZ Home Range Golf Net. Users are advised to set up the net in a clear area, away from any obstructions or property that could be damaged. This ensures that even if a ball misses the net or an unexpected event occurs, there is minimal risk to people or property. The instructions emphasize the importance of others staying clear of the area during use to reduce the risk of injury.
The net is suitable for a wide range of golfers, from beginners learning the basics to experienced players refining their skills. Its robust construction is designed to withstand the force of repeated golf ball impacts, providing a durable practice solution. The visual feedback of hitting a ball into the net, combined with the ball return feature, creates an engaging and effective practice environment.
Maintaining the SKLZ Home Range Golf Net is crucial for ensuring its longevity and safe operation. The manual provides specific instructions regarding maintenance and care.
Regular inspection for wear and tear is a key maintenance feature. Users are instructed to always check the net and its components for any signs of damage before each use. This includes inspecting the net material for tears or holes, and the frame components for bends, cracks, or loose connections. If any wear or tear is found, the product should not be used, and replacement parts or professional assistance should be sought. This proactive approach to maintenance helps prevent potential injuries and extends the product's lifespan.
Proper storage is another important maintenance aspect. The net should not be left outdoors for extended periods of time. Exposure to harsh weather conditions, such as prolonged sunlight, rain, or extreme temperatures, can degrade the materials of the net and frame, leading to premature wear and tear. After use, it is recommended to disassemble the net and store it in a protected environment, preferably in its carry bag, to shield it from the elements and physical damage. This practice helps preserve the integrity of the materials and ensures the net remains in good condition for future use.
The manual also advises against any alteration of the product or its components. Any unauthorized modifications can compromise the structural integrity and safety features of the net, potentially leading to injury or damage. Adhering to the original design and components is essential for maintaining the product's intended performance and safety standards.
In case of missing components or issues, the manual directs users to contact customer service. This support system is a maintenance feature, ensuring that users can obtain necessary parts or guidance to keep their golf net in optimal working condition. The availability of customer support underscores the commitment to product longevity and user satisfaction.
Overall, the SKLZ Home Range Golf Net is designed to be a durable and user-friendly golf training aid. Its function as a ball containment and return system, combined with its ease of assembly, portability, and clear maintenance guidelines, makes it a valuable tool for golfers looking to practice their game conveniently and safely at home.
| Product Name | SKLZ HOME RANGE GOLF NET |
|---|---|
| Category | Sports & Outdoors |
| Color | Black |
| Portable | Yes |
| Carry bag | Yes |
| Usage | Indoor/Outdoor |
| Target Area | Included |
| Setup Time | 5 minutes |
| Netting | Polyester |