QUICK START
a). Unpack this instrument from its special shipping container. Be sure to save all
packaging materials in case you need to return it to the factory for service.
b). Locate a suitable testing area and be sure you have read all safety
instructions for the operation of the instrument and suggestions on the test
area set-up in the SAFETY section of this manual. Locate a three prong grounded outlet.
Be sure the outlet has been tested for proper wiring before connecting the instrument to it.
c). Check to be sure the correct input line voltage has been selected on the
rear panel. Either 115 volts AC or 230 volts AC. Connect the power input
plug into its socket on the rear panel of the instrument. Connect the male end of the plug to
the outlet receptacle.
Please be sure that the safety ground on the power line cord is not defeated and that you are
connecting to a grounded power source.
d). Turn on the POWER switch located on the lower left hand side of the
front panel. Upon powering the instrument up a POWER ON SELF
TEST (POST) will automatically be performed. This test will check for
the condition of the ram chips, led indicators, pcb's and other critical
components. All of the front panel led's will light temporarily then go out. In addition, you
will see the Slaughter Company name and Model Number briefly appear on the LCD
readout and then clear itself.
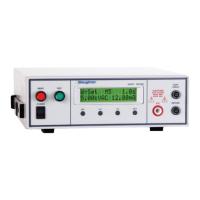
You should then see the default
parameters on the LCD meter as
follows for models :
Or these defaults for models 2925
and 2935:
Or these defaults for models 2945.
The underbar character after the
memory location indicates that an
Insulation Resistance test will
execute after the Dielectric
Withstand test is completed
successfully.
SET 1.0S
1.24KVAC 10.00mA
SET M1 1.0S
1.24KVAC 10.00mA
W - SET M1_ 1.0S
1.24KVAC 10.00mA
Current software version
displayed here