Fig. a
Fig. b
Fig. c
Fig. d
Fig. e
Fig. f
Fig. g
2
Quick Start Guide
1 Remove the cover from the patterned side of the large pad (Fig. a). Place the pad on the
metal stud between the parallel lines on the inside of the belt. Ensure the pad completely
covers the metal stud.
2 Remove the covers from the patterned side of the smaller pads. Place one either side of the
large pad, using the positioning guides that best suit your figure (Fig. b). Make sure the
studs are fully covered by the pads.
3 Press the embossed arrow and slide the battery cover off. With the unit facing towards
you, place the first battery in the left-hand space with the flat (negative) end first (Fig. c).
Place the second battery in the right-hand space (flat end first - Fig. d). Finally, place the
third battery in the central space with the flat end last (Fig. e). Replace the battery cover.
Battery Removal
When removing the batteries raise the negative end of the central battery and lift it out.
Then remove the left- and right-hand batteries.
4 Slide the unit into the holder until it clicks into place.
5 Remove the covers from the black side of the pads. Do not dispose of these covers, as you
will need them at the end of your session.
6 Wrap the belt tightly around your waist with the large pad centred over your navel and the
two smaller pads directly between your hip-bones and ribs.
7 Press and hold the On/off button for two seconds to switch the unit on (Fig. f ).
8
Select your programme and
increase the intensity to a level you find comfortable (Fig. g).
9 When the session is finished, the unit stops automatically. Press and hold the On/off button
for two seconds to switch the unit off.
10 Replace the covers on the black surface of the pads and pack away your unit ready for its
next use.
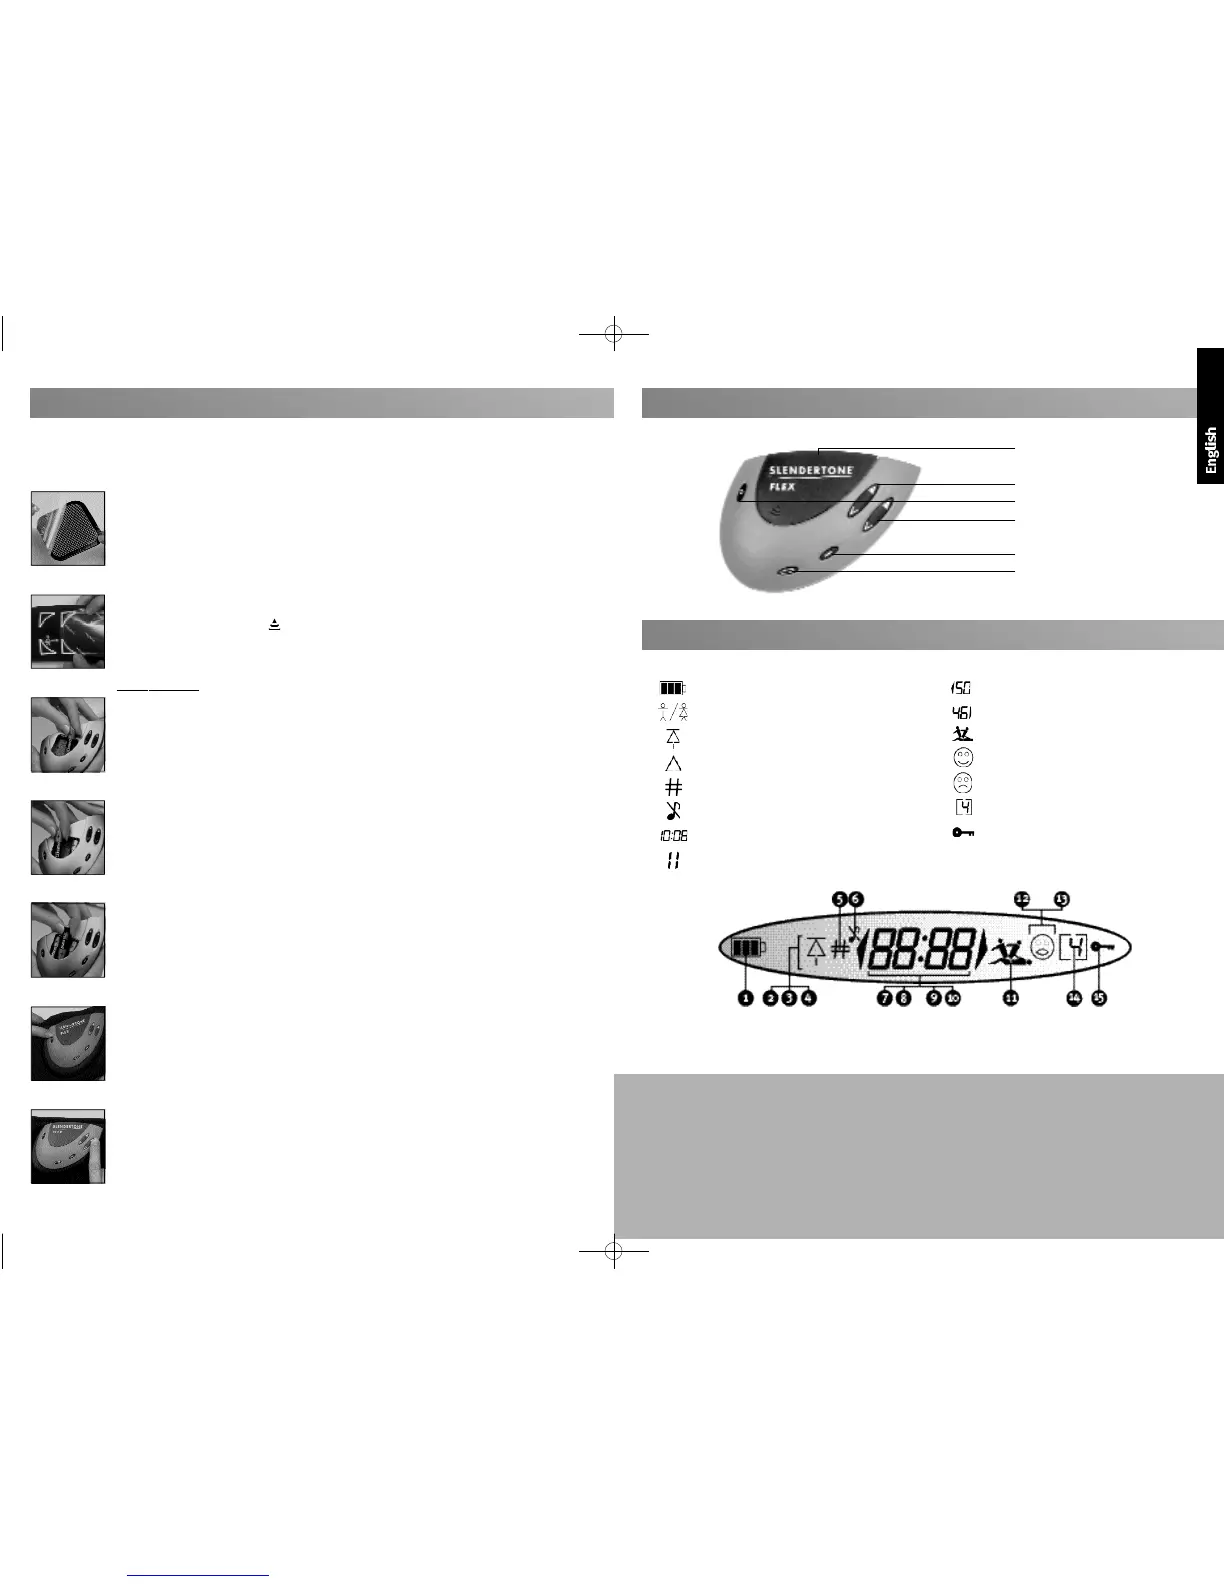
Your
SLENDERTONE
Unit
Display screen (see below)
Right intensity button
On/off (pause) button
Left intensity button
Information button
Programme button
1 Battery power remaining.
2 Male/female unit indicator.
3 Highest intensity reached to date.
4 Pad contact problem (see page 6).
5 Number of sessions completed.
6 Mute function activated.
7 Program timer/ error messages.
8 Programme paused.
9 Left-hand intensity.
10 Right-hand intensity.
11 Muscles contracting/ relaxing.
12 User progressing.
13 Unit switched off before session complete.
14 Programme number.
15 Keylock activated.
Your
SLENDERTONE
Display
3
Product Guarantee
Should your unit develop a fault within two years of
purchase, SLENDERTONE will undertake to replace or repair
the unit or any parts found to be defective with no charge
for labour or materials *, provided the unit:
• has been used for its intended purpose and in the
manner described in this instruction manual.
• has not been connected to an unsuitable power sourc e .
• has not been subjected to misuse or neglect.
• has not been modified or repaired by anyone other
than an approved SLENDERTONE agent.
This guarantee complements existing national guarantee
obligations and does not affect your statutory rights as a
consumer.
* This excludes consumables (e.g. pads, belt etc.) when
subject to normal wear and tear
If this is your first time using the SLENDERTONE FLEX Abdomianl Training System, you must read the rest of this
manual before you begin. This guide offers a quick reminder for using your
SLENDERTONE FLEX
correctly.