The SMARTRO Cooking Thermometer is a versatile device designed to help users monitor cooking temperatures with precision, offering both standalone operation and smart app integration. It comes with a main thermometer unit, three meat probes, three probe wraps, and two AA batteries.
Function Description
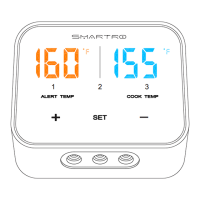
The thermometer's primary function is to measure and display temperatures, allowing users to set alert temperatures for their cooking. It features three measurement channels, enabling simultaneous monitoring of up to three different food items. The display shows both the alert temperature and the current cook temperature, with units in either Fahrenheit (°F) or Celsius (°C). A dedicated button allows for easy conversion between these units.
The device can be used without the app for basic temperature monitoring. Users can power it on, insert probes into the designated sockets, and select a measurement channel. Alarm temperatures can be set and adjusted using the increase and decrease buttons. Once the set temperature is reached, the thermometer will emit an audible beep.
For enhanced functionality, the SMARTRO Cooking Thermometer integrates with a smartphone app, "SmartThermo2," available for both iPhone and Android devices. The app allows users to download and pair their phone with the thermometer via Bluetooth. Once paired, users can monitor cooking progress remotely, set custom temperatures, and utilize pre-programmed meat types and doneness levels. The app also offers a timer function and the ability to view a history of time-temperature data.
Usage Features
Quick Start Guide without App:
- Power On: Open the battery compartment, insert two new 1.5V AA batteries, and then short press the
SET button to turn on the thermometer.
- Probe Insertion: Remove probes from their wraps and insert them into the probe sockets.
- Channel Selection: Short press the
+ button to choose one of the three measurement channels (displayed as 1, 2, or 3 on the LED screen).
- Alarm Temperature Setting: With the desired channel selected, short press the
SET button to enter the alarm temperature setting state. Use the + button to increase the alarm parameters (long press for quick increase) and the - button to decrease them (long press for quick decrease). Press SET again to confirm the setting.
- Temperature Measurement: Insert the tip of the probe into the middle of the food. The thermometer will display the current temperature. When the set temperature is reached, the thermometer will beep.
- Power Off: Long press the
SET button to power off the device after use.
How to Download and Pair the App (iPhone/Android):
- Power On Thermometer: Insert batteries and short press
SET to turn on the thermometer.
- Enable Bluetooth: Ensure Bluetooth is enabled on your smartphone through its settings interface and control center.
- Download App: Search for "SmartThermo2" in the Apple App Store or Google Play Store, or scan the provided QR code to download the app.
- App Permissions (Android only): For Android users, upon first opening the app, grant all three permissions (Storage, Camera, and Location) by clicking "ALLOW" for successful pairing.
- Pairing: Open the app and keep your phone close to the thermometer. Tap "Search" on the app's Bluetooth screen. A successful connection will be indicated by a beep from the thermometer and the "Pair" indicator stopping its flashing. If the Bluetooth search interface doesn't appear, tap "Pair" at the top right of the main app screen to access it.
How to Use the App:
- Probe Insertion: After successful Bluetooth pairing, insert probes into the thermometer's sockets.
- Settings:
- Tap the menu icon (three horizontal lines) on the top left of the app screen to access settings.
- Select
°C or °F for temperature mode.
- Tap
Alarm to scroll through 27 pre-programmed alert sounds.
- Meat Type and Doneness Selection:
- Return to the main screen and tap
Home.
- Tap
Beef Well Done or the displayed temperature to access the meat selection screen.
- Choose from pre-set meat types (Beef, Chicken, Veal, Turkey, Lamb, Fish, Pork, Hamburger) and doneness levels (Well Done, Medium, Medium Rare, Rare).
- Temperatures for doneness levels can be adjusted up or down by 2°C (3°F-4°F).
- To add custom meats/foods, tap
Add at the top right.
- Start Cooking:
- Insert the metal probe tip into the food.
- Click the
Start button in the app to begin timing.
- Click
Current Cook Temperature to view a history of time-temperature data.
- Monitoring: Monitor cooking progress on your smart device. When the set temperature is reached, your device will alert you with the chosen sound, and the measurement channel on the thermometer will flash.
- Custom Temperature Cooking:
- Tap
Temperature at the bottom of the app screen, then click 0°F (or 0°C).
- Scroll to select the desired alert temperature.
- Tap the back arrow to return to the main screen.
- Click
Start to begin timing.
- Click
Current Cook Temperature to view time-temperature history.
- Timer Cooking:
- Tap
Timer at the bottom of the app screen, then click 0m 00s.
- Scroll to select the custom cooking time.
- Tap the back arrow to return to the main screen.
- Click
Start to begin the countdown.
- Click
Current Cook Temperature to view time-temperature history under countdown conditions.
- Sharing Photos:
- Tap the menu icon.
- Tap
Camera to access the camera function.
- Tap
Camera again to take a picture.
- Tap the
Share icon to share photos through social media.
Maintenance Features
Attention:
- Placement: Do not place the thermometer on high-temperature surfaces.
- Probes: Do not put probes directly into flames.
- Temperature Range: The thermometer measures temperatures from -22°F to 572°F (-30°C to 300°C). Use it within this range.
- Children: Keep the probe away from children.
- Cleaning: Sterilize the probe before each use. Clean it with a damp cloth. Do not wash in a dishwasher or use abrasive materials.
- Exposure: Do not expose the thermometer to water, direct heat, hot surfaces, or direct sunlight for extended periods.
Troubleshooting:
- "HH" Display: If the temperature displays "HH" (indicating the probe temperature exceeds the normal working range of 572°F/300°C), remove the probe from the high temperature to cool it down, then use it within the normal working temperature. The probe is not damaged in this instance and can be reused.
- "LL" Display: If the temperature displays "LL," the probe is not plugged in completely. Unplug and re-insert the probe into the thermometer.
- Thermometer Not Turning On / "LO" Display / Phone Vibrates with "Peripheral Electricity Shortage": The batteries are out of power. Replace them as soon as possible.
- Unable to Pair with Android Phone: If you did not select "ALLOW" for storage, camera, and location permissions when first opening the SmartThermo2 app, delete and re-install the app. Grant all three permissions when prompted.
- Unable to Pair with iPhone: Ensure Bluetooth is active on your iPhone's settings interface or control center.
- Unable to Pair with Your Phone (Connected to another device): The thermometer can only connect to one device at a time. Click "Pair-Unbound" to disconnect the currently connected device, then click "Pair-Search" to re-establish a new pairing with your new device.
- Short Bluetooth Transmission Range:
- Barriers like walls, buildings, glasses, and windows can significantly affect Bluetooth range. Use the product in an open area for optimal range.
- Some phone models (e.g., Samsung S8, S9) may have shorter Bluetooth transmission ranges. Consider using other devices if experiencing issues.
- Measuring Temperature Too High/Low: If the probe is exposed to open fire or temperatures exceeding 716°F (which can damage the probe), you will need to buy a new probe or contact customer support.
- Melted Silicone Handle: If the probe's silicone handle melts (due to exposure to temperatures higher than 500°F), you will need to buy a new probe or contact customer support. When using it again, ensure the probe's silicone handle temperature remains below 500°F.
Setup Video:
QR codes are provided in the manual to access setup videos for both Android and iPhone devices on YouTube by searching "SMARTRO ST55 Android" or "SMARTRO ST55 iphone."