This document describes the Smeg BCC11 Bean to Cup Coffee Machine, an automatic coffee machine designed for home use. It provides comprehensive instructions for its operation, maintenance, and troubleshooting, ensuring optimal performance and longevity.
Function Description
The Smeg BCC11 is an automatic coffee machine capable of preparing various coffee beverages from whole beans. It features a user-friendly interface with illuminated controls for selecting different coffee types and customizing drink settings. The machine grinds fresh coffee beans for each preparation, ensuring a rich aroma and taste. It offers eight functions accessible through two menus: "White Menu" and "Orange Menu."
White Menu functions:
- Ristretto coffee
- Espresso coffee
- Coffee
- Hot water
Orange Menu functions:
- Light Ristretto coffee
- Light Espresso coffee
- Long coffee
- Americano
The machine also includes a dispensing program that allows users to adjust the quantity of coffee dispensed, providing flexibility for different cup sizes and preferences. It is equipped with a brewing group that extracts coffee under optimal pressure and temperature.
Important Technical Specifications
While specific technical specifications like power consumption or water tank capacity are not explicitly detailed with numerical values in the provided excerpts, the manual highlights several key components and features:
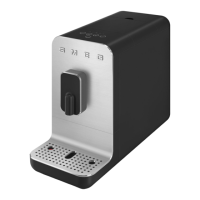
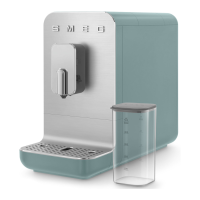
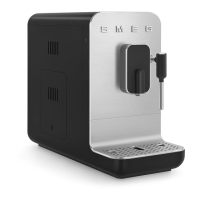
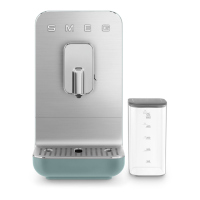
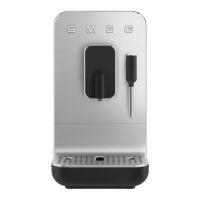
- Machine body: The main housing of the appliance.
- Coffee bean container (2): A lid (4) and container (3) for storing whole coffee beans.
- Water tank (5): A removable tank for water, with a "MAX" level indicator.
- Grinding selection knob (6): Used to adjust the fineness of the coffee grind.
- Brewing group access door (8): Provides access to the internal brewing unit for cleaning.
- ON/OFF button (9): For powering the machine on and off.
- Control panel (10): Features various LED indicators and buttons for operation.
- Height adjustable coffee dispenser (11): Allows for different cup heights.
- Coffee grounds container (12): Collects spent coffee grounds.
- Drip tray (13): Collects excess liquid, with an external drip tray (14) and internal drip tray (15).
- Mug holder (16): A removable grid on the drip tray.
- Infuser unit (17): The core brewing component.
- Water hardness test strip (19): Used to determine water hardness for descaling settings.
- Cleaning brush (18) and cleaning tool (19): Accessories for maintenance.
The machine operates on a standard electrical current, and it is crucial to ensure the power outlet has a minimum capacity of 10A and an efficient earth connection.
Usage Features
The Smeg BCC11 is designed for ease of use, with clear instructions for initial setup and daily operation.
Before first use:
- Unpack all packaging materials.
- Rinse removable components: water tank (5), lids (2,4), door (8), grounds container (12), drip trays (13,14,15), cup holder (16), and infuser unit (17).
- Ensure all components are integral and free of damage.
Assembly of components:
- Place the machine on a flat, stable surface.
- Connect the power supply cable to the socket on the rear of the machine and then to a power outlet.
Use (Fig. E-F-G):
- Lift the tank cover (4) and pour fresh water into the tank (5) up to the 'Max' level. Replace the water tank cover (4).
- Lift the coffee bean container lid (2) and introduce coffee beans into the container (3).
- Check that the drip tray (14) is correctly positioned. Ensure the tray (14) is washed and the mug holder (16) is inserted.
- Press the button (9) to start the machine. The heating phase and LEDs light up in sequence. After the self-cleaning cycle, the internal circuits are carried out, and the machine is ready for use.
Dispensing a drink:
- Adjust the position of the dispenser (11) according to the cup used.
- Place a cup or large cup under the dispenser.
- Press the key for the desired function. The machine will emit a single sound to signal the restoration of the factory settings.
- The machine will automatically stop dispensing at any time by pressing the dispensing key again.
Customization of the quantity:
- Press for at least 3 seconds one of the keys relative to the drink to be dispensed. The selected key lights up flashing; the machine emits a double sound to signal the modification of the preset program.
Machine settings (Fig. B):
- Water hardness: The machine factory setting is "Hard Water Level." Users can set the water hardness according to their region by using the supplied test strip (19).
- Submerge the strip in a glass of water for about one second.
- Read the results after about one minute.
- The machine offers three hardness levels: Soft (25), Medium (26), and Hard (27).
- To set, press and hold keys (20) and (24) simultaneously for at least 3 seconds, or key (21) and (24) for 1.5 seconds.
- To activate/deactivate acoustic signals, press keys (21) and (24) for three seconds; key (21) flashes three times indicating memorization of the setting.
Maintenance Features
Regular cleaning and maintenance are essential for the machine's performance and hygiene.
Cleaning and maintenance (Fig. B-D-E-F-G-H):
- Cleaning of the machine body: Clean regularly with a soft cloth dampened with water. Never immerse the machine body in water or other liquids.
- Empty coffee bean container (3): Use the supplied brush to clean the empty coffee bean container (3), removing any beans or residue.
- Cleaning the drip tray (14, 15): The drip tray (14) is removable. The internal tray (15) can be washed in the dishwasher. Clean the tray (14) and the grid (16) in running water with neutral dish detergent. Dry the components and reassemble them.
- Coffee grounds container cleaning (12) and drip tray (13): Empty the coffee grounds container (12) when the appliance is switched on. The counter resets at least 1.5 seconds after opening the various components and LED (27) flashes. Remove the trays (14, 15). Remove the grounds container (12) with its tray (13) by pulling it outwards. Empty the coffee grounds from the container (12). Clean the container (12) and the tray (13) in running water with neutral dish detergent. Thoroughly dry components and reassemble.
- Cleaning the water tank (5): Remove the lid (4) and remove the tank (5) from the machine. Clean the tank (5) in running water with neutral dish detergent and reassemble it.
- Cleaning the brewing group (17): Thoroughly clean the housing and the duct as well, using the cleaning brush (18). Dry thoroughly before re-mounting the various components. Refit the service door (8) making sure it is correctly positioned. Open the door and clean the brewing unit while the machine is on. The counter resets at least 10 seconds after opening the various components and LED 28 turns off.
- Descaling: The machine signals when descaling is necessary. Place a container with a capacity of at least 1.4L under the dispenser (11). Make sure the White program with white illuminated keys is selected. Fill the tank (5) up to the "MAX" level, with a solution of water and descaler. The machine will guide you through the descaling process. The entire cycle lasts approximately 30 minutes.
- "Empty system" procedure: This procedure is recommended before long periods of non-use and before consulting a maintenance manager. Activate the procedure by holding down the key (20) and the key (23) simultaneously for three seconds, the key (21) and the key (23) flash simultaneously. The entire quantity of water in the tank is drained through the coffee circuit. The pump continues to operate, even intermittently, to also empty the internal water circuits. At the end of the procedure the machine switches off.
Automatic rinse:
After dispensing a coffee beverage or beverage with milk, the machine automatically rinses the dispenser nozzle (11) before turning off.
Manual rinse:
Make sure that the White program is selected with keys (20), (21), (22), (23) illuminated in white. With the machine ready to dispense and the drip tray mounted, press the keys (24) and (23) simultaneously for at least 3 seconds; the machine will rinse the coffee circuit.
Important Safeguards:
- Do not immerse the appliance, the power cord, the plug in water or any other liquid.
- Do not touch the plug with wet hands.
- Make sure that the power outlet used is always freely accessible.
- If you want to remove the plug from the socket, grasp the plug directly.
- If the appliance should break down, do not attempt to repair it.
- Do not use an adapter or an extension cord.
- Do not spill liquid on the power plug and on the power base.
- Keep the appliance out of the reach of children under the age of 8.
- Do not fill the water container beyond the maximum limit indicated.
- Do not use without water in the tank or without a tank.
- Use only coffee beans to obtain the powder, do not put already ground coffee in the coffee bean hopper.
- Do not insert the appliance in a closed cabinet.
- Do not use steam jets to clean the coffee machine.
- Do not use cleaning products containing chlorine, ammonia or bleach on parts with metal surface finishes.
- Do not use abrasive or corrosive detergents, stains removers and metallic scourers.
- Do not use rough or abrasive materials or sharp metal scrapers.
- The descaler contains acids that can irritate the skin and eyes. Follow the manufacturer's instructions and safety warnings on the packet scrupulously in the event of contact with skin or eyes. Use descaler products recommended by Smeg to prevent damage to the coffee machine.
The Smeg BCC11 is a sophisticated yet user-friendly coffee machine that brings the convenience of bean-to-cup coffee to your home, with detailed instructions to ensure a safe and enjoyable experience.