3
EN
2 Installation
RefertothenearestAuthorisedServiceAgentfor
installation of the product. To make the product
ready for use, review the information in the user
manual and make sure that the electricity, tap
water supply and water drainage systems are
appropriatebeforecallingtheAuthorizedService
Agent.Iftheyarenot,callaqualifiedtechnician
andplumbertohaveanynecessaryarrangements
carried out.
C
Preparation of the location and electrical,
tap water and waste water installations at
the place of installation is under customer's
responsibility.
B
Installationandelectricalconnectionsof
theproductmustbecarriedoutbythe
AuthorizedServiceAgent.Manufacturershall
notbeheldliablefordamagesthatmayarise
fromprocedurescarriedoutbyunauthorized
persons.
A
Prior to installation, visually check if the
producthasanydefectsonit.Ifso,donot
haveitinstalled.Damagedproductscause
risks for your safety.
C
Makesurethatthewaterinletanddischarge
hosesaswellasthepowercablearenot
folded, pinched or crushed while pushing
the product into its place after installation or
cleaning procedures.
Appropriate installation location
• Placethemachineonarigidfloor.Donot
place it on a long pile rug or similar surfaces.
• Totalweightofthewashingmachineandthe
dryer-withfullload-whentheyareplaced
on top of each other reaches to approx.
180 kilograms. Place the product on a solid
and flat floor that has sufficient load carrying
capacity!
• Donotplacetheproductonthepowercable.
• Donotinstalltheproductatplaceswhere
temperaturemayfallbelow0ºC.
• Placetheproductatleast1cmawayfrom
the edges of other furniture.
Removing packaging reinforcement
Tiltthemachinebackwardstoremovethe
packaging reinforcement. Remove the packaging
reinforcementbypullingtheribbon.
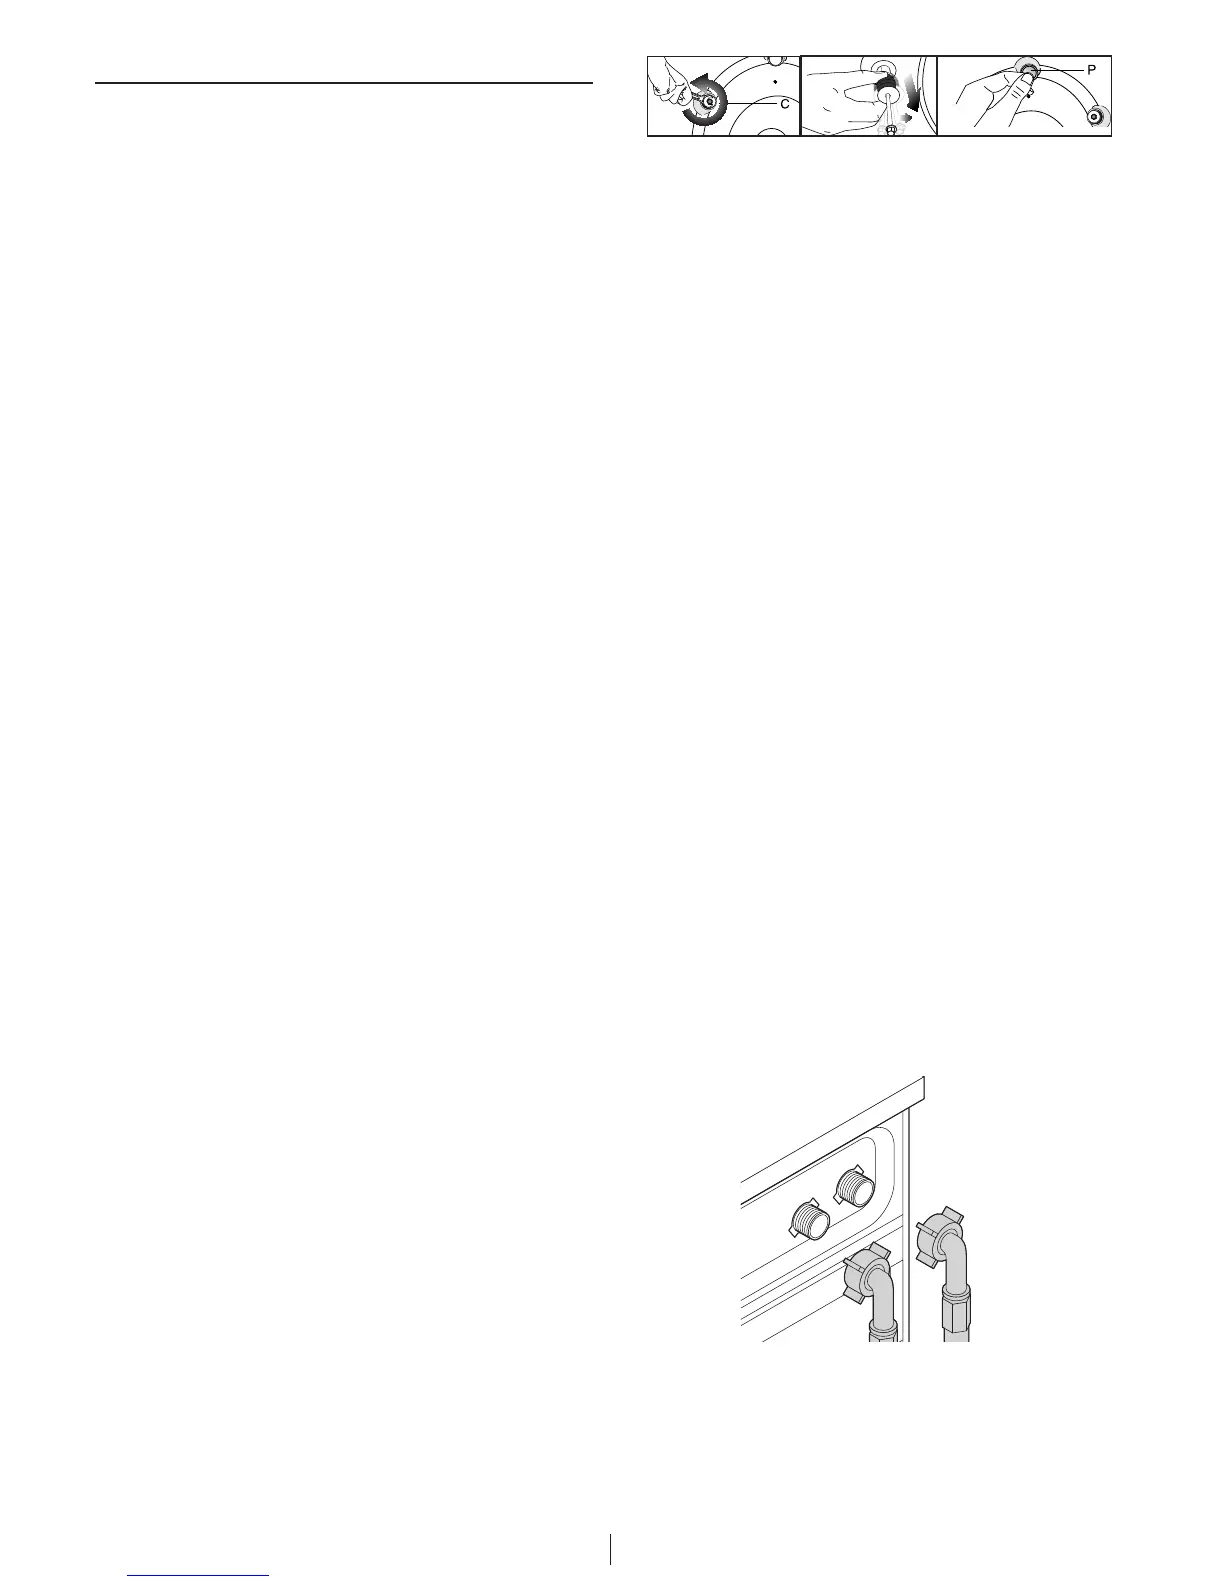
Removing the transportation locks
A
Donotremovethetransportationlocksbefore
taking out the packaging reinforcement.
A
Removethetransportationsafetyboltsbefore
operating the washing machine, otherwise,
theproductwillbedamaged.
1. Loosenalltheboltswithaspanneruntilthey
rotatefreely(C).
2. Removetransportationsafetyboltsbyturning
them gently.
3. AttachtheplasticcoverssuppliedintheUser
Manualbagintotheholesontherearpanel.
(P)
C
Keepthetransportationsafetyboltsinasafe
place to reuse when the washing machine
needstobemovedagaininthefuture.
C
Never move the product without the
transportationsafetyboltsproperlyfixedin
place!
Connecting water supply
C
Thewatersupplypressurerequiredtorun
theproductisbetween1to10bars(0.1–10
MPa).Itisnecessarytohave10–80litersof
water flowing from the fully open tap in one
minute to have your machine run smoothly.
Attachapressurereducingvalveifwater
pressure is higher.
C
Ifyouaregoingtousethedoublewater-inlet
productasasingle(cold)water-inletunit,you
must install the supplied stopper to the hot
watervalvebeforeoperatingtheproduct.
(Appliesfortheproductssuppliedwithablind
stopper group.)
C
Ifyouwanttousebothwaterinletsofthe
product, connect the hot water hose after
removing the stopper and gasket group from
thehotwatervalve.(Appliesfortheproducts
suppliedwithablindstoppergroup.)
A
Modelswithasinglewaterinletshouldnot
beconnectedtothehotwatertap.Insuch
a case the laundry will get damaged or the
product will switch to protection mode and
will not operate.
A
Donotuseoldorusedwaterinlethoseson
thenewproduct.Itmaycausestainsonyour
laundry.
1. Connectthespecialhosessuppliedwiththe
product to the water inlets on the product.
Redhose(left)(max.90ºC)isforhotwater
inlet,bluehose(right)(max.25ºC)isforcold
water inlet.
A
Ensure that the cold and hot water
connections are made correctly when
installingtheproduct.Otherwise,yourlaundry
will come out hot at the end of the washing
process and wear out.
2. Tightenallhosenutsbyhand.Neverusea
wrench when tightening the nuts.
 Loading...