EasyManua.ls Logo

Smittybilt Defender Series User Manual

Default Icon
2 pages
To Next Page IconTo Next Page
Page #1 background imageLoading...
Page #1 background image
Installation Instructions
Defender Series
Rack Mount
P
a
r
t
#
D
S
5
-
6
,
D
S
5
-
8
,
D
S
6
-
6
Part# DS5-6
Parts Included Qty
Parts Included Qty
Bracket (DS5) 6 5/16” Flat Washers 48
“L” Bracket (D8107A) 6 5/16” Lock Washers 24
Hardware Pack (DS5-6-HP) 5/16” Nut 24
5/16”x3/4” Bolt 24
Part# DS5-8
Parts Included Qty
Parts In
cluded Qty
Bracket (DS5) 8 5/16” Flat Washers 64
“L” Bracket (D8107A) 8 5/16” Lock Washers 32
Hardware Pack (DS5-8-HP) 5/16” Nut 32
5/16”x3/4” Bolt 32
Part# DS6-6
Parts Included Qty
Parts Included Qty
Bracket (DS5) 6 5/16” Flat Washers 48
“L” Bracket (D8107A) 6 5/16” Lock Washers 24
Hardware Pack (DS6-6-HP) 5/16” Nut 24
5/16”x3/4” Bolt 24
Grade 8 nut torque specifications
Standard
Metric
5/16” nuts 20 ft. lbs.
M6 9 ft. lbs.
3/8” nuts 35 ft. lbs.
M8 23 ft. lbs.
7/16”nuts 60 ft. lbs.
M10 45 ft. lbs.
M12
75 ft. lbs.
9/16” nuts 160 ft. lbs.
M14 120 ft. lbs.
M16 165 ft. lbs.
Please read instructions entirely before installing this product.
Question and Answer IconNeed help?

Do you have a question about the Smittybilt Defender Series and is the answer not in the manual?

Smittybilt Defender Series Specifications

General IconGeneral
MaterialSteel
MountingBolt-on
DimensionsVaries by model
FinishBlack Powder Coat
Weight CapacityVaries by model
Mounting TypeRoof Rack
InstallationDrilling required for some applications
CompatibilityVehicle-specific

Summary

Parts Breakdown

Part# DS5-6 Parts

Lists parts included for the DS5-6 Defender Series Rack Mount, including brackets, bolts, and washers.

Part# DS5-8 Parts

Lists parts included for the DS5-8 Defender Series Rack Mount, including brackets, bolts, and washers.

Part# DS6-6 Parts

Lists parts included for the DS6-6 Defender Series Rack Mount, including brackets, bolts, and washers.

Installation Steps

Step 1: Assemble and Position Brackets

Assemble bracket assemblies and place them on factory rails without tightening initially.

Step 2: Attach Roof Rack

Position the roof rack onto the installed brackets and attach using 5/16" hardware.

Step 3: Final Tightening

Once the rack and brackets are in the desired location, tighten all hardware securely.

Usage Notes

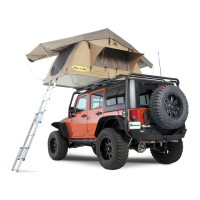
Defender Roof Racks have a 150lb load limit and a maximum tire diameter of 33" when carried.

Torque Specifications

Grade 8 Nut Torque Specifications

Provides standard and metric torque specifications for Grade 8 nuts used in installation.

Related product manuals