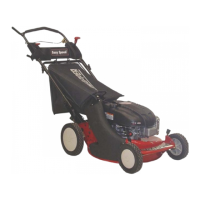
This document serves as the Safety Instruction & Operator's Manual for the SNAPPER 21" HI-VAC Walk Behind Mowers, covering various models including the 21351, 21351D, 21351PD, 21401, 21401S, 21401P, 21401PS, 21401PD, 214X1, 214X1R, 214X1R-2, 214X1P, 214X1PS, 214X1PR, and 214X1PR-2. The manual emphasizes the importance of reading it carefully before operation, with particular attention to the Important Safety Instructions. It highlights that power equipment can be dangerous if used improperly and that safety requires careful use in accordance with instructions and common sense.
The manual explains that it covers all Snapper 21" design series 1 walk-behind mowers, identified by the last numeral in their five-digit model designation. It clarifies the meaning of letter suffixes: models without suffixes are push models with a Kwik-N-Ezy grass catcher; 'D' indicates side discharge; 'P' indicates self-propelled; 'S' indicates electric start; 'R' indicates a premium engine; and 'X' in the fourth digit indicates an extra tough version. The '-2' suffix denotes units powered by a 2-cycle engine. Differences between models are noted throughout the manual where pertinent.
Function Description
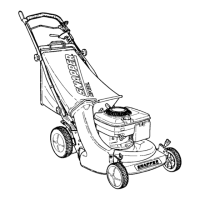
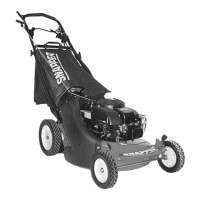
The SNAPPER 21" HI-VAC Walk Behind Mower is designed for lawn maintenance, offering functions such as mowing, vacuuming, and, with accessories, mulching and dethatching. The "HI-VAC" designation suggests an efficient vacuuming system for collecting grass clippings. The mower is available in various configurations, including push and self-propelled models, with options for side discharge, electric start, and different engine types.
The primary function is to cut grass efficiently. The cutting height is adjustable, allowing users to tailor the cut to prevailing grass conditions. The mower is designed to handle different grass types and conditions, from tall, thick grass to sparse grass. The vacuuming capability, particularly with the Kwik-N-Ezy grass catcher, allows for clean collection of clippings, contributing to a healthier lawn by preventing thatch buildup.
Self-propelled models feature a WHEEL DRIVE control and a GROUND SPEED CONTROL lever, enabling the user to set a desired forward speed and engage the clutch for forward motion. Push models require manual propulsion. The engine control allows for starting and stopping the engine, while the blade control engages and disengages the cutting blade. Electric start models offer the convenience of key-ignition starting, while rope start is also available.
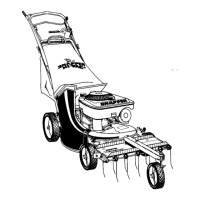
Accessories like the Snapperizer Kit, Mulcherizer Kit, Grass Catcher Bag Kit, Side Chute Kit, and Thatcherizer Kit extend the mower's functionality. The Snapperizer converts the mower into an outdoor vacuum and shredder, capable of broadcasting shredded clippings and leaves or bagging them. The Mulcherizer effectively cuts and chops grass into nutritive mulch. The Grass Catcher Bag Kit and Side Chute Kit allow for conversion between bagging and side discharge operations. The Thatcherizer attaches to the front of self-propelled models to dislodge thatch for vacuuming.
Usage Features
The manual provides detailed instructions for operating the mower safely and effectively.
Starting and Stopping:
- Pre-Start Checks: Before each start-up, users must check guards, grass bag, adapter, or side discharge chute for proper installation and tightness. Surfaces should be cleaned to remove dust and clippings, especially from the engine's cooling air intake screen. Oil levels in 4-cycle engines must be checked, and cutting height adjusted. The fuel tank should be filled outdoors, and for 2-cycle engines, the correct fuel-to-oil ratio must be used.
- Rope Start: For rope start models, the ENGINE CONTROL is set to START or CHOKE. The BLADE CONTROL must be held firmly against the upper handle. The user places a foot on the rear tire for stability, bends at the waist to reach the ROPE STARTER, and pulls the rope using back muscles. The rope should be guided slowly back to the engine.
- Electric Start: On electric start models, the ENGINE CONTROL is set to START or CHOKE. The BLADE CONTROL is held firmly. The key is inserted and turned to START until the engine starts, then released. The manual advises against continuous cranking for more than 5 seconds to avoid depleting battery energy or overheating the starting motor.
- Stopping: The engine (and blade) is stopped by releasing the BLADE CONTROL or pulling the ENGINE CONTROL rearward to STOP. Forward motion on self-propelled models is stopped by releasing the WHEEL DRIVE control.
Mowing Procedure:
- Speed Control: Engine speed can be varied to suit grass conditions—high for tall, thick grass and lower for sparse grass. Push models should be operated at a comfortable speed that allows even cutting without stalling. Self-propelled models use the GROUND SPEED CONTROL lever to set forward speed, engaging the WHEEL DRIVE control to activate the clutch. Releasing the WHEEL DRIVE control stops forward motion.
- Cutting Height Adjustment: This is a crucial feature for effective mowing. The manual instructs users to stop the engine and wait for the blade to halt before adjusting. The height adjusting latch on each wheel is moved outward and slid one notch at a time to the desired position. The highest notch sets the lowest cutting height, and vice-versa. For best results, latches on one side are set first, then the other. When resetting rear latches to lower notches, the mower's weight should be lifted off the rear wheels by pulling up on the handle.
- Mowing/Vacuuming Hints: The cutting deck should always be level. A general rule is to cut no more than 1/3 off the grass height. If shorter grass is desired, it's recommended to wait a few days after an initial cut before recutting to a lower height to prevent stress on the grass. The manual advises against mowing in dry periods or over areas with freshly spread dry fertilizer, as the fertilizer will be vacuumed up.
- Mowing Pattern: Changing mowing patterns periodically is recommended for a smoother lawn. Finely chopped clippings add nutrients, but excessive clippings can form thatch. Vacuuming and bagging are recommended for most cuttings, with occasional broadcasting of clippings for nutritive value.
Grass Catcher Bag:
- Installation: The KWIK-N-EZY grass catcher connector slides over the adapter flange, and the support frame hooks onto the middle handle.
- Emptying: When full, the engine is stopped, support hooks are lifted, and the connector is removed. The bag is lifted forward until it clears the mower. To empty, the connector end is raised, the door flap handle released, and the catcher shaken.
- Emptying into Trash Bag: After removing the catcher, the connector end is placed on the ground, the door flap opened, a trash bag slipped over the catcher, and the catcher is turned over. It is then lifted by the connector and door handles and shaken to dump clippings into the trash bag.
Maintenance Features
The manual outlines essential maintenance procedures to ensure the mower remains in safe operating condition and extends its lifespan.
General Maintenance:
- Tightness: All nuts, bolts, and screws must be kept tight.
- Cleanliness: To reduce fire hazards, the mower should be kept free of grass, leaves, or excessive grease.
- Annual Inspection: It is recommended to have the mower inspected and serviced annually by an authorized Snapper dealer.
- Replacement Parts: Only factory-specified Snapper replacement parts should be used to assure adequate protection against injury and to maintain the mower's quality. Using non-genuine parts may impair safety and void the warranty.
Engine Maintenance:
- Oil Change: For 4-cycle engines, oil should be changed every 25 hours as specified in the engine manual.
- Spark Plug: Before performing any service on the mower, the spark plug wire must always be disconnected and secured away from the plug to prevent unintentional starting.
- Tipping the Mower: When working on the underside, the mower should always be tilted with the spark plug up to prevent flooding the engine with gasoline and oil. For Tecumseh powered units, specific rules apply: do not keep the engine tilted for more than 5 minutes, do not crank or turn the blade while tilted, and do not tilt the plug up more than 90 degrees.
Transmission Maintenance (Self-Propelled Models):
- Grease Check: The transmission plug should be removed, and grease checked every 25 hours. If grease is not visible on the input gear, a small amount of Snapper "00" grease (not exceeding 2 ounces) should be added. The plug must be replaced after servicing.
- Moving Parts: Occasionally, a few drops of oil should be applied to movable surfaces like height adjusting levers, wheel axles, and shift levers. Care must be taken not to spill oil on the drive disc.
Cutting Blade Service:
- Safety: Before checking or working on the blade, the spark plug wire must be disconnected and secured.
- Inspection: The blade should be checked frequently for tightness and condition. It must be replaced if badly chipped, bent, out of balance, or if a notch starts wearing in the tip between the flat surface and upturned lift (as depicted in Figure 6, View B). Operating the mower with a blade worn to the extent shown in View C is dangerous and could cause injury or property damage.
- Sharpening: Dull cutting edges should be sharpened on a grinding wheel at an angle of 22 to 28 degrees, extending about 3 1/2" from the tips. The blade must be checked for balance after sharpening to prevent excessive vibration. Users are warned to be careful and protect their hands from cuts.
- Installation: The blade components must be installed in the sequence shown in Figure 7, ensuring the turned-up rims in the center of the blade fit over the edges of the blade drive hub. No substitute components should be used. The blade retaining capscrew should be tightened to 20 to 30 foot-pounds torque.
Clutch Linkage Adjustment (Self-Propelled):
- Clearance: Maintain 1/16" - 1/8" clearance between the clutch pull rod and the clutch idler components. This prevents the clutch from rubbing against and wearing a hole in the grass bag.
- Adjustment: If excessive pressure is required to hold the wheel drive clutch lever, the linkage or drive post-tion of the clutch rod springs may need adjustment. The engine must be stopped, and the spark plug wire disconnected. The inner spring is removed, and the push rod is adjusted by turning it to achieve the correct clearance.
Driven Disc Service:
- Inspection: If the mower does not pull properly, or if the wheel drive clutch is engaged, the driven disc assembly should be inspected for damage. Worn driven discs can cause poor performance.
- Driven Disc Adjustment: If the engine is stopped and the speed lever is shifted to the highest speed setting, the driven disc should be 1/8" to 1/4" from the center of the drive disc. The connector hex nut is loosened, and the drive disc assembly is slid to the correct position, then the hex nut is tightened.
- Driven Disc Replacement: If the rubber of the driven disc is badly worn or broken, it needs replacement. The manual details a procedure involving removing the drive disc assembly, the connector, the drive disc, and the differential bracket.
Bearing Replacement (Self-Propelled):
- If the bearing fails, the hub bearing assembly needs replacement. This involves removing the engine pulley, the drive disc assembly, the differential bracket, and the bearing.
Belt Service:
- Slippage: If the drive belt slips, it indicates wear or deterioration. The belt should be replaced if loose seams or tears are evident.
- Poly V-Belt Replacement: The belt can be replaced after removing the driven disc assembly. The manual provides instructions on how to slip the replacement belt over the hex shaft pulley, idler pulley, and between the differential bracket and transmission pulley, ensuring the lower span of the belt is above the belt guide.
Storage Procedure:
- Engine Preservation: Refer to the engine manual for specific directions.
- Cleaning: With the spark plug wire disconnected, the mower should be turned on its side, and the underside of the deck thoroughly cleaned of grass with a putty knife or wire brush, then washed with water. Openings should be taped closed to prevent water from entering the exhaust or air intake.
- Lubrication: External surfaces should be cleaned and allowed to dry, then lubricated with a light coating of oil to prevent corrosion.
- Grass Bag: The grass bag must be completely emptied and allowed to dry thoroughly to prevent decay and mold. It can be washed in detergent.
- Storage Location: Store the mower in a shed or dry area protected from weather.
- Handle Adjustment: On push models, handles can be tilted forward for storage by loosening wingnuts, taking care not to kink cables. For all models, handle height can be adjusted by loosening locknuts, resetting the handle, and retightening the locknuts.
Battery Charging (Electric Start Models):
- A plug-in battery charger is provided, operating off 120V/60hz household current. When recharging, the battery must be disconnected from the wiring harness, the charger installed in a household outlet, and the battery connected to the charger. A weak battery should be charged for 48 hours, and a completely discharged battery for 72 hours. Continuous charging will not damage the battery. Electric start engines have alternators to maintain sufficient battery charge with frequent use.
The manual concludes with a Manufacturer's 2 Year Limited Warranty, detailing the coverage for residential and commercial use, exclusions, and the importance of using genuine Snapper replacement parts. It also lists popular accessories that enhance the mower's versatility.