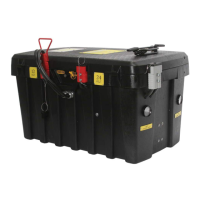
BATTERY REPLACEMENT (FIX MOUNT FMB1224)
See Figure 2
REMO
VING OLD BATTERIES:
1. Open box lid.
2. Disconnect cables and wiring from batteries.
3. Loosen hold-down by removing 1/4–20 bolt on end of box, by vehicle harness. This will allow hold-down
to pivot up.
4. Lift and remove old batteries.
INSTALLING NEW BATTERIES
1. With hold-down pivoted up, place 3 new batteries with negative terminals against back of case.
2. Pivot hold-down onto batteries and secure with 1/4–20 bolt.
3. Order of Connection for cables and wiring.
a) To #1 Battery negative terminal connect:
Negative cable from Jumper Cable Connector (with Black #12 gauge wire from #1 Charger ground tab).
Negative cable from vehicle harness.
Negative cable from 12 Volt connector.
Black #12 gauge wire from Volt gauge.
b) To #2 Battery negative terminal connect:
One end of 6" negative crossover.
Black #12 gauge wire from #2 Charger ground tab.
c) To #3 Battery negative terminal connect:
Other end of 6" negative crossover.
Negative cable from common connector with handle.
d) To #3 Battery positive terminal connect:
Positive cable from 12 Volt connector.
One end of 6" positive crossover.
Red #12 gauge wire from Amp gauge.
e) To #2 Battery positive terminal connect:
Other end of 6" positive crossover.
Positive cable from Jumper Cable Connector (with Red #12 gauge wire from Volt Gauge).
f) To #1 Battery positive terminal connect:
Positive cable from vehicle harness.
Positive cable from common connector with handle.
Red #12 wire from #1 Charger circuit breaker.
4. Tighten all connections securely.
5. Close box lid.
6. Put on charge with voltage selector on 12 Volt side.