EasyManua.ls Logo

SolarEdge SE-WND-3Y400-MB-K2 - User Manual

SolarEdge SE-WND-3Y400-MB-K2
77 pages
Print Icon
To Next Page IconTo Next Page
Loading...
Installation Guide
Energy Meter with Modbus
Connection
Version 1.5

Questions and Answers

  • R
    Robert ScottAug 4, 2025
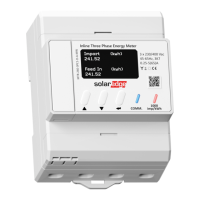
    Why is the total [Wh] value not advancing on my SolarEdge SE-WND-3Y400-MB-K2?
    • C
      christopher15Aug 4, 2025
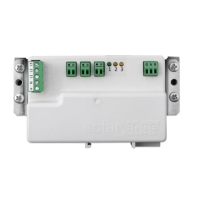
      If the 'Total [Wh]' value remains constant despite the site consuming power, verify that all connections at the inverter connectors and the meter are secure, focusing on the AC wiring at the meter's 10-pin connector. Also, confirm that the CT black and white cables are correctly connected to the 6-pin connector on the meter, ensuring the white CT wire connects to the L1/L2/L3 white dot and the black CT wire to the L1/L2/L3 black dot.
  • R
    Rebecca ScottAug 10, 2025
    How to troubleshoot if the energy value is not advancing on SolarEdge Measuring Instruments?
    • A
      Amanda AlvaradoAug 10, 2025
      If the Energy [in MWh] value displays a steady value even though the site is consuming power, check for loose connections at the inverter connectors and at the meter, specifically the AC wiring on the meter's AC wiring connector. Also, ensure the CT black and white cables are correctly connected to the CT connectors on the meter, and that the L1/L2/L3 cable passes through the CT in the correct direction, according to the arrow on the inside of the CT.
  • R
    Roger StewartAug 15, 2025
    What to do if SolarEdge SE-WND-3Y400-MB-K2 don't display ?
    • M
      Mercedes HarrisAug 15, 2025
      If '' is not displayed in the Status line of the status screen, it indicates that the meter is not communicating with the inverter. Check for any loose connections at the inverter communication board and the meter. Also, verify that the wiring between the black 4-pin terminal block on the meter and the RS485 terminal block on the communication board is correctly connected.
  • M
    Mrs. Haley DorseyAug 27, 2025
    How to configure device type or protocol on SolarEdge SE-WND-3Y400-MB-K2?
    • J
      Jodi NelsonAug 27, 2025
      If MTR (meter) is not displayed as the device type (DEV), or WN (WattNode) is not displayed as the Prot (protocol), configure the meter as follows: 1. Select Communication è RS485-x Conf è Device Type è Revenue Meter. 2. Select Communication è RS485-x Conf è Protocol è WattNode. 3. Check that the Device ID under Communication è RS485. 4. Select Revenue Meter è Meter Func. è Export+Import / Export / Import / Consumption / Site Production / Inv. Production.
  • W
    whernandezNov 21, 2025
    What to do if the number of devices is not displayed on SolarEdge SE-WND-3Y400-MB-K2?
    • J
      jessicapriceNov 21, 2025
      If '' is displayed under the ## column in the Communication status screen, the meter is not communicating with the inverter. Check the meter's DIP switch settings. The switches should be set as follows: Ensure that switches 1-6 correctly specify the meter address. To set the address to '2' (the default address), set them to DOWN. Switch 7: Set to 1 (UP), if 120 ohm termination is required, otherwise, set to 0 (DOWN). Switch 8: Set to 0 (DOWN). Also, ensure there are no loose connections at the inverter connectors and at the meter, especially the RS485 wiring. Verify that the wiring between the meter and the RS485 terminal block on the communication board is correct. Use a Voltmeter to measure the voltage on the meter 10pin's terminal block. The L1 - L2 - L3 line to line voltage should be 4...

Summary

Disclaimers

Important Notice

Provides important legal and copyright notices regarding the document and SolarEdge Inc.

Emission Compliance

Version History

Handling and Safety Instructions

Safety Symbols Information

Explains the meaning of safety symbols used in the document.

Chapter 1: Introduction

Terminology

Defines key terms used throughout the installation guide.

SolarEdge Energy Meter with Modbus Connection

Describes the functionality and applications of the SolarEdge Energy Meter with Modbus connection.

Meter Connection Options

Details the various ways the energy meter can be connected in a SolarEdge system.

Chapter 2: Meter Installation

Installation Guidelines

Outlines the necessary specifications and recommendations for installing the meter.

Installing and Connecting the Meter

Covers the physical mounting of the meter on a surface or DIN rail.

Chapter 3: Configuration

SolarEdge Device Firmware Version

Explains how to check and ensure the correct firmware version for inverter communication.

Device Configuration

Describes basic configuration of SolarEdge devices for meter usage.

Verifying the Meter Connection

Explains how to verify meter connections using SetApp and the device display.

Appendix A: Troubleshooting Meter Connection

Troubleshooting the Meter using SetApp

Covers troubleshooting meter connectivity failures and error messages via the SetApp.

Troubleshooting the Meter using the Device Display

Guides users on diagnosing meter issues using the device's LCD panel.

Appendix B: Installing Two Meters

Connecting Two Meters

Details the physical wiring and connection steps for multiple meters.

Configuring the Dual-Meter Connection

Provides instructions for configuring dual-meter setups using SetApp or the device display.

Verifying Meter Connection

Verifying the Meter Connections using SetApp

Confirms meter connectivity status through the SetApp interface.

Verifying the Meter Connections using the Device Display

Checks meter connectivity status via the device's LCD display.

Appendix C: Monitoring Platform - Meter Data

Troubleshooting Dual-Meter Connections using SetApp

Provides troubleshooting steps for dual-meter setups via the SetApp.

Troubleshooting Dual-Meter Connections using the Device Display

Guides on diagnosing dual-meter issues using the device display.

Appendix D: Meter Technical Specifications

Appendix E: External Lightning Protection

Support Contact Information

SolarEdge SE-WND-3Y400-MB-K2 Specifications

General IconGeneral
ModelSE-WND-3Y400-MB-K2
CategoryMeasuring Instruments
ManufacturerSolarEdge
TypeWind Sensor
CommunicationModbus RTU
Power Supply12-24V DC
Operating Temperature-40°C to +70°C
Protection RatingIP65
Wind Speed Range0 to 50 m/s
OutputRS485
Voltage12-24V DC
Maximum Current50 mA
Wind Direction Range0 to 360°

Related product manuals