after a while the electronic system of the hob goes into a standby mode, the indicators are switched
off and the main switch sensor is turned on again.
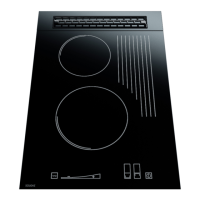
-TIMER function, touch the burner selection fields twice (Fig.2, no 5,6 or 7), touch “+” and “-“
to select time in minutes (from 1 to 99 min.), the burner stops automatically after selected time
3.2. Switching on and setting the heating power of burners.
NOTE!!!! - do not switch on the hob burners for a prolonged period without filled dishes put
on the hot fields first!!! Otherwise, your device might be damaged. When you choose any
single burner by touching the controller activating field no 5, or 6, or 7 on fig. 2 and set the
power by touching the power setting slider, no 2 fig. 2, within a range exceeding “0”, the selected
burner will go on. This is supposed to happen within less than 5 seconds of enabling the
controller via on/off sensor – no 11 on fig. 2. If the delay is longer than specified above, the
burner will not start and the controller will switch to standby mode until further instruction is
received. All changes of controller program status are accompanied by short sound signals. To
start individual burners of the hob, make sure you do the following:
Put a filled pot on the relevant
heating pad.
- Touch the on/off sensor no 11 fig. 2. “0” indicators will light up in fields 5, 6, 7. If you touch
the sensor corresponding to the selected burner – fig. 2. again, as needed and as indicated on the
heating panel, you start the second stage of burner setting. Slide your finger along the setting slider
– no 3 on fig. 2 – to set the required power of the heating pad. At that time, the power setting
display – no 4 of fig. 2 – displays a row of diodes and a digital message shows in the previously
selected field, within the range of 0 to 9, showing the power value set. As the row of diodes
extends and the message number displayed increases, the burner power increases as well, and
opposite – if you slide your finger towards the key symbol, you will reduce the power setting. The
row of LEDs will simultaneously become shorter and the numbers displayed are lower, to finally
reach “0”. “9” corresponds to the maximum heating power of the burner, and “0” corresponds to
no power set.
- After 1 to 3 seconds, the burner will start burning gas (the ceramic insert under the heating plate
will turn red when fully heated).
You may also vary the burner power in a different way. First activate the selected burner
(fields 5, 6, 7, of the controller) by touching any location within the power setting control field – no
3 on fig. 3. The activated burner’s power will change in increments, to reach the level
corresponding to the touching point. Set the power level using this method within not more than 5
seconds. After 5 seconds of completing the last change of pad power, the control pad of the
controller will stop receiving further instructions, and a new power value of the selected burner
will be set as specified in the preceding step.
Follow the same procedure with each burner.You may touch the sensors described above at
any time to set the desired heating power of burner, in the range from 1 to 9.After each change
of the selected burner’s power setting, the row of LEDs will light up, then go off after a short
time, with only the modified power setting of the active burner being displayed. When you
have started all burners, their power settings are displayed accordingly and the LED row – no
4. fig. 2 is off. Burners that have not been switched on in the relevant controller field
corresponding to the burner indicated on the panel will remain off and not light up.
If the burner heating power level is set from 1 to 8, the burner will operate in pulse mode,
meaning that when the burner is not burning gas (several to several tens of seconds in one
cycle), it re-circulates heat from incandescent hearth to heating pad of the ceramic panel, thus
achieving better gas intake efficiency.At first (cold) run of burner(s), they heat up during
approx. 1 minute, to switch to pulse operating mode after that time, depending on the heating
power settings.
3.3. Description of operating condition with intelligent reheating function.