EasyManua.ls Logo

Sonoscape Flagship S9 - User Manual

Sonoscape Flagship S9
2 pages
To Next Page IconTo Next Page
Loading...
Flagship
General Introduction
S9, the portable Color Doppler system in SonoScape, has the
unique 13.3 inch touch control panel. With the state-of-the-art
powerful imaging platform, it will provide you the best solution for
ultrasound diagnosis with outstanding performance.
S9
Preparation before Scanning
1. Getting Start
Create new patient and get into Scanning Mode
1. Press [Patient], fill in basic patient information;
2. Press OK on the patient interface to create a new patient file;
3. Choose the probe and exam mode on the touch screen.
2. Scanning
B Mode
1. The default scanning mode is B mode, if you want to return to B mode, please
press the [B] in keyboard or B Mode on the touch screen.
2. Rotate [B] in keyboard to adjust gain, or Press [M-tuning]on the touch screen for
image one key optimization.
Image Adjustment in B mode:
Easily adjust parameters by touch left or right side of the button, mostly include:
[Gain] : ↓↑ brightness; [μ-Scan] : 5- level speckle reduction
[Compound]: edge enhancement; [GSC]: 7 selectable grayscale curve;
[DYN] : more contrast, more information and details;
[Frequency]: high frequency for resolution, while low frequency for penetration;
[Chroma]: colorize the image for high resolution.
2B/4B Imaging
1. Press [Dual] or [Quad] to get into 2B/4B Imaging;
2. Press [Dual] or [Quad] to change the activated image.
Color/DPI Mode
1. Press [Color] on the screen or [D] in keyboard to enter Color mode;
2. Move [Trackball] to change the position of ROI;
3. Press [Set] and then move [Trackball] to change the size of ROI;
4. Press [Set] again to change the position of ROI.
The Parameters in Color Mode:
Easily adjust parameters by touch left or right side of the button, include:
[D Gain] : ↓↑ color brightness ; [PRF] : ↓↑ Scale;
Probe Direction
Power
ON/Off
D Gain
B Gain
Depth
Exam Mode
Probe
Calculation
M-tuning
Body Mark
Annotation
Save Image
Save Cine
Scanning Mode
Parameter Adjustment
Dual Mode
Quad Mode
Unlock
Question and Answer IconNeed help?

Do you have a question about the Sonoscape Flagship S9 and is the answer not in the manual?

Sonoscape Flagship S9 Specifications

General IconGeneral
BrandSonoscape
ModelFlagship S9
CategoryMedical Equipment
LanguageEnglish

Summary

General Introduction

Preparation Before Scanning

Probe Selection

Select the correct probe for the desired ultrasound examination.

Exam Mode Selection

Choose the appropriate examination mode from the touch screen interface.

Panel Lock and Unlock

Control panel lock/unlock functionality for preventing accidental input.

Measurement and Calculation Tools

Access measurement tools for calculating distance, area, and circumference.

Scanning Mode Configuration

Select scanning modes like B Mode, Dual, Quad, or Color/DPI for imaging.

Image Parameter Adjustment

Adjust key imaging parameters such as focal span, power, and frequency.

Getting Started with Scanning

New Patient and Scan Initiation

Enter patient details and select probe/mode to initiate a new ultrasound examination.

Scanning Operations and Modes

B Mode Imaging and Optimization

Adjust B mode parameters including gain, speckle reduction, and contrast.

Dual and Quad Screen Imaging

Activate and manage dual or quad screen display modes for comparative imaging.

Color and DPI Mode Parameter Tuning

Configure Color/DPI mode parameters for blood flow visualization, including gain and scale.

Doppler and Advanced Imaging Modes

PW and CW Doppler Operations

Enter and adjust PW/CW modes, including sample volume, angle, and spectral optimization.

3 D and 4 D Imaging Setup

Select volume probes and modes to capture and display 3D/4D ultrasound data.

Steer M Mode Functionality

Enter Anatomical M mode and adjust sample line position and angle.

Tissue Doppler Imaging (TDI)

Enter TDI mode, adjust ROI, and activate Pulse Wave Doppler for velocity analysis.

Elastography and Contrast Imaging

Utilize Elastography for tissue stiffness and Contrast Imaging for enhanced visualization.

Post-Scanning Procedures

Measurement and Annotation

Perform calculations and add annotations to images for documentation.

Body Mark and Image Saving

Add body marks and save single frames or cine loops.

Patient File Review

Access and review saved images and cine loops from patient files.

Report Generation and Printing

Create, comment on, and print ultrasound reports.

Ending and Starting Exams

Conclude the current examination and prepare for a new patient study.

Image Management and Settings

Image Transfer to USB

Export images and video clips to a USB storage device.

Touch Screen Customization

Adjust touch screen appearance, color lightness, and volume settings.
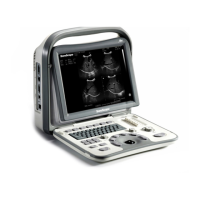
Related product manuals